
Installation Sheet
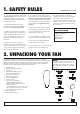
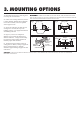
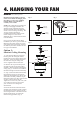
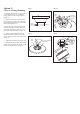
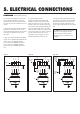
Table Of Contents

Downrod
Hanger bracket
WARNING -Turn off the power!
DO NOT fasten the blades to the fan
until it is assembled and hanging from
the ceiling. To do so now will likely
bend the blade arms and almost
certainly cause wobble.
NOTE: This ceiling fan is supplied with
two types of hanging assemblies; the
standard ceiling installation using the
downrod with ball and socket mounting,
and the "close-to-ceiling" mounting. The
"close-to-ceiling" mounting is
recommended in rooms with less than
8-foot ceilings or in areas where
additional space is desired from the floor
to the fan blades.
Once you have decided which ceiling
installation you will use, proceed with the
following instructions. Where necessary,
each section of the instructions will note
the different procedures to follow for the
two types of installation.
Option 1:
Standard Ceiling Mounting
1. If not already affixed to the hanger
bracket, place the rectangular rubber
isolators between the hanger bracket and
outlet box. Secure the hanger bracket to
the outlet box using the 2 long steel
screws supplied with the outlex box.
2. Remove the set pin and safety lock
clip from the yoke on top of the motor
assembly. Slide the downrod through the
canopy. (Fig. 5). Feed the wires from the
fan motor through the downrod assembly.
3. (Fig. 6) Attach the downrod assembly
(downrod and canopy) to the motor by
sliding the downrod into the yoke on top
of the motor assembly. Slide the set pin
through the hole in the yoke, downrod and
secure it with the safety lock clip.
Tighten the set screws on yoke. The yoke
cover will lower down to conceal the
yoke. Feed the wires through the
downrod ball.
4. Lift the fan motor without the blades
and place into the hanger bracket, rotating
the ball until the groove engages the tab
on the hanger bracket. This locks the ball
mount and fan motor, preventing fan
rotation during operation. (Fig. 7)
4. HANGING YOUR FAN
Fig. 7
Fig. 6
Downrod
assembly
Ceiling
canopy
Fig. 5
Downrod
Set screw
Yoke
Safety
lock clip
Set pin
Canopy