
Operating instructions


7
REV 1 - 0806200953
L-A2-26108
Installation
Installing and Testing the Burner
1. Connect the gas fl exible connector to the gas
stub from the fi replace wall.
2. Place the assembled burner and grate into the
center of the fi rebox.
3. Connect the other end of the gas fl ex connector
to the burner.
4. Check for leaks.
CAUTION: CHECK ALL CONNECTIONS FOR
GAS LEAKS USING A HALF-AND-
HALF SOAPY WATER SOLUTION.
IF A LEAK IS DETECTED TIGHTEN
CONNECTIONS AND TEST AGAIN.
NEVER USE AN OPEN FLAME TO
CHECK FOR GAS LEAKS.
5. Place the heat shield over the valve.
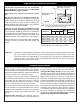
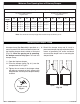
Adjusting Air Mixers
Burners are equipped with air mixers for the upper
(except 60") and front burners. Adjust the size
and color of the fl ame by opening (turn outward)
or closing (turn inward) as shown in Fig. 7-1 and
Fig. 7-2.
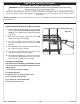
Placing the Logs
CAUTION: Logs are heavy! Safely moving the
front or back logs requires two or
more people (see Fig. 8-2)
1. Place the front log on the grate in front of the
burner pipe with the fl at down and the heat
chambers toward the burner pipe and the log
as far forward as possible while keeping the
back parallel with the burner pipe (Fig 8-2).
Repeat for the second front log on the opposite
side of the see-thru burner.
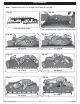
2. Place top logs across the front and back logs
in the order and positions shown for your
particular log set size on p. 8-9.
Placing the Decorative Lava Rock
Locate the bag of lava rock and pour its contents
around the base of the grating in an attractive
pattern. Do not place the Lava Rock on the logs
or grate.
Fig. 7-1 Fig. 7-2
Open