
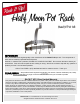
Instructions / Assembly
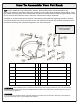

Item No. Description Qty. Item No Description Qty.
4B Wall half Circle 1 25A Pot Hook Straight 4
6 Curve Arm 1 25B Pot Hook Angled 4
11 Half circle back bar 2/utensil bend 1 26A Hex wrench 1
18B 3/8” button head bolt 6 27A Toggle 1
Installation Hardware 30A Wall Screw 3
19C Button Head Bolt 1/4 x 20 x 2” 1 30B Wall Sleeve 2
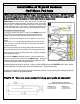
How To Assemble Your Pot Rack
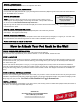
MISSING A PART?
Please call our TOLL FREE
SERVICE CENTER
1 (877) 362-5863
TIP!
FIRST, REMOVE PAINT FROM BOLT HOLES. Because the powder coat finish applied at the
factory also adheres to the inside of bolt holes, pushing a bolt through it during assembly may be difficult. There-
fore, before connecting parts, we recommend that you check to see that bolts slip easily through all holes. If they
do not, carefully clear paint from holes in side bars, ends and arms using a small knife.
SECOND, be certain that barrel nuts and bolts screw together easily BEFORE beginning assembly. Residue
from the black finish may cause some bolts to stick a bit, therefore use the two hex wrenches enclosed (one for
each end of the barrel) and screw them together to clear away extra paint.
PAINTABLE Want a different color? The finish on this pot rack can be spray painted any color. We recommend
Rustoleum “Hammered” colors for their metal-like finishes, however any quality spray-can paint may be used. See
a paint retailer for guidance
CLEANING
Your pot rack has a durable powder coat finish designed to provide years of protection. Cleaning is done easily us-
ing soap and a damp cloth. Dry thoroughly after cleaning.