
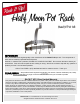
Instructions / Assembly
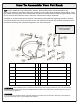

STEP 1: LAYOUT PARTS
On a table lay out all parts as shown in the exploded view above.
STEP 2: CONNECT MAIN BODY PARTS
Connect half circle (4B) and back bar (11) by inserting button head bolts (18B) through all screw holes. Be certain back bar
is on the INSIDE when connected.
STEP 3: ATTACH ARM
TIP!
It is easiest to attach arm when the corner of the pot rack to which you are
connecting the arm hangs slightly over the edge of the table. That provides clearance
for the flared end that extends below the body of the rack.
Align arm (6) over two holes at front of half circle (4B) and connect with two button heads (18B). Do not tighten bolts firmly
until all bolts are in place.
STEP 4: LEVEL POT RACK ON TABLE
Place assembled rack squarely on table and adjust all parts to be certain they are level
and straight. Then tighten all bolts firmly.
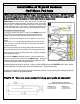
STEP 5: MEASURE FOR WALL
After the rack is squared and tightened, the position of the three anchor points (a triangle) is 11” high by 11-1/4” wide. Use
this measurement when determining location of rack on wall in installation section below.
You’re now ready to attach to the wall!
TOOLS NEEDED FOR INSTALLATION:
Provided: Installation hardware (anchors, bolts, wall screws and red sleeves)
You will need: level, tape measure, pencil, electric drill and ½” and 1/8” drill bits, hammer and nail.
STEP 1: LOCATION
Decide where you want to place your pot rack. Consider the height of the wall where the pot rack will hang, keeping in mind
how far below the rack your pots and utensils will hang, plus how high above your head you can still easily reach cookbooks,
etc. stored on the grid.
On the wall, mark the three points 11” long by 11-1/4” high (a triangle) where the top of rack arm and back bar will attach.
Then tap a small nail through each mark to be certain a stud is not in the way. (NOTE: because your pot rack includes super-
strong new-technology anchors, you DO NOT need to locate and bolt to studs. See diagram C at bottom of the GREEN in-
sert.)
STEP 2: INSTALL DRYWALL ANCHORS
RACK IT UP!’s drywall togglers eliminate the need to bolt your pot rack to a stud. The steel anchors are very strong and when
installed in drywall each drywall anchor holds about 200 lbs. Two anchors hold about 400 lbs., many times the weight you will
likely hang from your pot rack. See Back of this Booklet for Toggle Instructions.
INSTALL IN WOOD
If you need to install one or both sides of your rack in wood, use as many of the four wall screws (30A) included, but without a
red sleeve. See back page of booklet under Step 1.
MISSING A PART?
Please call our TOLL FREE
SERVICE CENTER
1 (877) 362-5863
How to Attach Your Pot Rack to the Wall
RACK IT UP
24 Colwell Street, Port Hadlock WA 98339
TOLL FREE (877) 362-5863
customerservice@enclume.com