
User's Manual


QUICK START
Note:
This section is designed for guitar technicians that are familiar
with speaker cabinet loads and remote switching. We do highly
recommend that all users take a few moments to peruse the rest
of this manual so all features and functions are understood. This
is important as we have no way of controlling how the Cabbone is
used. It is therefore your responsibility to follow these instructions
and consult your amplifier manuals to ensure compatibility.
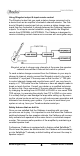
Basic connections
Before starting, ensure your amplifier is turned off, all volume con-
trols are set to zero, and the Cabbone power supply is disconnected.
Assuming both of your speaker cabinets have the same impedance,
make sure you set your amp’s impedance to match. We recommend
using 16-gauge or larger speaker cables for all connections.
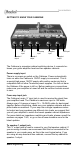
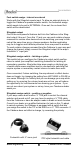
Connect your amp’s speaker output to the Cabbone’s ‘FROM AMP’
input jack. The Cabbone’s maximum input is 120 watts. Connect the
Cabbone’s SPEAKER-1 output jack to your first speaker cabinet and
SPEAKER-2 output to your second speaker cabinet. You can now con-
nect the Cabbone’s power supply. This will turn the Cabbone on and
one of the LED indicators will illuminate.
Now, turn your amp on and bring up the volume slowly. Driving your
amp at a low level during setup will minimize any harmful occurrences
should an improper connection be made. At this point you should have
sound coming through speaker-1. Make sure the Cabbone remote
selector switch is set to INTERNAL so that the on-board footswitch
will work. Depress the footswitch on the Cabbone. This will switch the
sound to speaker-2.
If you are using two speaker cabinets with different loads (different
impedance rated in ohms), set the amp’s impedance to match the load
of the lowest speaker cabinet impedance you intend to use.
True to the Music
Radial Engineering Cabbone Owner’s Manual
3
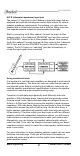
Basic speaker cabinet switching set up