
Instructions / Assembly


6
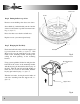
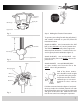
Fig. 5
Remove screws holding clear dust cover down.
Screw bulbs (4) -included with your fan- into the
sockets located in the top of the fan motor hous-
ing (see figure 5).
Place clear dust cover back over bulb area.
Replace screws you removed previously.
Step 4 Putting bulbs in top of fan
Socket
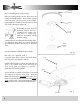
Fig. 6
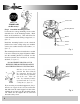
Notice the half ball on the end of the support rod
is grooved down one side (see figure 6). This
Keyway fits over the small keyway pin on the
inside of the mounting bracket and keeps the
ceiling fan from spinning on the mounting
bracket.
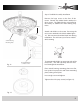
Using your step ladder, lift the fan and place the
half ball in the center of the mounting bracket
with the keyway pin inserted into the keyway on
the ball. Turn the fan left and right slightly to
make sure it is seated on the bracket with the
keyway pin in the keyway (see figure 7).
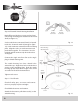
Trim the lead wires, leaving about six inches of
each wire extending from the support rod (see
figure 8).
Step 5 Hanging the Fan Body
Mounting Bracket
Support Rod
Bulb
Keyway
Dust Cover