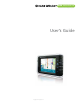
GPS NAVIGATOR Complete Personal Navigation System User’s Guide Rand McNally August 2006 | GPS Version Navigator 1.
PREFACE Rand McNally GPS Navigator Warnings, Disclaimers, and End-User License Agreement Pay attention to road conditions and street signs, and obey all traffic and safety laws. Traffic laws and current traffic conditions must always be observed and take precedence over the instructions issued by the navigation system. The user should be aware of situations where current traffic conditions and the instructions from the navigation system may be in conflict.
TABLE OF CONTENTS SECTION / TITLE PAGE 1 Introduction . . . . . . . . . . . . . . . . . . . . . . . . . . . . . 1 About GPS . . . . . . . . . . . . . . . . . . . . . . . . . . . . . 1 Navigation Devices – what you should know . . . . . . . . . . 1 Map Data . . . . . . . . . . . . . . . . . . . . . . . . . . . . . . 2 Device Overview . . . . . . . . . . . . . . . . . . . . . . . . . .
TABLE OF CONTENTS continued SECTION / TITLE PAGE 6 MP3 Player . . . . . . . . . . . . . . . . . . . . . . . . . . . . . 19 Selecting and Quitting . . . . . . . . . . . . . . . . . . . . . . 19 Downloading from PC . . . . . . . . . . . . . . . . . . . . . . 19 7 FAQ . . . . . . . . . . . . . . . . . . . . . . . . . . . . . . . . . 21 8 Support / Warranty . . . . . . . . . . . . . . . . .
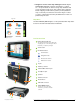
1 INTRODUCTION Congratulations on purchasing the Rand McNally GPS Navigator personal navigation system! About GPS The Rand McNally GPS Navigator uses GPS (Global Positioning System) satellites, direction-sensing electronics, and a map database to calculate and display route directions. The GPS is based on 24 satellites, which orbit the earth and continuously emit signals.
ÿ Navigation arrows on the map will begin to move as you start moving. Navigation devices are similar to computers — they are electronic devices using map databases and route calculation technology. Just as with other computerbased mapping and directions systems, the map database may occasionally not reflect recent road changes or select a route to a destination that may be different from the one preferred by the user.
Insert the included memory card in the top slot. ÿ Powering On for the First Time There are two key steps to powering on the unit for the first time: 5 see page 2 1 Insert the included memory card in the top slot. NOTE: The memory card must be inserted into the slot as shown at left, with the clipped edge on the lower left side. When inserted correctly, the sticker on the memory card is on the same side of the device as the device screen.
2 MAIN MENU The Main menu screen — The main functions of the Rand McNally GPS Navigator are accessible via this screen. Tap the icons below to reach the corresponding screens. Navigate — Enter a destination for turn-by-turn voice-guided GPS navigation. Destination options include entering an address, selecting points-of-interest (POI), routing to a recent destination, and going to your favorite places. Please see pages 5–12 for details.
3 NAVIGATION The GPS Navigator provides turn-by-turn voice instruction along with visual map guidance throughout the entire route. Before each turn, the device both announces and displays the upcoming maneuver. The map scrolls with the directional green arrow to continually show your current location. If a turn is missed, the GPS Navigator will automatically reroute you and provide new instructions within a few seconds.. NOTE: In some cities, streets are located close together.
To Start Navigation: Tap . A route will be calculated and you will taken to the navigation screen where your turn-by-turn directions will begin. NOTE: Route calculation requires a GPS signal. To receive a GPS signal your unit needs a clear line of sight to the sky. Situations where you will not receive a GPS signal include being inside a building, garage or tunnel.
ÿ Points of Interest (POI) Choose restaurants, banks, gas stations and many more points of interest. You can select the POI in two ways: 1. Near Current Location NOTE: This feature is only enabled if a GPS signal is available Tap on the green field corresponding to each category to direct your search: Point of Interest screen Within – Maximum miles you are willing to drive to reach the Point of Interest Category – F ood, Lodging, Banks & ATMs, etc.
ÿ Go Home Tap dedicated Go Home icon to route you back home from any location. To set your home address: Push the menu button on the right side of your unit Tap Menu on the lower right side of the screen to navigate to the Main Menu Tap Settings on Main menu. Tap the orange box with the down arrow until Home address is highlighted Home address settings screen Tap Tap on Enter your home address. Your home address can be entered by clicking Address.
ÿ Recent Destinations All destinations you have navigated to recently are listed in the Recent Destinations screen and can be re-selected at any time for routing. To select a destination: Scroll through the list and highlight the destination. Tap . The Address screen appears with each field filled in, according to your selection. Navigation Menu Tap Start Navigation. Scroll using up and down arrows To delete recent destinations: Scroll to highlight the destination to delete.
ÿ My Favorites Your favorite destinations can be named and saved to be accessed at any time and routed to from any location. From the Main menu, tap Navigate. Two screens allow you to save My Favorites: - Address - Recent Destinations To create a favorite from: 1. Address screen Enter a destination in the Address screen. Tap the Save icon . Type in a name for this destination and tap 2. Recent Destinations Choose a destination from the list and tap . . The Recent Destinations screen opens.
Turn-by-Turn Navigation ÿ Map Screens You can view map screens any time - from the Main menu tap Show Map. After selecting Start Navigation, the map screen will open. Use to expose or hide the command bar. The command bar has several functions. Toggle between Zoom / Scroll modes. Zoom Mode – Allows you to toggle between manual zoom and manual scroll modes. Navigation screen When the Pan Mode is on (ie.
ÿ En Route Features The En Route menu allows you to make changes during navigation. Tap quickly any place on the map to open the En Route menu screen. ü Night Mode – This allows you to change between maps optimized for daytime and nighttime driving. To enable the nighttime maps, tap Night Mode. You are returned to the map in Night Mode. To revert to Day Mode, tap anywhere on the map and select Day Mode from the menu.
4 PLAN TRIP You may plan itineraries with two or more stops whether or not you are currently receiving GPS signals. This allows you to enter several destinations or plan longer trips in your home or business and save them for later use. At any time you can add stops along the route, called route points, modify the order of your stops, or display individual itineraries on the map. Planning your itinerary… ÿ Select Plan Trip. Tap Add Route Point to enter the first route point.
Managing itineraries ÿ Load Saved itinerary Tap to display saved itineraries. Highlight the desired itinerary you want to load. Tap . ÿ Delete itinerary Tap Load Saved Itinerary . Highlight itinerary you want to delete. Tap Delete icon Confirm . or cancel with X. ÿ Best of the Road™ itineraries Rand McNally has developed several Best of the Road™ preplanned trip itineraries with our editors’ picks of points of interest, including shops, attractions, and restaurants throughout the country.
Starting Navigation Tap Start. The system calculates the route and opens the navigation display screen. The navigation begins with your first route point. When you reach each route point, calculations for the next route point will begin, followed by the routing for the second stop. This continues through each route point.
5 CUSTOMIZING SETTINGS You can personalize many functions of your GPS Navigator through various Settings options. The main Settings screen identifies the categories of settings you can customize. Each is described below. Scroll using the arrows to select the setting you want to modify and tap . Settings screen After modifying any settings, tap Save to apply the changes you made or Cancel to return to the Main menu without saving your changes.
Brightness Tap day or night to change brightness (1-8) of the display for each of those modes. 1 is optimized for night driving, 8 is optimized for day driving. Navigation Display You can modify the following displays on the map by tapping the green boxes corresponding to each section: Brightness screen ü Map view – Select the default map to be either 2D or 3D.
Route Planning When you have selected two or more destinations, determine whether you want to navigate automatically to the next route point after reaching one of your stops, or be prompted to each route point. To toggle between yes and no, tap the green box to the right of “Proceed automatically to…”. If you do not navigate automatically, you can proceed as follows: ü While navigating, tap briefly on any place on the map Route Planning screen ü Select Next Destination.
6 MP3 PLAYER To select, tap MP3 Player from the Main menu. When you wish to return to Navigation, tap the Quit button and you will be taken to the Hardware menu. Simply tap the Navigation button to return to the GPS Navigator Main menu.
3 Once fully connected, you will see this: ActiveSync Connection screen 4 Select "Explore" to open standard Windows Explorer on device. Windows Explorer 5 From there, users can drag-and-drop MP3 files as needed to the My Flash Disk folder. ÿ Easy access to the Rand McNally navigation support site: www.randmcnally.com/gpshelp is available if you should have any problems transferring data. Please visit www.randmcnally.
7 FAQ Q Why won’t my unit turn on? A There are two key steps to powering on the unit for the first time – inserting the included memory card and turning the unit’s master switch to on. To do this, use the device stylus (stored in the lower left corner on the backside of the device), a ballpoint pen or similar item, move the switch on the bottom of the device to the “On” position. This process is highlighted on page 3 of this User Guide.
Q Can I switch the languages used in the unit? A Yes! When you turn on your system for the first time, you will be asked to select a language (English, French or Spanish). To change the language at a later date, you’ll need to toggle the hardware on/off switch at the bottom of the unit.
Q Can my location be tracked when I’m using my GPS system? A No. The GPS receiver in your device is a receiver only. It cannot broadcast your location to the satellite, the company or emergency services. Q How do I update my map? A Visit www.randmcnally.com/gpshelp periodically to see if new updates are available. The website will have purchase and retrieval instructions. Approximately one year after purchase, you unit will display a one-time message screen reminding you to check for new updates.
8 SUPPORT / WARRANTY Support Contacts If you should have additional questions or problems with your GPS Navigator please call toll-free 866-627-3526, 8 am – 12am (CST), 7 days a week (except holidays). You may also email our support staff at gpshelp@randmcnally.com. You should include a detailed description of the issue and any addition contact information for technical support response. Or, visit www.randmcnally.
EXCLUSIONS: this limited warranty does not apply, and you will have no remedy hereunder with respect to (a) products that have been modified, opened, repaired or otherwise altered, except by RAND MCNALLY or an ASC, (b) products that have been damaged or destroyed after delivery to the customer, (c) any third party software, interfaces, parts, supplies, peripherals or other products or any defects resulting from use of the product in connection with such third party products, (d) defects resulting from impro
9 APPENDIX Changing the language When you turn on your system for the first time, you will be asked to select a language (English, French or Spanish). To change the language at a later date, you’ll need to toggle the hardware on/off switch at the bottom of the unit. Purchasing Accessories Please visit www.randmcnally.com/gps to purchase additional accessories for your GPS Navigator. Care of your GPS Navigator • Use a soft cloth to wipe the screen; do not use any liquid cleaners.