
User`s guide


Rand McNally GPS Navigator User’s Guide | INTRODUCTION 3Help (866) 627-3526
Powering On for the First Time
There are two key steps to powering on the unit for the first
time:
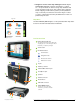
1 Insert the included memory card in the top slot.
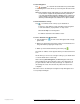
NOTE: The memory card must be inserted into the slot as shown at left, with the
clipped edge on the lower left side. When inserted correctly, the sticker
on the memory card is on the same side of the device as the device screen.
2 Using the device stylus (stored in the lower left corner on the
back side of the device), move the switch on the bottom of the
device to the “on” position.
NOTE: This process only needs to be done prior to the initial use of the unit.
From then on the power button on the right-hand side of the unit should
be used.
The software may respond slowly upon first use as some functions
are initialized. This is normal.
The first use of the Rand McNally GPS Navigator requires a few
additional steps:
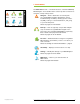
1 After turning on your unit, you will be prompted to
select your language.
2 Several startup screens will flash. When asked
“Do you want to select the navigation map now?” tap .
3 You will be taken to a screen that asks you to select a geo-
graphic map area. Highlight the map that corresponds to
your current geographic region (this can be changed later
from the Settings screen).
Battery Life
The Rand McNally GPS Navigator comes with an internal Li-Ion
battery. Under normal use this battery should last up to 4 hours.
The battery can be charged while the device is in use or powered
off, from the included 12V vehicle adapter. The on-screen bat-
tery gauge indicates battery status.
In the event that the battery power depletes completely, the
device may initiate a full restart (see “Powering On for the First
Time”) when powered back on.
Screen
The GPS Navigator is a touch-screen, menu-driven system. Make
your selections by touching the screen menus at any time and
follow the highlighted prompts. Be careful not to scratch the
screen. Most input and selections can be made using your fingers,
but the included stylus (stored in the lower left corner on the
back side of the device) may be used instead.
Some polarized sunglasses will “block out” the view of LCD screens.
This is related to the way light interacts with the polarized
lenses and is not a malfunction of the device.
ÿ
ÿ
ÿ
Insert the included
memory card in the
top slot.
Using the device stylus (stored in the lower left corner of the
back side of the device), or a ballpoint pen, move the switch
on the bottom of the device to the “on” position
5
see page 2
12
see page 2