
Manual


Troubleshooting
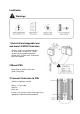
Ensure all tests are undertaken by a qualified, trained engineer
Ensure safe working practices are followed at all times
Step 1 Basics
Check polarity of illuminator connection: red= +ve, black= -ve
Ensure PSU outputs provide 24V DC
Ensure telemetry wires are shorted out or closed contact input (zero volt) is applied
Check photocell is working. Cover illuminator photocell fully, light should turn on. It is
sometimes difficult to see Infra-Red lamps working in high brightness conditions.
Check mains input
Check fuses intact
If longer cables used, ensure sufficient voltage is provided to allow for drops across the
cable
If OK…
Step 2 Lamp Test
Check current is being drawn – amount of current will depend on power setting of
unit. Please note – use appropriate DC multimeter
To test this you must ensure photocell fully covered (or disabled using optional VARIO
remote controller or VARIO IP web interface) and ensure telemetry wires are shorted out
or closed contact input (zero volt) is applied
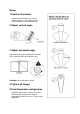
Step 3 Set-up Camera, lens and illumination
Check camera lens – fully open at night & set correctly
Check model number to Raytec performance specification to ensure required distance is
achievable;
- Check illuminator is set to max power
- Check orientation of illuminator and ensure it is pointing in correct direction
- Check angle of illuminator (Holographic lens) – Too narrow may cause hot spots
and the aperture of the camera lens to close down. Too wide and there may be
insufficient light on scene and light going where it is not needed.