26980/26981 40-Channel 900MHz Cordless Telephone and AM/FM Clock Radio User’s Guide We bring good things to life.
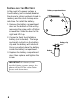
FCC REGISTRATION INFORMATION Your telephone equipment is registered with the Federal Communications Commission and is in compliance with parts 15 and 68, FCC Rules and Regulations. 1 Notification to the Local Telephone Company On the bottom of this equipment is a label indicating, among other information, the FCC Registration number and Ringer Equivalence Number (REN) for the equipment. You must, upon request, provide this information to your telephone company.
TABLE OF CONTENTS FCC REGISTRATION INFORMATION .... 2 INTERFERENCE INFORMATION ............ 2 HEARING AID COMPATIBILITY ........... 2 INTRODUCTION ..................................... 4 BEFORE YOU BEGIN .............................. 5 PARTS CHECKLIST ............................. 5 MODULAR JACK REQUIREMENTS ...... 5 DIGITAL SECURITY SYSTEM ............. 5 INSTALLING THE BATTERY ................... 6 DESKTOP INSTALLATION ......................... 7 SETUP ................................................
INTRODUCTION Your 900 MHz Cordless Telephone is designed to give you flexibility in use and high quality performance. To get the most from your new cordless telephone, we suggest that you take a few minutes right now to read through this instruction manual. IMPORTANT: Because cordless phones operate on electricity, you should have at least one phone in your home that isn’t cordless, in case the power in your home goes out.
BEFORE YOU BEGIN PARTS CHECKLIST Make sure your package includes the items shown here.
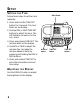
INSTALLING THE BATTERY In the event of a power outage, a 9-volt battery (not included) enables the phone to retain numbers stored in memory and the clock to keep accurate time. To install the battery: Battery compartment door 1. Remove the battery compartment door on the bottom of the unit by removing the screw with a Phillips screwdriver. Slide the door to the right and lift it up. 2. Connect a fresh 9-volt alkaline battery (not included).
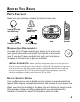
DESKTOP INSTALLATION 1 2 3 5 4 6 1. Set the RINGER switch on the handset to ON. 2. Place the handset in the base. 3. Raise the base antenna. 4. Set the TONE/PULSE switch to TONE for touch-tone service, or PULSE for rotary service. If you don't know which type of service you have, check with the phone company. 5. Plug the power supply cord into the base and then into an AC outlet. The CHARGE/IN USE light comes on indicating that the battery is charging.
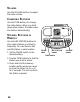
SETUP SETTING THE TIME AM indicator Follow these steps to set the clock manually. 1. Press and hold the TIME SET button for 2 seconds. The hour blinks on the display. 2. Use the REV or FWD TIME SET buttons to adjust the hour. The AM indicator comes on for the a.m. hours. CHARGE IN USE NITE LITE DISPLAY 3. Press and release TIME SET. The minutes blink on the display. 4. Use REV or FWD to adjust the minutes.You can make the minutes advance faster by pressing and holding the REV or FWD buttons. 5.
CLOCK RADIO OPERATION ANTENNAS ANTENNA AM ANTENNA A built-in ferrite rod antenna is used for AM reception. Rotating the unit slightly may also improve reception for distant AM stations. FM ANTENNA The AC power cord acts as the FM antenna. For best reception, be sure the power cord is stretched to its full length. Do not coil or bunch the cord together. Changing position of the power cord may also improve reception.
VOLUME Use the VOLUME buttons to adjust the radio volume. CHANGING STATIONS Use the TUNE buttons to change the radio station. When you hold down either button, the radio scans the stations automatically. STORING STATIONS IN MEMORY CHARGE IN USE NITE LITE DISPLAY TIME SET 900 MHz BEDROOM CORDLESS TELEPHONE/CLOCK RADIO SLEEP REV TIME SET FWD SNOOZE Use the ABC STATION buttons to store radio stations you listen to frequently. You can store an AM and FM station in each location. 1.
USING THE PRESET STATIONS 1. Set the FM/AM switch to the setting of the desired preset station. 2. Press the memory location button where the station is stored (A, B, or C). The radio tunes to that station. WAKE 1 button WAKE ALARMS You can set two different alarm times for the radio to wake you using the WAKE 1 and WAKE 2 buttons. Each alarm can be set to either music or standard alarm and lasts for about 1 hour.
1. Press and hold the WAKE 1 or WAKE 2 button for 2 seconds. The hours blinks on the display. 2. Use the REV or FWD TIME SET buttons to adjust the hour. The AM indicator comes on for the a.m. hours. AM indicator WAKE 1 button TIME LOCK button 3. Press and release the TIME SET button. The minutes blink on the display. 4. Use REV or FWD to adjust the minutes. 5. Press and release TIME SET to store the information and exit alarm setup.
SNOOZE After the alarm comes on, you can use the SNOOZE button to delay the alarm from coming on again for 7 more minutes (up to 59 minutes total). NITE LIGHT button SNOOZE button SLEEP button SLEEP Use the SLEEP button to set the radio to automatically turn off after a chosen amount of time (up to 60 minutes). 1. Make sure the radio is OFF. CHARGE IN USE NITE LITE DISPLAY TIME SET 900 MHz BEDROOM CORDLESS TELEPHONE/CLOCK RADIO SLEEP REV TIME SET FWD SNOOZE 2. Press and hold the SLEEP button.
TELEPHONE OPERATION RECEIVING A CALL Press the TALK button to answer a call. When finished, press TALK again to hang up. MAKING A CALL To make a call, press the TALK button before you dial and press it again to hang up. REDIAL 900 MHz CORDLESS PHONE Press the REDIAL button to redial the last number you dialed (up to 32 digits). If you get a busy signal, and want to keep dialing the number, just press REDIAL again (you don't have to turn the phone off and back on).
FLASH BUTTON Use the FLASH button to activate custom calling services such as call waiting or call transfer, which are available through your local phone company. TIP: Don‘t use the TALK button to activate custom calling services such as call waiting, or you‘ll hang up the phone. CHANNEL BUTTON 900 MHz While talking, you might need to manually change the channel in order to get rid of static. Press and release the CHANNEL button to advance to the next clear channel.
TEMPORARY TONE This feature enables Pulse (rotary) service phone users to access touch-tone services offered by banks, credit card companies, etc., by pressing the TONE button to temporarily make the phone touchtone compatible. To get information about your bank account, for example, you would: 900 MHz CORDLESS PHONE IN USE VOLUME 1. Call the bank’s information line. TALK 2. Press the TONE button (*) after your call is answered. 1 ABC 4 JKL 7 TUV GHI PQRS 3.
Press the PAGE/FIND button on the base. The handset beeps continuously for about 2 minutes or until you press any button on the handset or PAGE/FIND on the base. NOTE: You can still page the handset with the ringer off. RINGER SWITCH 900 MHz CORDLESS PHONE IN USE The RINGER switch must be ON for the handset to ring during incoming calls.
THE MEMORY FEATURE Store up to ten 16-digit numbers in memory for quick dialing. STORING A NUMBER IN MEMORY The phone must be OFF when you store numbers. 1. Press the MEMORY button. 2. Press the memory location number (0-9). 3. Press MEMORY again. 4. Use the keypad to enter the number you want to store (up to 16 digits). 5. Press MEMORY again to store the number. 900 MHz CORDLESS PHONE IN USE VOLUME TALK 1 ABC 4 JKL 7 TUV GHI PQRS * TONE 6.
CHANGING A STORED NUMBER Use the same procedure to change a stored number as you do to store a number—you’re just replacing the phone number with a different one. DIALING A STORED NUMBER 1. Make sure the phone is ON by pressing the TALK button. 2. Press MEMORY. 3. Press the number (0-9) for the desired memory location. The number dials automatically.
CHAIN DIALING FROM MEMORY Use this feature to make calls which require a sequence of numbers such as using a calling card for a frequently called long distance number. Basically, you dial each part of the sequence from memory. The following example shows how you can use chain dialing to make a call through a long distance service: The Number For Long distance access number Authorization code Frequently called long distance number Memory Location 7 8 9 1. Make sure the phone is ON. 2.
INSERTING A PAUSE IN THE DIALING SEQUENCE Press the REDIAL button to insert a delay in the dialing sequence of a stored telephone number when a pause is needed to wait for a dial tone (for example after you dial 9 for an outside line, or to wait for a computer access tone). Each pause counts as 1 digit in the dialing sequence.
HEADSET AND BELT CLIP OPERATION CONNECTING A HEADSET TO THE HANDSET For hands free conversation, connect the headset (provided with 26981 only) to the HEADSET jack as shown. The handset receiver and microphone are disabled when the headset is connected. Handset jack HEADSET Adjust the headset to rest comfortably on top of your head and over your ear. Move the microphone to approximately 2 to 3 inches from your mouth. • Press the TALK button to answer or place a call before using the headset.
CHANGING THE BATTERY Make sure the telephone is OFF before you replace battery. 1. Remove the battery compartment door. 2. Disconnect the cord attached to the battery pack and remove the battery pack from the handset. 3. Insert the new battery pack and connect the cord into the jack inside the handset. 4. Put the battery compartment door back on. 5. Place handset in the base to charge.
SERVICE FCC requires this product to be serviced only by the manufacturer or its authorized service agents. In accordance with FCC requirements, changes or modifications not expressly approved by Thomson Consumer Electronics could void the user’s authority to operate this product. For instructions on how to obtain service, call Consumer Information, 1-800-448-0329. Attach your sales receipt to the booklet for future reference or jot down the date this product was purchased or received as a gift.
TROUBLESHOOTING TIPS TELEPHONE Problem Solution No dial tone • Check installation: — Is the base power cord connected to a working outlet? — Is the IN USE light on? — Is the telephone line cord connected to the base unit and the wall jack? • Disconnect the base from the wall jack and connect another phone to the same jack. If there is no dial tone in the second phone, the problem might be your wiring or local service.
Problem Solution You experience static, noise, or fading in and out • • • • • Handset beeps continuously, as if the battery is low • Place handset in base for 20 seconds to reset the security code. If that doesn’t work, charge battery for 12 hours. • Clean charging contacts on handset and base with a soft cloth, or an eraser. • See solutions for “No dial tone.” • Replace battery.
INDEX A H Accessory Order Form 29 Adjusting the Display 8 AM Antenna 9 Antennas 9 Headset 22 Headset and Belt Clip Operation 22 B Battery Installation 23 Belt Clip 22 C Chain dialing from memory 20 Changing Stations 10 Changing the Battery 23 Clock Radio Operation 9 Connecting a headset to the handset 22 Connecting the Belt Clip 22 I Installing the Battery 6 Introduction 4 M Making a call 14 Memory 18 N Nite Lite 13 O Order form 29 P Dialing a stored number 19 Pause Inserting in dialing sequence
S T Security 5 Setting the Broadcast Band 9 Setting the Time 8 Setting the Wake Time 11 Setup 8 Sleep 13 Snooze 13 Stored numbers dialing 19 Storing Stations in Memory 10 Telephone operation 14 Temporary tone 16 Troubleshooting tips 25 U Using the Preset Stations 11 Using Wake 12 V Volume 10 W Wake Alarms 11 28
5-2476 5-2463 5-2425 5-2475 5-2462 5-2444 TOTAL Sales Tax........................................................$_______________ Daytime Phone Number ( )_______________________________ City ________________________State________ ZIP_________________ Address_____________________________________ Apt.____________ Name_______________________________________________________ Ronks, PA 17573-8419 P.O. Box 8419 Mail Order Department TCE Mail order form and money order or check (in U.S.
CAUSES OF POOR RECEPTION • Aluminum siding. • Foil backing on insulation. • Heating ducts and other metal construction can shield radio signals. • You’re too close to appliances such as microwaves, stoves, computers, etc. • Atmospheric conditions, such as strong storms. • Base is installed in the basement or lower floor of the house. • Base is plugged into an AC outlet with other electronic devices. • Baby monitor is using the same frequency. • Handset battery is low. • You’re out of range of the base.
LIMITED WARRANTY What your warranty covers: • Any defect in materials or workmanship. For how long after your purchase: • One year. (The warranty period for rental units begins with the first rental or 45 days from date of shipment to the rental firm, whichever comes first.) What we will do: • Provide you with a new or, at our option, a refurbished unit. • The exchange unit is under warranty for the remainder of the original product’s warranty period.
26980/26981 Teléfono Inalámbrico con Reloj y Radio AM/FM de 900 MHz con 40 Canales Guía del Usuario Creamos cosas buenas para la vida.
INFORMACIÓN DE LA REGISTRACIÓN DE LA FCC Su equipo telefónico de la ha sido registrado con la Comisión Federal de Comunicaciones (FCC) y está en acuerdo con las Partes 15 y 68 de las Regulaciones y Reglas de la FCC. 1 Notificación a la Compañía Telefónica Local Al fondo de este equipo Ud. hallará un rótulo indicando, entre otra información, el número de la Registración con la FCC y el Número del Equivalente Timbre (REN) para este equipo. Ud.
TABLE DE CONTENIDO INFORMACIÓN DE LA REGISTRACIÓN DE LA FCC ................................... 2 INFORMACIÓN DE INTERFERENCIAS .... 2 COMPATIBILIDAD CON AUDÍFONOS .... 2 INTRODUCCCIÓN .................................... 4 ANTES DE COMENZAR ........................... 5 LISTA DE PARTES ............................... 5 REQUISITOS DE ENCHUFE MODULAR ...... 5 SISTEMA DE SEGURIDAD DIGITAL: .... 5 PARA INSTALAR LAS BATERÍAS ............ 6 INSTALACIÓN SOBRE ESCRITORIO O SUPERFICIE PLANA ........................
INTRODUCCCIÓN Su teléfono inalámbrico 900 MHz está diseñado para darle flexibilidad de utilización y rendimiento de alta calidad. Para aprovechar al máximo su teléfono inalámbrico, le sugerimos que dedique ahora algunos minutos a la lectura de este manual de instrucciones. IMPORTANTE: Como los teléfonos inalámbricos funcionan con electricidad, usted debe tener por lo menos un teléfono en casa que no sea inalámbrico, en caso de que haya un corte de corriente en su casa.
ANTES DE COMENZAR LISTA DE PARTES Asegúrese de que su paquete incluye los siguientes artículos: Audífonos (provisto unicamente Cable de corriente AC con el modelo 26981) 900 MHz CORDLESS PHONE IN USE VOLUME TALK CHARGE IN USE NITE LITE DISPLAY TIME SET 900 MHz BEDROOM CORDLESS TELEPHONE/CLOCK RADIO SLEEP REV TIME SET FWD SNOOZE PAGE FIND WAKE A AM MUSIC * TONE - 2 2 C JKL 7 RADIO ON/OFF + ALARM WAKE BATT LOW AM VOLUME 1 1 B FM ABC 4 PQRS SEEK STATION 1 GHI MUSIC REDI
PARA INSTALAR LAS BATERÍAS En caso de que ocurra un corte de corriente, una batería de 9 voltios (no incluida) le permite al teléfono retener los números que estaban almacenados en la memoria y al reloj conservar la hora correcta. Para instalar la batería: Puerta del compartimento de la batería 1. Quite la puerta del compartimento de las baterías en la parte de abajo del aparato, simplemente quitando el tornillo con un destornillador Phillips. Deslice la puerta hacia la derecha y levántela. 2.
INSTALACIÓN SOBRE ESCRITORIO O SUPERFICIE PLANA 2 1 3 5 4 6 1. Programe el selector del timbre (“RINGER”) del auricular en posición de encendido (“ON”). 2. Coloque el auricular sobre la base. 3. Levante la antena de la base. 4. Programe el selector de TONE/PULSE (tono/pulso) en la “TONE” para servicio de tono (touch-tone), o en la “PULSE” para servicio de pulso (rotatorio). Si usted no sabe qué tipo de servicio tiene, cheque con su compañía telefónica. 5.
PROGRAMACIÓN PROGRAMACIÓN DE LA HORA Indicador "AM" Siga estos pasos para programar el reloj manualmente. 1. Oprima y sostenga el botón para programar la hora ("TIME SET") durante 2 segundos. La hora parpadea en la pantalla. 2. Use el botón "REV" o "FWD TIME SET" para ajustar la hora. El indicador "AM" aparece para las horas a.m. CHARGE IN USE NITE LITE DISPLAY TIME SET 900 MHz BEDROOM CORDLESS TELEPHONE/CLOCK RADIO SEEK WAKE 4. Use el botón "REV" o "FWD TIME SET" para ajustar los minutos.
OPERACIÓN DEL RADIO RELOJ ANTENAS Antena ANTENA AM Para la recepción de AM, se utiliza una antena de núcleo de ferrita integrada. El girar el aparato ligeramente también puede mejorar la recepción de estaciones distantes de AM. ANTENA FM El cable de corriente AC actúa como la antena FM. Para una mejor recepción, asegúrese de que el cable de corriente esté estirado a todo su largo. No enrolle o enrede el cable. El cambiar la posición del cable de corriente puede también mejorar la recepción.
VOLUMEN Utilice los botones de volumen ("VOLUME") para ajustar el volumen del radio. PARA CAMBIAR ESTACIONES Utilice los botones para sintonizar ("TUNE") para cambiar la estación de radio. Cuando usted sostiene cualquiera de los botones oprimidos, el radio sintoniza las estaciones automaticamente. PARA ALMACENAR LAS ESTACIONES EN MEMORIA Utilice los botones "ABC STATIONS" para almacenar las estaciones de radio que usted escucha frecuentemente.
PARA USAR LAS ESTACIONES PRE-SELECCIONADAS 1. Mueva el selector de FM/AM a la posición de la estación preseleccionada deseada. Botón despertador "WAKE 1" 2. Oprima el botón de la localización de memoria en donde la estación está almacenada (A, B, o C). El radio sintoniza esa estación. ALARMAS DESPERTADORAS Usted puede programar dos diferentes horas en la alarma despertadora para que el radio le despierte usando los botones "WAKE 1" o "WAKE 2.
1. Oprima y sostenga el botón "WAKE 1" o el botón "WAKE 2" durante 2 segundos. Las horas parpadean en la pantalla. 2. Utilice los botones "REV" o "FWD TIME SET" para ajustar la hora. El indicador de AM aparece para las horas a.m. Indicador de AM Botón para asegurar la hora ("TIME LOCK") Botón despertador "WAKE 1" 3. Oprima y suelte el botón "TIME SET." Los minutos parpadean en la pantalla. 4. Utilice los botones "REV" o "FWD TIME SET" para ajustar los minutos. CHARGE IN USE NITE LITE DISPLAY 5.
BOTÓN RECORDATORIO "SNOOZE" Después de que la alarma suena, usted puede usar el botón "SNOOZE" para posponer que la alarma vuelva a sonar nuevamente durante otros 7 minutos (hasta un total de 59 minutos). Botón para luz nocturna ("NIGHT LIGHT") Botón recordatorio ("SNOOZE") Botón para dormir ("SLEEP") BOTÓN PARA DORMIR ("SLEEP") Use el botón "SLEEP" para programar que el radio se apague automaticamente después de un periodo de tiempo que usted escoja (hasta 60 minutos). 1.
OPERACIÓN DEL TELÉFONO PARA RECIBIR UNA LLAMADA Oprima el botón "TALK" para contestar una llamada. Cuando haya terminado, oprima nuevamente el botón "TALK" para colgar. PARA HACER UNA LLAMADA Para hacer una llamada, oprima el botón para hablar (“TALK”) antes de marcar y oprímalo nuevamente para colgar. REDISCADO Oprima el botón de rediscado (“REDIAL”) para volver a marcar el último número que usted marcó (hasta 32 digitos).
BOTÓN DE CENTELLEO/ SERVICIOS ESPECIALES Use el botón de centelleo (“FLASH”) para activar los servicios especiales como llamada en espera o llamada transferida, que son disponibles a través de su compañía telefónica local. SUGERENCIA: No use el botón para hablar (“TALK”) para activar los servicios especiales como llamada en espera, porque así va usted a colgar el teléfono.
TONO TEMPORARIO Esta función le permite a los usuarios de servicio de pulso (rotatorio) tener acceso a los servicios de tono (touch-tone) que ofrecen los bancos, compañías de crédito, etc., simplemente oprimiendo el botón “TONE” para hacer el teléfono compatible a servicio de tono temporalmente. Para obtener información de su cuenta bancaria, por ejemplo, usted tiene que: 900 MHz CORDLESS PHONE IN USE VOLUME TALK 1. Llamar a la línea de información del banco. 2.
Oprima el botón localizador ("PAGE/ FIND") en la base. El auricular emite tonos continuamente durante aproximadamente 2 minutos o hasta que usted oprima cualquier botón en el auricular o el botón "PAGE/FIND" en la base. Botón para control de volumen (“VOLUME”) NOTA: Usted puede aun localizar el auricular con el timbre desactivado.
LA FUNCIÓN DE MEMORIA Almacene hasta diez números de 16 dígitos en la memoria para discado rápido. PARA ALMACENAR UN NÚMERO EN LA MEMORIA El teléfono debe estar apagado (OFF) cuando usted almacena números. 1. Oprima el botón de memoria (“MEMORY”). 2. Oprima el número de la localización de memoria (0-9). 900 MHz CORDLESS PHONE IN USE VOLUME 3. Oprima nuevamente el botón "MEMORY." 4. Use el teclado para inscribir el número que usted quiere almacenar (hasta 16 dígitos). 5.
PARA CAMBIAR UN NÚMERO ALMACENADO Use el mismo procedimiento para cambiar un número almacenado que el que usa para almacenar un número- usted está simplemente reemplazando el número telefónico con otro diferente. PARA MARCAR UN NÚMERO ALMACENADO 1. Asegúrese de que el teléfono está encendido (ON), simplemente oprimiendo el botón para hablar (“TALK”). 2. Oprima el botón de memoria (“MEMORY”). 3. Oprima el número (0-9) para la localización de memoria deseada. El número es marcado automaticamente.
DISCADO EN CADENA DESDE LA MEMORIA Use esta función para hacer llamadas que requieren una secuencia de números como el usar una tarjeta para llamar por teléfono o un número de larga distancia llamado frecuentemente. Basicamente, usted marca cada parte de la secuencia desde la memoria.
PARA INTRODUCIR UNA PAUSA EN LA SECUENCIA DE DISCADO Oprima el botón “REDIAL” para introducir un retraso en la secuencia de discado de un número telefónico almacenado cuando una pausa es necesaria para esperar al tono de marcar (por ejemplo después de que usted marca 9 para obtener línea externa, o para esperar e tono de acceso en una computadora).
OPERACIÓN DEL AUDÍFONO Y BROCHE DEL CINTURÓN CONEXIÓN DEL AUDÍFONO AL AURICULAR Clavija del Audífono Enchufe del Audífono HEADSET Para conversar sin sostener el auricular en la mano, conecte el audífono (provisto unicamente con el modelo 26981) al enchufe del audífono como se muestra. El receptor del auricular y el micrófono quedan deshabilitados cuando se conecta el audífono. Ajuste el audífono para que descanse cómodamente sobre su cabeza y sobre su oído.
CAMBIO DE LA BATERÍA Asegúrese de que el teléfono esté apagado (OFF) antes de cambiar la batería. 1. Quite la puerta del compartimento de batería. 2. Desconecte el cordón del paquete de batería y saque el paquete de batería del auricular. 3. Inserte el nuevo paquete de batería y conecte el cordón al enchufe dentro del auricular. 4. Vuelva a colocar la puerta del compartimento de la batería. 5. Coloque el auricular en la base para cargarlo.
CÓMO OBTENER SERVICIOS DE MANTENIMIENTO La FCC requiere que este producto sea sometido a servicios de mantenimiento solamente por el fabricante o por sus agentes de servicio autorizados. De acuerdo con los requerimientos de la FCC, los cambios o las modificaciones que no hayan sido expresamente aprobadas por Thomson Consumer Electronics podrían anular la autoridad que tiene el usuario de operar este producto.
DETECCIÓN DE AVERÍAS TELÉFONO Problema Solución No hay tono de marcar • Cheque la instalación: — ¿Está el cable de la base conectado a un contacto que sirve? — ¿Está la luz indicadora “IN USE” iluminada? — ¿Está el cable telefónico conectado a la base del aparato y a un contacto de pared? • Desconecte la base del contacto de pared y conecte otro teléfono al mismo contacto. Si no hay tono de marcar en el segundo teléfono, el problema puede estar en el cableado o en el servicio local.
Problema Problema Usted experimenta • estática, ruido, o • debilitamiento del • sonido entrante o saliente • • Cambie canales. ¿Está el auricular fuera de rango? Acérquese a la base. ¿La base necesita moverse a otra localización? Cambie la batería. Asegúrese de que la base no esté conectada en un contacto con otros aparatos eléctricos. El auricular pita • Coloque el auricular en la base durante 20 segundos continuamente, como si para re-programar el código de seguridad.
INDICE A L Antes de Comenzar 5 La Función de Memoria 18 Lista de partes 5 B Botón de Centelleo/ Servicios Especiales 15 Botón para Cambiar Canales 14 C Cambio de la batería 23 Causas de una mala recepción 31 Clock Radio Operation 9 Compatibilidad con Audífonos 2 Conexión del Audífono al Auricular 22 Conexión del broche del cinturón 22 Connecting the Belt Clip 22 Cuidado General del Producto 31 D Detección de Averías 25 Discado en Cadena desde la Memoria 20 F O Operación del Audífono y Broche del Cin
R Rediscado 14 Requisitos de enchufe modular 5 S Selector del Timbre 17 Setting the Broadcast Band 9 Setup 8 Sistema de Seguridad Digital: 5 T Tono Temporario 16 28
29 5-2475 5-2462 5-2444 CANTIDAD TOTAL Número Telefónico durante el Día ( )_______________________ Ciudad________________Estado________ Código Postal_________ Dirección_____________________________________Depto.____________ Nombre_______________________________________________________ Ronks, PA 17573-8419 P.O. Box 8419 Mail Order Department TCE Envíe el formulario de pedido y giro postal o cheque (en moneda estadounidense) a nombre de Thomson Consumer Electronics, Inc. a: Monto total incluido..
30
CAUSAS DE UNA MALA RECEPCIÓN • Recubrimiento externo de la casa con aluminio. • Aislación con revestimiento de papel de aluminio. • Conductos de calefacción y otras construcciones de metal que paran las señales de radio. • Está demasiado cerca de los aparatos eléctricos como microondas, cocina, computadoras, etc. • Condiciones atmosféricas, como una tormenta eléctrica. • La base está instalada en el sótano o en un piso más bajo de la casa.
GARANTÍA LIMITADA Lo que cubre su garantía: • Cualquier defecto en material o mano de obra. Por cuánto tiempo después de la compra: • Un año. (El periodo de garantía para unidades arrendadas se inicia con la primera renta o 45 días de la fecha del embarque a la firma de arrendamiento, lo que ocurra primero). Lo que haremos: • Proporcionarle una unidad nueva o, a nuestra opción, una reacondicionada. • La unidad de intercambio quedará bajo garantía por el resto del periodo de garantía del producto original.