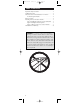
ANT3901new 4/29/03 8:37 Page 1 User’s Guide universal Amplified Outdoor Antenna VHF•UHF•FM Designed for elliptical DBS satellite dish antennas with multi-satellite LNB for sharp local channel reception Limited One-Year Warranty ANT3901
ANT3901new 4/29/03 8:37 Page 2 Table of Contents Important Safety Precautions . . . . . . . . . . . . . . . . . . . . . . . . . .3 Lightning Protection . . . . . . . . . . . . . . . . . . . . . . . . . . . . . . . . .3 About Your New ANT3901 Outdoor TV Antenna . . . . . . . . .4 For Best Reception Results . . . . . . . . . . . . . . . . . . . . . . . . .4 Before You Begin . . . . . . . . . . . . . . . . . . . . . . . . . . . . . . . . . . . .4 Installing Your New ANT3901 Antenna . . . . . . . . . . . .
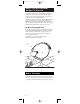
ANT3901new 4/29/03 8:37 Page 3 Important Safety Precautions WARNING! Many do-it-yourself and professional antenna installers are injured or killed each year by electric shock. While anyone can see the obvious danger of falling, the most resourceful sometimes fail to recognize overhead wires as being potentially lethal. To touch any part of the antenna to these overhead wires is the same as touching the wires with your bare hand.
ANT3901new 4/29/03 8:37 Page 4 About Your New ANT3901 Outdoor TV Antenna The ANT3901 is the perfect complement for a multi-beam satellite dish system. It picks up VHF and UHF signals so that you can enjoy local programming at no extra cost, along with your satellite programming. The ANT3901 features an internal amplifier that minimizes signal loss. The DBS receiver powers the amplifier, so no additional power supply is required.
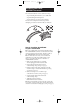
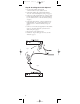
ANT3901new 4/29/03 8:37 Page 5 Installing Your New ANT3901 Antenna The ANT3901 installation consists of three basic steps: Step A: Installing the ANT3901 on your satellite dish. Step B: Installing the inside diplexers. Step C: Setting up your TV to use the ANT3901. Please be sure to complete all of these steps before attempting to watch local channels with your ANT3901. Fig 1 Step A: Installing the ANT3901 on your satellite dish Note: Some satellite dishes have integrated multi-switches.
ANT3901new 4/29/03 8:37 Fig 2 Fig 3 Fig 4 6 Page 6
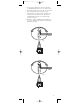
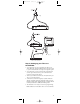
ANT3901new 4/29/03 8:37 Page 7 7. Disconnect the satellite cables from the “OUTPUT” or “TO RECEIVER” terminals on your multi-switch. 8. Connect the satellite cables to the “OUT” 1-4 terminals on the ANT3901 antenna (see Fig 5 on page 7). 9. Using the black 32”antenna cables, connect the “IN” 1-4 terminals of the ANT3901 to the “OUTPUT” or “TO RECEIVER” terminals on your multi-switch (see Fig 6 on page 7). 10.
ANT3901new 4/29/03 8:37 Page 8 Step B: Installing the inside diplexers 1. Disconnect the satellite cable from the “SAT IN” terminal on your satellite receiver. 2. Connect the satellite cable to the terminal marked “TV/SAT” on the inside diplexer (see Fig 7 on page 8). 3. Connect one of the supplied white 12” connector cables from the terminal labeled “SAT” on the inside diplexer to your satellite receiver’s “SAT IN” terminal (see Fig 8 on page 8). 4.
ANT3901new 4/29/03 8:37 Page 9 Fig 9 Fig 10 Step C: Setting up your TV to use the ANT3901 1. Access the menu of your TV and make sure the TV is in ANT/AIR mode and not CABLE/CATV mode. Please refer to your TV manual for the exact steps to change this option. 2. Access the menu of your TV and run the “Auto Channel Search” option. Please refer to your TV manual for the exact steps to change this option. 3. Turn on your DBS receiver and set to ANT, then tune your TV to your favorite channel. 4.
ANT3901new 4/29/03 8:37 Page 10 Limited One-Year Warranty THOMSON INC. warrants that, for one year from date of purchase, it will replace this product if found to be defective in materials or workmanship. Return it postage prepaid to the Product Exchange Center, 11721 Alameda Ave., Socorro, TX 79927, for prompt, no-charge replacement with a current equivalent. This replacement is THOMSON INC.’s sole obligation under this warranty. THOMSON INC.
ANT3901new 4/29/03 8:37 Page 11
ANT3901new 4/29/03 8:37 Page 12