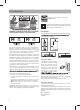
user manual manual de usuario DTA809 DTA809L www.1800customersupport.com/RCA Es importante leer este manual antes de usar por vez primera su equipo. rst time.
FCC information This conver ter box has earned the ENERGY STAR. This symbol indicates that this product incorporates double insulation between the hazardous mains voltage and user accessible parts. Ventilation You must adequately ventilate the product. Make sure there ow for ventilation. See diagram. This device complies with Par t 15 of the FCC Rules.
Important safety instructions Please read and save for future reference Some of the following information may not apply to your particular product; however, as with any electronic product, precautions should be observed during handling and use. • Read these instructions. • Keep these instructions. • Heed all warnings. • Follow all instructions. • Do not use this apparatus near water. • Clean only with dry cloth. • Do not block any ventilation openings.
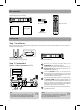
Box contents The following items are included: RCA Digital TV Converter Box Quick Start Guide RF coaxial cable User Manual (this booklet) Remote control - + - + 2 AAA Batteries Setting up Step 1: Installation The Converter Box can be installed either horizontally or vertically. The left side of the Converter Box can be rotated as a stand for vertical installation.
Setting up (continue) EN Option 2 : If you also need to connect your VCR 1 Co n n e c t yo u r e x i s t i n g a n te n n a c a b l e to t h e ANTENNA IN jack of the Converter Box. 2 Connect the RF coaxial cable* (supplied) from the OUTPUT TO TV jack of the Converter Box to the ANTENNA IN jack of the VCR. 3 Connect the RF coaxial cable* (not supplied) from the ANTENNA OUT jack of the VCR to the ANTENNA IN jack of the TV set.
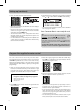
Setting up (continue) 3. Press 1 to start automatic channel search. • When the scan finishes, the Channel List menu displays the found channels. • Reposition the antenna and perform the automatic channel scan again if you cannot find all available channels by pressing MENU key. • The Conver ter Box is also compatible with Smar t Antennas which can provide improved reception over standard indoor antennas. • If a Smart Antenna is connected, press 1 for Quick Scan or 2 for Full Scan.
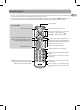
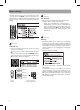
General controls EN • The keys on the Converter Box remote control are divided into two parts. The keys shown in white in the diagram below control the Converter Box, while the grey keys control your TV set. • You can control TV sets of all major brands after programming this remote control with the PGM key. RCA TV sets can be controlled directly without programming. Refer to “Program the supplied remote control” section for details.
Menu settings The main menu lets you access more features of the converter box. Press MENU to show or hide the menu. When the menu is displayed, press the number keys on the remote control to access the corresponding menu item directly. . 2 AV Settings • Change the video display and sound output formats. • Press 1 for Picture or 2 for Audio Controls. – Picture : Press 1 for Widescreen or 2 for Fullscreen . – Audio Controls : Press 1 for Stereo, or 2 for Alternate Audio (for bilingual programs).
Menu settings EN • Press 3 for Change PIN To change the password for ratings. The initial default password is “0000”, you must change it and create your own password to activate the rating settings. • Press 2 for Rating Limits Tip: After the rating settings are done, do not forget to activate them by selecting ON in the Lock/ Unlock menu.
Menu settings Some programmers use the Movie Ratings (MPAA) System to rate TV shows on the same scale as motion pictures: • A G -rated motion picture contains nothing in theme, language, nudity, sex, violence or other matters that would offend parents whose younger children view the motion picture. • A PG -rated motion picture should be investigated by parents before they let younger children attend.
Display 16:9 contents EN When receiving a 16:9 digital broadcast signal, DTA809 Digital TV Converter will convert the 16:9 picture to fit a 4:3 TV screen. Use the “Picture” setting to select among two conversion modes. Fullscreen Mode (Default) This mode uses the entire screen of your TV, but the left and right end of the picture will be removed.
Watching non-digital over-the-air TV broadcast To continue to view non-digital TV broadcasts, if available, press the BOX on your remote to place the Converter Box in stand-by mode (red light), then you can tune your TV to any available non-digital channels (refer to your TV controls). You must have the RF coaxial cable connected to your TV input, in order to watch non-digital TV broadcasts. Note that most non-digital TV broadcasts will cease to be available after Feb 17th 2009.
More information Troubleshooting tips Unit does not work. • Unplug the AC power cord and plug it back in. No picture on the TV screen. • Make sure the converter box is turned on. • Make sure the connections between the converter box and TV are properly done. • Choose different channels or video inputs on the TV set until the picture appears. No sound. • Make sure the connections between the converter box and TV are properly done. • Make sure the TV sound is not muted. Remote control does not work.
Limited warranty AVC MULTIMEDIA (“AVC”) makes the following limited warranty. This limited warranty extend to the original consumer purchaser and is limited to non-commercial use of the product. One Year Parts & Labor Warranty AVC products purchased in the United States are warranted to be free from defects in materials or workmanship for a period of one year from the date of their original retail purchase.
Importante instrucciones de seguridad Favor de guardar esto para una referencia futura Alguna de la siguiente información quizá no se aplique a su producto en particular. Sin embargo, como con cualquier producto electrónico, se deben tomar precauciones durante su manejo y uso. • Lea estas instrucciones. • Conserve estas instrucciones. • Tome en cuenta todas las advertencias. • Siga todas las instrucciones. • No use este aparato cerca del agua. • Limpie solamente con un paño seco.
Contenido de la caja Se incluyen los siguientes elementos: Convertidor para TV Digital RCA Guía de Inicio Rápido Cable coaxial RF Manual del Usuario (este folleto) Control remoto - + - + 2 baterías “AAA” Configuración Paso 1: Instalación El Convertidor puede ser instalado en forma horizontal o vertical. El lado izquierdo del Convertidor puede ser rotado como un soporte para instalación vertical.
Configuración E Opción 2: Si usted también debe conectar su VCR AC120V 60Hz de la antena 1 Conecte su cable de antena al receptáculo de entrada (ANTENNA IN) del Convertidor 2 Conecte el cable coaxial* RF (suministrado) del receptáculo de salida a T V (OUTPUT TO TV) del Convertidor al receptáculo de entrada de ANTENA de la VCR. 3 Conecte el cable coaxial* RF (no suministrado) del receptáculo de salida de antena (ANTENNA OUT) de la VCR al receptáculo de entrada de ANTENA del receptor de TV.
Configuración 3. Presione 1 para iniciar la búsqueda automática de canal. • Cuando la exploración termina, el menú Lista deCanales muestra los canales que se encontraron. • Vuelva a posicionar la antena y realice un escaneoautomática de canales si no puede encontrar todos los canales disponibles al oprimir la tecla MENU. • El Convertidor también es compatible con las Antenas Inteligentes (Smart Antennas), las cuales pueden suministrar una mejor recepción que las antenas interiores estándares.
Controles generales E • Las teclas en el control remoto del convertidor están divididas en dos partes. Las teclas que se muestran en blanco en el diagrama siguiente controlan el convertidor, en tanto que las teclas grises controlan su receptor de TV. • Usted puede controlar receptores de TV de las principales marcas después de programar este control remoto con la tecla PGM. Los receptores de TV RCA pueden ser controlados directamente sin programación.
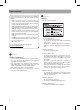
Configuraciones de menú El menú principal le permite acceso a más características del convertidor. Presione MENU para mostrar u ocultar el menú. Cuando el menú se visualice, presione las teclas numéricas en el control remoto para accesar directamente el elemento de menú correspondiente. 2 Configuraciones AV • Cambio de los formatos de salida de audio y visualización de video. • Presione 1 para Cuadro ó 2 para Controles de Audio .
Configuraciones de menú • Presione 2 para Límites de Clasificación E • Presione 3 para Cambie el Perno Para cambiar la clave de acceso para clasificaciones. La clave de acceso predeterminada inicial es “0000”, usted debe cambiarla y crear su propia clave de acceso para activar las selecciones de clasificación. Consejo: Después de establecer las clasificaciones, no olvide activarlas seleccionando ON en el menú Bloquear/Desbloquear.
Configuraciones de menú Algunos programadores usan el Sistema de Clasificaciones de Películas (MPAA) para clasificar shows de TV en la misma escala que películas de acción: • Una película de acción clasificada como G no contiene nada en temática, lenguaje, desnudez, sexo, violencia y otros asuntos que pudieran ofender a los padres cuyos niños más jóvenes vean una película de acción.
Visualización de contenidos 16:9 Al recibir una señal de transmisión digital 16:9, el Convertidor de TV Digital DTA809 convertirá la imagen 16:9 para ajustarse a la pantalla de la TV de 4:3. Use la opción “imagen” para seleccionar entre los dos modos de conversión. Modo Pantalla Completa (opción predeterminada) Este modo usa toda la pantalla de su TV, pero el extremo izquierdo y derecho de la imagen serán removidos.
Cómo visualizar una transmisión televisiva aérea no digital. Para seguir visualizando transmisiones de televisión no digitales, si están disponibles, oprima BOX en su control remoto para colocar el convertidor en modo de espera (luz rojo), después sintonice su televisor en cualquier canal no digital disponible (refiérase a los controles de su televisor). Usted deberá tener un cable coaxial RF conectado a la entrada de su televisor para poder visualizar transmisiones de televisión no digitales.
Más información Tips para solución de problemas Servicio al Cliente y soporte técnico La unidad no funciona. • Desconecte el cable de corriente CA y vuelva a conectarlo. www.1800customersupport.com/RCA No hay imagen en la pantalla de la TV. • Asegúrese de que el convertidor esté encendido. • Asegúrese de que las conexiones entre el convertidor y la TV sean las correctas. • Elija diferentes canales o entradas de video en el receptor de TV hasta que la imagen aparezca.
Garantía limitada AVC MULTIMEDIA (“AVC”) ofrece la siguiente garantía limitada, la cual se extiende al comprador-consumidor original y está limitada al uso no comercial del producto. Garantía de repuestos y reparaciones por Uno Año Los productos AVC que se hayan comprado en los Estados Unidos tienen una garantía de uno año a partir de la fecha original de compra en caso de presentar defectos en los materiales o en su fabricación.
Program codes/Códigos de programa Admiral 002, 128, 183, 189 Advent 191, 258, 260, 275 Adventura 129 Aiko 014, 182 Aiwa 289, 290 Akai 003, 177, 195, 201, 202, 295 Albatron 218 Alleron 036 America Action 186 Amtron 186 Anam 186 Anam National 141, 142, 186 AOC 005, 130, 143, 177, 260, 274, 275 Apex 053, 172, 184, 192, 232, 250, 280 Audiovox 182, 186, 188, 207, 223, 234 Aventura 185 Belcor 274 Bell & Howell 002, 037, 198 Benq 204, 306 Bradford 186 Brillian 236, 237, 238 Brockwood 274 Broksonic 186, 189, 200 Ca
Marantz 005, 043, 045, 057, 177, 181, 220, 230, 274 Matsushita 187 Maxent 193 Megatron 005, 043, 196, 274 Memorex 002, 005, 037, 139, 185, 189, 197, 198, 260, 274, 275, 283 MGA 005, 018, 058, 177, 197, 260, 274, 275 Midland 040, 135, 163, 176, 178, 179, 245 Minutz 039 Mitsubishi 005, 018, 058, 094, 183, 197, 217, 260, 262, 274, 275 Monivision 218 Montgomery Ward 002 Motorola 128, 183 MTC 005, 080, 177, 195, 260, 274, 275 Multitech 186 Multivision 061 NAD 005, 052, 053, 137, 155, 184, 274, 291 NEC 005, 009,