
Owner's Manual

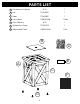


10
1. Read and understand all operating instructions before lighting.
2. Before beginning, make sure the control knob is in the OFF position.
3. Connect your propane cylinder (see previous pages).
4. Slowly open the valve on your LP cylinder.
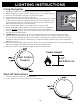
5. Prepare to ignite your fire column by placing one hand on the control
knob and one hand on the ignition button(as seen in diagram on the
right). DO NOT lean over any part of the burner, and verify that the
area around the burner is free of hazards.
6. Push and hold the igniter, you should hear a clicking sound.
7. While holding the igniter depressed with one hand, use your other
hand to push in and turn the control knob to the LIGHT position.
8. Once the burner ignites, release the igniter button, but continue to keep the control knob
pushed in for 15-30 seconds.
9. WARNING: If ignition does not occur in 30 seconds, turn the control knob to the “OFF”
position and turn the gas o at its source. Make sure there is no source of ignition around
the fire column and wait at least five minutes until the gas has cleared to repeat the lighting
procedure. Failure to do so could result in a large flashback of pooled gas, causing property
damage or injury.
10. After successfully lighting the column, release the control knob and turn it to the LOW setting.
Observe the flame and make sure that all the burn ports are lit.
11. Adjust the flame to the desired height using the control knob.
LIGHTING INSTRUCTIONS
Using the Igniter
1. Turn the control knob to the OFF position.
2. Close the valve on the LP tank to shut-o gas flow.
Shut-o Instructions
Push Control
Knob In
Flame Height
8-14”
20.3-35.5 cm