
Assembly Instructions


ASSEMBLY INSTRUCTIONS
Assembly of this fixture will be accomplished by first assembling the main body,
installing the mounting hardware to the junction box, hanging the fixture and then
installing the shade and crystals.
STEP 1
1
back to this sheet to continue installation of this fixture.
STEP 3
1
2
3
[DRAWING 1]
4
8
d
ce
5
b
e
e
9
7
9
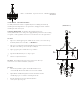
Slip center stem (4) with top main body (b) along wire and thread onto threaded
tube (t) located on the top of socket body assembly (a).
Slip loop (5) along wire and thread onto top of fixture.
Spread arms (b) until they are 120 degrees apart.
.Fixture is ready for installation.
2
3
4
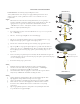
Take shade (7) and line up holes in tabs (d) with the holes in
end of arms (b). Shade tab should be on bottom of the arm (b).
Slip ball knob stud (8) through hole in shade tab and thread it into
arm (b). Repeat process with the remaining shade tabs.
attach crystals (9) to loop (e).
t
1
Slip center col
main body with the three arms (b) - see DRAWING 1.
umn
(4) along wire and thread onto swivel (s) located on the top
a
Next thread knob (10) onto threaded tube (f). Then
f
10
Bulbs: 4-60W CAND. Replacement Parts: SHADE: (BNI FINISH),
( fbz FINISH)
STEP 2
Refer to Hanging Instruction Sheet to hang fixture. Then refer
SAFETY WARNING: Read wiring and grounding instructions
and any additional directions. Turn power supply off during installation. If new wiring
is required, consult a qualified electrician or local authorities for code requirements.