
Replacement Part List


9
Operation
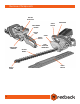
Adjusting the Rear Handle
Depending on the planned use the rear handle can be rotated from
the middle position by 90° in either direction (see Figure 3). Press
the release button downwards
1
and simultaneously rotate the
rear handle to the left or right
2
until it clicks.
NOTE: The hedge trimmer will not turn on when the rear handle is
not securely engaged in the respective end position.
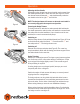
Powering the Hedge Trimmer
The hedge trimmer is switched on and operated with both hands.
One hand operates the switch on the rear handle, the second hand
the safety switch on the handlebar. If you release one of the two
switches, the cutter bar automatically stops.
Switching on
Hold the hedge trimmer rmly with both hands (see Figure 4). Press
and hold down the switch interlock
1
. Press the switch
2
and
the safety switch
3
. The hedge trimmer runs.
Switching off
Release one of the two switches (see Figure 5). The cutter bar
stops immediately. Wait until all rotating parts have stopped. Place
the blade sheath on the cutter bar.
Hedge Trimming
Always cut at full engine speed. The impact guard protects against
the recoil torque of the cutter when striking a solid object. Cut the
upper edges of the hedge slightly round. Cut in several stages if
heavy trimming is required.
If cutting hedges over a prolonged period, interrupt your work
frequently and oil the cutting bar.
Switch the engine off and remove the battery to remove jammed
clippings from the cutting blades.
The hedge trimmer can be guided with its double-sided cutters
forwards and backwards or in an oscillating movement from one
side to the other. Cut the sides of the hedge rst and then the top.
When cutting sideways, rotate the rear handlebar sideways.
When cutting down low, hold the handlebar above. Cut the hedge
from bottom to top. Hold the hedge trimmer at an angle of 5–10° to
the hedge to ensure a straight cut.
Figure 3
Figure 4
Figure 5
1
2
1
2
3