2 in 1 Play Yard & Safety Gate OWNER’S MANUAL MODEL: 1360, 1360DS • READ ALL INSTRUCTIONS BEFORE ASSEMBLY AND USE OF GATE. • KEEP INSTRUCTIONS FOR FUTURE USE. www.regalo-baby.com Regalo International, LLC. 3200 Corporate Center Drive, Suite 100 / Burnsville, MN 55306, USA 866.272.5274 (U.S. only) or 952.435.
Before Using Product Read and follow all instructions carefully to ensure that your gate is properly installed. Improper installation could result in the gate becoming unstable or dislodged from the doorway. Always make sure the gate panels are securely attached before using. The safety of your child is your responsibility. Please keep these instructions for your reference. IMPORTANT • The four mounting brackets must be used in securing the gate to the wall.
WARNING • To prevent serious injury or death, securely install gate or enclosure and use according to manufacturer's instructions. • Children have died or been seriously injured when gates are not securely installed. ALWAYS install and use gate/enclosures as directed using all required parts. • STOP using when a child can climb over or dislodge the gate. • Use only with the locking/latching mechanism securely engaged. • To prevent falls, NEVER use at top of stairs. • NEVER use to keep child away from pool.
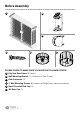
Before Assembly 8 7 6 5 4 D A B C B 8 7 6 5 4 3 2 1 D C D A 8 C 7 6 5 4 C B B A PROPRIETARY AND CONFIDENTIAL THE INFORMATION CONTAINED IN THIS DRAWING IS THE SOLE PROPERTY OF REGALO INTERNATIONAL / CARLSON PET PRODUCTS. ANY REPRODUCTION IN PART OR AS A WHOLE WITHOUT THE WRITTEN PERMISSION OF REGALO INTERNATIONAL / CARLSON PET PRODUCTS IS PROHIBITED.
Option A: Installing Your Gate Between Two Walls STEP 1 Unfold the gate frame at each pivoting joint by loosening each cap. 8 7 6 D STEP 2 Determine the size of your opening. If you need to remove panels from your gate simply unhook the upper and lower knobs between the panels. If you are C panels, hook together opposite panel ends; one panel with the male adding side and one panel with the female side. Check to make sure all the panels are securely locked.
7 6 5 4 3 2 1 STEP 3 Attach two gate connectors to one of the free ends of your gate at the specified mounting locations shown below. The placement of the gate connectors will determine where your gate is attached to the wall. Repeat step for the other free end of the gate.
STEP 5 Use a Phillips/cross-head screwdriver to fix the wall mounting bracket to the wall. Repeat for all four brackets. STEP 6 Rotate wall mounting bracket to the locked position. Repeat step for remaining wall mounting brackets. DEIFICEPS ESIWREHTO SSELNU 9002-5.41Y EMSA REP SECNARELOT & SNOISNEMID SEHCNI : STINU 500.± : XXX. 10.± : XX. 1.± : X. °2± : SELGNA C ETAROPROC 0023 M ,ELLIVSNRUB EMAN M ELGNA DR3 NOITCEJORP RETFARD RENGISED LAIRETAM .RPPA GNE HSINIF .RPPA GFM .A.
NOTE: When putting your gate away you can remove the gate panels without removing the wall mounting brackets. STEP 8 To remove your gate, rotate all wall mounting brackets to the unlocked position. You are now able to detach the gate connectors from the wall mounting brackets. 8 7 6 5 4 3 2 NOTE: This gate is designed to fit minimum width openings 36 inches wide to maximum width openings 192 inches wide.
Option B: Installing Your Gate as a Freestanding Enclosure STEP 1 Unfold the gate frame at each pivoting joint by loosening each cap. 8 7 6 D 7 6 5 4 STEP 2 C Position the play yard into your desired configuration, then join the free ends of the play yard together at the plastic joints.
STEP 3 Tighten the locking knobs to secure your play yard into your desired configuration. NOTE: When adding or removing additional panel units to the configuration, panels must be added or subtracted in sets of two for the freestanding enclosure to function properly.
TO FOLD YOUR PLAY GATE STEP 1: Detach two of the gate panels by unhooking the upper and lower knobs. STEP 2: You will now be able to pull the play yard apart. STEP 3: Fold and put away. CARE AND MAINTENANCE Periodically check the gate for signs of damage, wear, or missing components. Do not use if any part is missing, worn or damaged. Check the gate regularly to ensure all the hardware and mountings are tightened. Do not use abrasive cleaners or bleach.
www.regalo-baby.com Regalo International, LLC. 3200 Corporate Center Drive, Suite 100 Burnsville, MN 55306, USA 866.272.5274 (U.S. only) or 952.435.