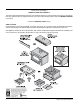
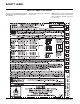
www.regency-fire.com Freestanding Woodstoves MODELS: F1100S F3100L Owners & Installation Manual S3100L Tested by: Installer: Please complete the details on the back cover and leave this manual with the homeowner. Homeowner: Please keep these instructions for future reference. 908-288b FPI FIREPLACE PRODUCTS INTERNATIONAL LTD. 6988 Venture St.
Thank-you for purchasing a REGENCY FIREPLACE PRODUCT. The pride of workmanship that goes into each of our products will give you years of trouble-free enjoyment. Should you have any questions about your product that are not covered in this manual, please contact the REGENCY DEALER in your area. Keep those REGENCY FIRES burning. SAFETY NOTES: If this woodstove is not properly installed, a house fire may result.
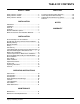
TABLE OF CONTENTS SAFETY LABEL Safety Label For F1100S ...............................................4 Safety Label For F3100L ...............................................5 Safety Label For S3100L ...............................................6 PARTS LIST F1100 & F3100 Stove Main Assembly.........................22 S3100 Step Stove Main Assembly ..............................23 Pedestal, Bottom Shield & Leg Options ......................24 Firebrick ....................................................
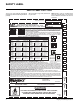
SAFETY LABEL SAFETY LABEL FOR F1100S We have printed a copy of the contents here for your review. duplicate serial number 100 C F BACK M FLOOR PROTECTION* O K 405 mm / 16 in L 150 mm / 6 in M 150 mm / 6 in L K FRONT MADE IN CANADA UNITED STATES ENVIRONMENTAL PROTECTION AGENCY CERTIFIED TO COMPLY WITH JULY 1990, PARTICULATE EMISSION STANDARDS. CAUTION HOT WHILE IN OPERATION DO NOT TOUCH. KEEP CHILDREN, CLOTHING AND FURNITURE AWAY. CONTACT MAY CAUSE SKIN BURNS. READ NAMEPLATE AND INSTRUCTIONS.
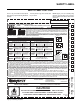
SAFETY LABEL SAFETY LABEL FOR F3100L This is a copy of the label that accompanies each Regency Large Freestanding Woodstove (F3100L). We have printed a copy of the contents here for your review. NOTE: Regency units are constantly being improved. Check the label on the unit and if there is a difference, the label on the unit is the correct one.
SAFETY LABEL SAFETY LABEL FOR S3100L This is a copy of the label that accompanies each Regency Large Freestanding Step Woodstove (S3100L). 6 We have printed a copy of the contents here for your review. NOTE: Regency units are constantly being improved. Check the label on the unit and if there is a difference, the label on the unit is the correct one.
INSTALLATION RESIDENTIAL INSTALLATION 1) Read all instructions before installing your Regency Stove. Install and use only in accordance with these installation and operating instructions. Be aware that local Codes and Regulations may override some items in this manual. Check with your local inspector. 2) Select a position for your Regency Stove. Consult the minimum clearance chart for your model and set the stove in place.
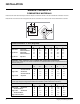
INSTALLATION MINIMUM CLEARANCE TO COMBUSTIBLE MATERIALS Please read the section below carefully as clearances depend on whether the airmate or the rear heat deflector is installed on the stove. Measurements "From Unit" are from the top plate of the stove to a side wall or to a corner, and from the rear heat shield to a back wall.
INSTALLATION Minimum Alcove Clearance to Combustible Materials The Regency Freestanding models have been alcove approved and must be installed with a listed double wall connector to the ceiling level. Note: Minimum alcove ceiling height - 84" Maximum depth of alcove - 36" From Unit Small F1100S with Airmate with Rear Deflector Large F3100L with Airmate with Rear Deflector Unit From Flue Min. Min.Hearth Center-line Width to Rear Wall G H I J K L 11" 13" 7" 5" 23" 25" 13.5" 11.
INSTALLATION Pedestal Assembly STOVE ASSEMBLY PRIOR TO INSTALLATION Rear Heat Deflector Assembly for F1100 & F3100 All units require either the pedestal or 4 legs attached to the base. The F1100 and F3100 stoves require either the Airmate or Rear Heat Deflector on top of the stove. Clearances to combustible materials vary depending on whether the airmate or rear heat deflector is installed, so be sure to check the Minimum Clearance to Combustible Materials section.
INSTALLATION Leg and Bottom Shield Assembly Bottom Shield Small Large Legs (set of 4) Steel - Painted Black Cast - Painted Black Cast - Gold Plated 850-121 850-321 850-125 850-126 850-127 The instructions below apply to the steel leg, painted cast leg and the gold plated cast leg. It will be easier to attach the legs to the stove if the stove is tipped on its back (preferably on a soft surface to prevent scratching). Ensure to be extremely careful when tipping stove.
INSTALLATION MASONRY CHIMNEY Ensure that a masonry chimney meets the minimum standards of the National Fire Protection Association (NFPA) by having it inspected by a professional. Make sure there are no cracks, loose mortar or other signs of deterioration and blockage. Have the chimney cleaned before the stove is installed and operated. When connecting the stove through a combustible wall to a masonry chimney, special methods are needed.
INSTALLATION COMBUSTIBLE WALL CHIMNEY CONNECTOR PASS-THROUGHS Method A: 12" (304.8 mm) Clearance to Combustible Wall Member: Using a minimum thickness 3.5" (89 mm) brick and a 5/8" (15.9 mm) minimum wall thickness clay liner, construct a wall pass-through. The clay liner must conform to ASTM C315 (Standard Specification for Clay Fire Linings) or its equivalent. Keep a minimum of 12" (304.8 mm) of brick masonry between the clay liner and wall combustibles.
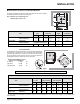
INSTALLATION TABLE 1 MINIMUM RECOMMENDED FLUE HEIGHTS IN FEET (Measured from the top of the unit) # OF ELBOWS ELEVATION (FT) ABOVE SEA LEVEL 0 0-1000 1000-2000 2000-3000 3000-4000 4000-5000 5000-6000 6000-7000 7000-8000 8000-9000 9000-10000 12.0 12.5 13.0 13.5 14.0 14.5 15.0 15.5 16.0 16.5 2 x 15o 4 x 15o 2 x 30o 13.0 13.5 14.0 14.5 15.0 15.5 16.0 16.5 17.0 17.5 14.0 14.5 15.0 15.5 16.0 17.0 17.5 18.0 18.5 19.0 15.0 15.5 16.0 17.0 17.5 18.0 18.5 19.0 20.0 20.5 4 x 30o 2 x 45o 4 x 45o 18.0 19.0 19.
INSTALLATION LISTED COMPONENTS FOR MOBILE HOME INSTALLATION The Regency Small and Large Freestanding pedestal units are approved for installation in a Mobile Home if one of the following pipe systems is used. U.S. Installation* METALBESTOS SSII Qty. Part # Description 1 6DS-VK Connector Kit 1 6TMH Shield/Support 1 6TAF-6 Flashing 1 6T-36 Chimney Length 1 6T-18 Chimney Length 1 6T-CT Rain Cap PRO-JET 3103 Qty.
INSTALLATION Small Stoves F1100S BRICK FLUE BAFFLE & SECONDARY AIR TUBE INSTALLATION The flue baffle system located in the upper area of the firebox is removable to make cleaning your chimney system easier. The brick baffles must be installed prior to your first fire. Smoke spillage and draft problems may occur if the baffles are improperly positioned. Check the position of the brick baffles on a regular basis as they can be dislodged if too much fuel is forced into the firebox.
INSTALLATION BRICK INSTALLATION Pedestal Ash Drawer Kit (850-100) Firebrick is included to extend the life of your stove and radiate heat more evenly. Check to see that all firebricks are in their correct positions and have not become misaligned during shipping. 1) Remove the bricks from the floor of the firebox.
INSTALLATION Blower/Fan (846-515) 1) Remove the two screws from the top of the fan housing. 2) Slide the fan up into the rear heat shield. 3) After aligning holes, secure the fan to the rear heat shield using the two screws removed earlier. Note: The connection cord should not be in contact with any hot surfaces.
OPERATING INSTRUCTIONS OPERATING INSTRUCTIONS good updraft in the flue to establish the fire. (Leaving the door slightly open will help your fire start more rapidly.) With your unit now correctly installed and safety inspected by your local authority, you are now ready to start a fire. Before establishing your first fire, it is important that you fully understand the operation of your draft control. CAUTION: Never leave unit unattended if door is left open.
OPERATING INSTRUCTIONS ASH DISPOSAL During constant use, ashes should be removed every few days. The Ash Drawer option features a convenient ash dump for easy removal of ash, refer to the "Modular Options" section. Bottom Shield (with Legs) Units: To remove the drawer, lift slightly and slide it out, and carry it away. 9) Do not connect this unit to a chimney flue serving another appliance.
MAINTENANCE MAINTENANCE It is very important to carefully maintain your fireplace stove, including burning seasoned wood and maintaining a clean stove and chimney system. Have the chimney cleaned before the burning season and as necessary during the season, as creosote deposits may build up rapidly. Moving parts of your stove require no lubrication. CREOSOTE When wood is burned slowly, it produces tar and other organic vapours, which when combined with moisture, form creosote.
PARTS LIST F1100 & F3100 STOVE MAIN ASSEMBLY Part # Description 1) 846-913 846-915 846-910 846-916 Door Assy-Sm/Med Gold F1100 (no glass) Door Assy-Sm/Med Black F1100 (no glass) Door Assy-Large Gold F3100 (no glass) Door Assy-Large Black F3100 (no glass) 3) 846-302 846-304 936-243 846-920 * 948-170/P 948-172/P 846-973 820-375 * 820-376 * 846-570 846-918 948-101 948-102 846-515 Glass - Replacement - Small/Medium F1100 Glass - Replacement - Large F3100 7/8" Adhesive Tape Gasket Glass Retainer Clips (8/
PARTS LIST S3100 STEP STOVE MAIN ASSEMBLY Part # 1) 3) 4) 5) 6) 7) 8) 9) 16) 17) 19) 20) 846-910 846-916 846-304 936-243 846-920 * 948-172/P 150-006 150-005 846-973 846-570 846-918 948-101 948-102 Description Door Assy-Large Gold S3100 (no glass) Door Assy-Large Black S3100 (no glass) Glass - Replacement - Large - S3100 7/8" Adhesive Tape Gasket Glass Retainer Clips (8/set) Screw - 1/4 - 20 x 3/8" Large Glass Retainer - S3100 Side Panel - Right - S3100 Side Panel - Left - S3100 Door Handle Assembly 7/8" D
PARTS LIST PEDESTAL, BOTTOM SHIELD & LEG OPTIONS Part # 48) Description 49) 50) 850-115 850-315 904-257 * Pedestal - Small Pedestal - Large Large Magnet Catch Blanking Plate - Pedestal 45) 46) 58) 59) 850-100 * * 942-110 820-249 Ashdrawer Kit - Pedestal Ashdrawer - Pedestal Ashdrawer Lid Assy Ash Plug Ash Plug Tool Handle 57) 850-121 850-321 * Bottom Shield - Small Bottom Shield - Large Blanking Plate - Btm Shield 55) 58) 59) 850-101 * 942-110 820-249 Ashdrawer Kit - Btm Shield Ashdrawer - Bott
PARTS LIST FIREBRICK Part # Description 70) 71) 72) 73) 74) 902-111 802-104 802-122 802-146 802-147 Brick - Regular Full Size: 1-1/4" x 4-1/2" x 9" Brick Partial: 1-1/4" x 4" x 9" Brick Partial: 1-1/4" x 2" x 4-1/2" Brick Partial: 1-1/4" x 1-3/4" x 9" Brick Partial: 1-1/4" x 4-1/2" x 3-1/2" 76) 77) 78) 79) 80) 802-152 802-145 802-149 802-153 802-154 Brick Partial: 1-1/4" x 2" x 9" Brick Partial: 1-1/4" x 3-1/4" x 9" Brick Partial: 1-1/4" x 4-1/2" x 3-1/4" Brick Partial: 1-1/4" x 4-1/2" x 2-1/4" Brick
NOTES 26 Regency Freestanding Woodstove
WARRANTY Regency Fireplace Products are designed with reliability and simplicity in mind. In addition, our internal Quality Assurance Team carefully inspects each unit thoroughly before it leaves our door. Regency Industries Ltd. is pleased to extend this limited lifetime warranty to the original purchaser of a Regency Product. This warranty is not transferable.
Regency fireplace products are designed with reliability and simplicity in mind. In addition, our internal Quality Assurance Team carefully inspects each unit thoroughly before it leaves our door. Fireplace Products International Ltd. is pleased to extend this Limited Lifetime Warranty to the original purchaser of a Regency Product. See the inside back cover for details. Register your Regency online at http://www.regency-fire.