
Instructions / Assembly

Any problems or questions call Regency Ofce Furniture at 1-866-816-9822
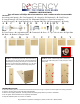
LWD6524- INSTRUCTIONS
You will need a Phillips Head screwdriver and a rubber mallet to assemble.
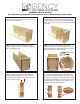
STEP 3 : Attach right side(V) to back(W) and
bottom(X) by inserting cam pins into locks. Do not
tighten locks until instructed.
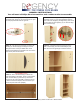
STEP 5 : Attach left side(U) to back(W), support
shelf(Y),bottom(X) and front runner(P) by inserting
cam locks and tightening.
STEP 7 : Insert 4 cam pins(G) into the top(T) and
connect to unit by standing the unit upright and
inserting and tightening the cam pins into the locks
on the back(W) and sides(U,V). The top overhang
should be facing forward.
STEP 4 : Attach support shelf(Y) to the back(W)
and right side(V) with cam locks facing the bottom.
Also attach front runner(P) to the bottom(X) and right
side(V). Then tighten all cam locks from this step and
from step 3.
STEP 6 : Using 4 small screws(K) attach each
glide(H) to the unit by using the screws to secure the
glide to the sides(U,V) so the adjusting control of the
glide ts in the holes in the bottom(X).
STEP 8 : Insert 4 adjustable shelf pins(E) evenly in
the holes you choose in the lower shelf area of the
unit and insert adjustable shelf(Q). Screw in 4 lock-
ing shelf pins(A) evenly into the upper shelf area and
lock in the xed shelf(R) by placing the shelf in place
and tightening the locks built into the bottom of the
shelf with a phillips head screwdriver.
V
W
X
V
W
X
Y
P
V
W
X
Y
P
U
E
A
adjusting control
R