TONO-PEN VET™ Tonometer User’s Guide Rx Only
Table of Contents Introduction ..................................... 4 Warnings and Cautions................ 6 Setup.................. 8 Calibration...................... 11 Taking a Measurement...................... 13 Interpreting the LCD........................ 16 Maintenance & Storage........................ 17 Troubleshooting........................ 19 Guidance and manufacturer’s declaration........... 20 Warranty........................
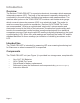
Introduction Overview The Reichert TONO-PEN VET is a precision electronic tonometer which measures intraocular pressure (IOP). The body of the instrument is specially designed to fit comfortably in the user’s hand, facilitating fast and accurate measurements. The stainless steel probe on the TONO-PEN VET contains a solid state strain gauge which converts intraocular pressure (IOP) to an electrical signal. The probe tip must be covered by a protective membrane. Reichert OCU-FILM® Tip Covers are recommended.
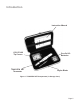
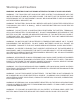
Introduction Instruction Manual OCU-FILM Tip Covers TONO-PEN VET Tonometer Ocu-Cel XL Batteries Stylus Blade Figure 1 TONO-PEN VET Components (in Storage Case) Page
Warnings and Cautions WARNING: AN INSTRUCTION THAT DRAWS ATTENTION TO RISK OF INJURY OR DEATH WARNING: THE TONO-PEN VET SHOULD BE USED IN STRICT ACCORDANCE WITH THE INSTRUCTIONS OUTLINED IN THIS USER’S GUIDE. THE SAFETY OF THE PATIENT AND THE PERFORMANCE OF THE INSTRUMENT CAN NOT BE GUARANTEED IF USED IN A MANNER NOT SPECIFIED BY REICHERT, INC. WARNING: THE BATTERY SHOULD ONLY BE REPLACED WITH THE BATTERY SPECIFIED IN THIS MANUAL (OCU-CEL™ XL Battery). USE OF ANOTHER BATTERY MAY CAUSE FIRE OR AN EXPLOSION.
Warnings and Cautions WARNING: NEVER ALLOW LIQUID LEAKING FROM THE BATTERY TO GET IN YOUR EYES OR MOUTH. BECAUSE THIS LIQUID COULD CAUSE SERIOUS PERSONAL INJURY, IF IT DOES COME IN CONTACT WITH YOUR EYES, FLUSH THEM IMMEDIATELY WITH PLENTY OF WATER AND CONSULT A PHYSICIAN. LIKEWISE, IF THE LIQUID GETS IN YOUR MOUTH, RINSE IMMEDIATELY WITH PLENTY OF WATER AND CONSULT A PHYSICIAN. CAUTION: AN INSTRUCTION THAT DRAWS ATTENTION TO THE RISK OF DAMAGE TO THE PRODUCT.
Setup Set Up Instructions To set up the TONO-PEN VET for operation, follow the instructions listed below: 1. . 3. 4. 5. 6. . 8. 9. Remove all protective packaging materials. Remove and discard the desiccant. Carefully remove the tonometer and accessories from the case. Check for missing items. Visually check the instrument and accessories for damage. Remove the Ocu-Film Tip Cover shipped with the TONO-PEN. Notify Reichert Customer Service immediately if any components are missing or damaged.
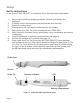
Setup Ocu-Film Tip Cover - Correct Ocu-Film Tip Cover - Too Loose Ocu-Film Tip Cover - Too Tight Figure 3 Ocu-Film Tip Cover Placement Battery Installation The TONO-PEN VET is supplied with four Ocu-Cel™ XL 3.0 volt lithium manganese dioxide batteries that need to be installed in the TONO-PEN VET. It is recommended that Reichert Ocu-Cel XL Batteries be used when the batteries need replacement. Note: The TONO-PEN VET unit will not function properly with mercury batteries. Installation Procedure 1. .
Setup - + + - Figure 4 Replacing Batteries Page 10
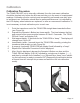
Calibration Calibration Procedure The TONO-PEN VET unit is internally calibrated, thus the instrument calibration should be checked only before the first use each day or in the event of unanticipated readings. Calibration must be routinely and successfully performed once daily prior to instrument use. Calibration should also be performed whenever it is indicated by the LCD display, when batteries are replaced, or after an unsuccessful calibration.
Calibration Unsuccessful Calibration If several consecutive attempts at checking the calibration are unsuccessful: Loosen or remove the Ocu-Film Tip Cover from the TONO-PEN VET probe tip and repeat the calibration check. If still unsuccessful: Spray the probe tip with compressed gas, and repeat the calibration check. If still unsuccessful: Replace the batteries and repeat the calibration check. Note: If “CAL” appears followed by a row of four dashes [- - - -], the unit did not go into calibration mode.
Taking a Measurement Instrument Preparation Prior to using the TONO-PEN VET for IOP measurement prepare the instrument according to the instructions below: 1. Allow the instrument to thermally stabilize at room temperature (72-82° F, 22 - 28° C) for approximately 30 minutes prior to use. . Remove the Ocu-Film Tip Cover from the probe. Visually inspect the tonometer’s probe tip for cracks, chips or other irregularities. If irregularities are present, contact Reichert. Do not use the instrument. 3.
Taking a Measurement To perform an IOP measurement: 1. Instruct the patient to look straight ahead at the fixation target with his/her eyes fully open. . Hold the TONO-PEN VET unit as you would a pencil. 3. Position yourself to facilitate viewing of the probe tip and patient’s cornea where contact will be made. For normal corneas, central corneal contact is recommended. 4.
Taking a Measurement Note: Anytime the operator’s button is depressed twice within 1.5 seconds, (which may be caused by operator’s inadvertent pressure on the button) the software will interpret this as a demand for calibration. Then a sustained display of [CAL] will be seen which initiates the calibration sequence. The calibration sequence must be successfully completed before further measurements can be accomplished. 10. 11. 1 .
Interpreting the LCD The number display represents IOP in millimeters of mercury (mmHg.) A number with a single horizontal bar displayed at the bottom of the LCD is an average of the valid measurements. A number without the single bar is a single measurement of IOP. (See Figure 7). The display of one of four horizontal bars located along the lower border of the LCD block indicates the statistical reliability of the averaged measurement.
Maintenance & Storage Instrument Storage 1. . 3. Cover the probe tip with an Ocu-Film Tip Cover for protection. If the TONO-PEN VET unit is not to be used until a subsequent day, the instrument and accessories should be replaced in the storage case provided. If the TONO-PEN VET unit is not to be used for an extended period of time, remove the batteries from the instrument.
Maintenance & Storage Replace the batteries using the procedure described on page 9. If the instrument is not to be operated for an extended period of time, remove both batteries. This will avoid possible damage to the instrument due to battery leakage Attachment Screw The attachment screw, located on the underside of the instrument, is used to protect the sensitive electronics against intrusion and should be removed only by the manufacturer. Note: Removal of the Attachment Screw will void the warranty.
Troubleshooting Overview This section provides a guide for troubleshooting some basic TONO-PEN VET operational problems. If a problem persists after using this guide contact Reichert technical service.
Guidance & Manufacturer’s Declaration Guidance and manufacturer’s declaration – electromagnetic immunity - Part I The TONO-PEN VET is intended for use in the electromagnetic environment specified below. The customer or the user of the TONO-PEN VET should assure that it is used in such an environment.
Guidance & Manufacturer’s Declaration Recommended separation distances between portable and mobile RF communications equipment and the TONO-PEN The TONO-PEN VET is intended for use in the electromagnetic environment in which radiated RF disturbances are controlled.
Guidance & Manufacturer’s Declaration Guidance and manufacturer’s declaration – electromagnetic immunity - Part II The TONO-PEN VET is intended for use in the electromagnetic environment specified below. The customer or the user of the TONO-PEN VETshould assure that it is used in such an environment.