
Installation Guide

INSTALLATION INSTRUCTIONS
for Interior Door Slabs
2
1
2
3
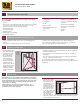
REMOVE PACKAGING AND INSPECT SLAB
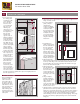
INSPECT EXISTING JAMB
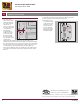
INSTALL SLAB
NEEDED MATERIALS AND TOOLS
• Existing jamb should be
3/16" wider than the
slab and at least 3/8"
taller. There should
be enough distance
between the jamb
edge and the stop
to accommodate the
thickness of the slab.
• Verify the existing
jamb is square. The (A)
and (B) measurements
should be the same.
Maximum allowable
deviation from square
is 1/4".
• Verify the existing jamb is level and plumb (C) and (D). The maximum
allowable deviation is 1/8".
• The opening oor or sill must be at and level (not be crowned or
sagged) (D).
• The face of the rough opening must be in a single plane (E) with less
than 1/8" twist from corner to corner.
Do not install the slab unless the jamb meets the above conditions.
Professional assistance may be necessary to correct any problems before
installation.
• Remove shipping materials such as corner covers, shipping blocks
or pads.
• Inspect slab for cosmetic damage, squareness and warp
• Verify it is the correct product (size, color, design, handing etc.)
If any of the above conditions represent a concern, do not install the
slab. Contact the supplier for recommendations.
NEEDED MATERIALS
Note! Follow all material manufacturers’ instructions for proper use
and compatibility.
• Hinges
• Wood screws: 3/4" minimum through hinges into the slab and frame;
For solid core, custom carved and stile and rail doors, 1 - 2 1/2"
through each of the top two hinges into framing
• Wood putty/spackle
• Lockset and template
• Finishing supplies
• Masking tape (for trimming)
• 150-280 grit sandpaper
NEEDED TOOLS
• Safety glasses
• Screwdrivers
• Pencil
• Chisel or router
• Drill with bits and hole saws
• Tape measure
• Level
• Finishing tools (paint brushes,
roller, spray equipment, masking
tape etc.)
• Circular saw (for trimming)
• Wood plane (for trimming or
beveling)
• Hammer
• Punch
IMPORTANT: The door slab should be nished (painted or stained) on
all six sides with an equal number of coats after all routing, trimming,
boring and touch-up has been completed and it has been properly t
in the jamb. Note! If hinges are already installed on the slab, do not
remove hinges for nishing.
Failure to nish on all six sides and install into a square, level
and plumb condition could result in denial of warranty claims for
operational or performance problems.
PREPARE JAMBS AND SLAB
1. Measure the existing
frame (not the stop)
from oor to head
and from side to side
in several places to
verify the slab will t.
The frame should be
3/16" wider than the
slab (1/16" clearance
on the hinge jamb and
1/8" clearance on the
strike jamb) and tall
enough (usually
1/4" - 1/2" taller) to
allow 1/8" clearance on the head jamb and allow the slab to operate
without rubbing on any ooring.
A
B
D
C
E
Verify
Square,
Level, &
Plumb
Frame
Stop