
Installation Guide


Ask about Lowe’s installation services.
Learn more at lowes.com/installation.
(03/14)
JII103A-Lowes
©2014 Lowe’s Companies, Inc. All rights reserved. Lowe’s, the gable design and
Never Stop Improving are trademarks of LF, LLC. All are used with permission.
INSTALL DOOR - CONTINUED
3
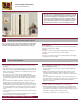
INSTALLATION INSTRUCTIONS
for Interior Bifold Doors
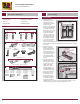
Adjusting
wheel
Back side
of door
Back side
of door
Knob
AlignerAligner
To adjust horizontally:
6. At the top, loosen
the screw in the top
pivot bracket and
move toward or away
from the jamb until
there is 1/4" clearance.
Retighten.
7. At the bottom, lift
assembly and move the
adjusting wheel toward
or away from the jamb
until doors are parallel
with jamb, then lower into bracket.
To adjust vertically:
8. Lift assembly slightly
until the adjustment
wheel clears the slot
in the lower bracket.
Rotate the adjustment
wheel to the left to raise
doors or to the right to
lower them. Be sure the
teeth lock rmly into
bracket when nished.
9. Snap the snugger into
the lead door end of
the track, or between
guides in a four door
installation.
10. For four door
congurations, fasten
an aligner with the #8 x
1/2" at head screws as
shown on the back side
of each lead door.
11. To install the door
knob, drill a hole,
slightly smaller than the
provided screw, in the
center of the middle
rail of the lead door(s) and attach knob.
12. If not already nished, nish all 6 sides of the doors with an even
number of coats on all surfaces.
13. Install any trim around the opening as desired.