
Installation Guide


1. TOOLS REQUIRED FOR INSTALLATION:
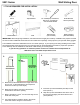
Pencil Tape Measure No. 2 Phillips tip screwdriver,
Drill w/ No. 2 Phillips tip
& 3/16” Metal Drill Bit
Roller Bracket
Wrench(Included)
LevelStud Finder
IMPORTANT: Before beginning installation, read instructions thoroughly and carefully / Installation may require the need
for anchors and/or additional screws that are not included in this package. Always protect your eyes with safety goggles.
The installation instructions listed below are for non-cased openings. If your opening has casing /molding around it then
the casing/molding should be removed or a mounting board can be placed behind the track for proper door operation.
Track assembly must be installed into wall studs / solid blocking or mounting board.
If you have any questions or comments please contact our Customer Service Department at:
1-888-244-1734 or visit www.chaparraldoors.com
Wall Anchors
(Not Included)
Safety Goggles
(Recommended)
9851 Series
Wall Sliding Door
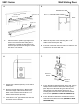
A. Measure from the finished floor the height of the door
plus 3-1/16. (If the finished floor has carpet then
measure from the top of the carpet.)
B. Mark the line location and using a level draw a
horizontal line across the opening.
C. Mark a vertical line 1-5/16 over from the edge on the
strike side of the jamb.
D. Use a stud finder to locate the studs in the wall an
mark their location along the horizontal line.
.
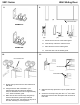
A. Insert the top roller assemblies (item #5) into the
track (item # 1).
B. Keep the top roller assemblies close to the end of
the track until engaging the rollers with the door
panel (item #2).
3.
2.
DOOR HEIGHT
MEASUREMENT
+3-1/16”
DOOR HEIGHT
MEASUREMENT
PLUS 3-1/16”
1-5/16”