
Use and Care & Installation Guide

6 • Residen al Electric Water Heater Use and Care Guide
GETTING STARTED
GETTING STARTED
1
Review all of the instruc ons
before you begin work.
If you aren’t sure that you
can safely and properly do this work
yourself, call a local plumbing supplies
store to arrange for Professional
Installa on (you may also call a
qualifi ed person of your choice, such
as a licensed plumber or electrician, to
have the work done). Improper
installa on can damage the water
heater, your home and other property,
and can present risks of serious injury
or death.
2
Check with your local and
state authori es for any local
or state codes that apply to
your area. In the absence of local and
state codes, follow Na onal Fire
Protec on Associa on (NFPA-70) and
the current edi ons of the Na onal
Electric Code (NEC) and the Interna-
onal Plumbing Code (IPC). The
instruc ons in this manual comply with
na onal codes, but the installer is
responsible for complying with local
codes.
Massachuse s code requires this wa-
ter heater to be installed in accordance
with Massachuse s 248-CMR 2.00 and
248-CMR 5.00: State Plumbing Code.
Other local and state authori es may
have similar requirements or other
codes applicable to the installa on of
this water heater.
3
Before you start, be sure you
have, and know how to use, the
following tools and supplies:
• Plumbing tools and supplies appropriate
for the type of water pipes in your home
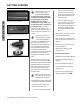
• Threaded connectors (fi gure 1) for
the cold and hot water pipes
• For homes plumbed with plas c
pipe, use threaded connectors
suitable for the specifi c type of
plas c pipe used: CPVC and PEX
(cross-linked polyethylene). Do
not use PVC pipe.
• For homes with copper pipes,
you may purchase connector kits
with compression fi ngs that
don’t require soldering (fi gure 1).
Compression fi ngs are easier
to install than soldering copper
pipes.
• Tefl on® tape or pipe joint compound
approved for potable water
• Tools to make the electrical connec-
ons (for example, screwdrivers, wire
strippers)
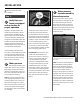
• Non-Contact circuit tester to check
for power (fi gure 2)
• Water Pressure Gauge (see next
page, fi gure 4)
Recommended Accessories:
• Suitable drain pan (see page 8, fi gure 6)
• Automa c leak detec on and shut-
off device
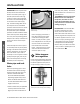
• Pressure Reducing Valve (fi gure 3)
• Thermal Expansion Tank (see next
page, fi gure 5)
• Point-of-use Thermosta c Mixing
Valves (see page 8, fi gure 7) ■
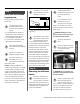
Figure 1 - Flexible connectors use compression
fi ngs and do not require soldering.
Figure 2 - Use a non-contact circuit tester to
insure that the power is off before you work on
a circuit.
Figure 3 - Install a Pressure Reducing Valve set to
50 to 60 PSI.