
Instructions / Assembly

3 | P a g e
Handy Tips
1. Choose the location carefully to ensure optimal sun exposure through the day. Check for any
shade on the roof created by trees, chimney, or satellite dish.
2. Measure twice and cut once. Take a minute to create a template that will create the correct
dimensions for your cut.
3. Center the Solar Attic Fan approximately 2 feet away from the roof ridge to facilitate good
circulation. NOTE: using Remington Solar attic fans with ridge vents are fine. We
recommend putting your fan 5 feet down from your ridge vent. Also, close any vent within
8-10 feet of your solar fan. (Cardboard underneath is an easy solution)
4. Before you begin, gently clean any oil residue from flashing.
5. Use a high quality silicone sealant to ensure a good waterproof seal
INSTALLATION
Step1
Choose a location for your Remington Solar Attic Fan on the south of the roof, considering potential problems
like tree, chimney etc. They may shade the solar panel during certain times of the day, reducing run time.
If a southern or western exposure is not possible, the fan can be installed on any other exposure and the solar
panel can be adjusted to capture maximum sunlight. Note: The Solar Attic Fan must be installed between roof
rafters. However, if you want to retrofit an existing turbine (Whirlybird) or electric fan, you may do so. Just
enlarge the hole if necessary, being careful not to cut through a rafter.
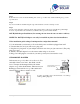
Step 2
Using either a string or template, create a 14 1/2 inch diameter circle onto the roof shingles.
Note: Roof rafters are generally 16” or 24” on center. (Stick a nail from underneath out to the roof,
then find the nail, so you can see the center.)
Step 3
The Solar Attic Fan must be installed between roof rafters. Do not cut through any framing member. With a
reciprocating saw, cut the diameter of the hole.
Step 4
Remove any roofing nails in the area where the base will be slid under the shingles.
Step 5
Lay a bead of Silicone Sealant around the base of the flashing.
Step 6
Slide the flashing underneath the tar paper and shingles. Adjust the flashing up until the shingles come into
contact with the raised portion of the flashing. The bottom side of the flashing will be on top of the shingles.