
Instructions / Assembly

4 | P a g e
Step 7
Position the four screws around the flashing. Two screws go on either side, and the remaining two go on the
top and bottom.
Step 8
Lay a bead of Silicone Sealant along the edge of the shaft base to insure a waterproof seal
Step 9
Use the screws and nuts to fasten the angle of the panel (South or south west is typically the optimal angle,
however, we prefer flat to the earth since you will need more power in summer months.
110V Hybrid Adapter Installation (For running the fan when the sun sets and it’s still hot)
NOTE: The 110V Hybrid Adapter can easily be installed any time after fan installation.
Video installation guide at https://remingtonsolar.com/product-manuals/
1. Look underneath your fan and you’ll see the thick power cord that is plugged into itself.
2. Unscrew that wire, and you will see two plug ends
3. Plug the two “plug ends” of your adapter into these new wires you just unscrewed. (They only
plug in one way)
4. Attach your 110V adapter box to the nearest rafter using wood screws
5. Plug your 110V plug into an outlet in your attic (you may need an extension cord)
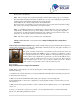
CURB MOUNT ADAPTER
Curb mounts are good for flat roofs or tile roofs. You
can build a frame out of 2x4’s, then flash over the
2x4’s. Then put the Remington Solar curb mount
adapter on top of the flashed frame. Then mount your
Remington Solar attic fan on top of the curb mount
adapter. Then you have a waterproof seal.
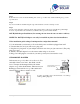
You may not simply remove the thermostat or it will stop
running. (Wiring diagram)