Z-URCTM 550EU (Z-Wave Enabled Universal Remote Control) 1 ZXT-300EU (Z-Wave-to-AV IR Extender)
Table of Contents Introduction .................................................... 4 Glossary .......................................................... 5 Z-URCTM 550EU Operations ............................. 6 Configurations ................................................. 7 Description of Setup Keys.................................. 8 Group Control .................................................. 9 XpressZetupTM (Group Setup) ........................... 9 Group Operation .............................
Add/Delete Devices .......................................... 32 Add/Remove Device to/from a Simple AV channel 34 IR Code Setup ................................................. 36 IR Port Mapping ............................................... 37 IR Output Power .............................................. 38 AV Command Operation .................................... 40 IR Code Learning.............................................. 40 IR Code Learning on ZXT-300EU ........................
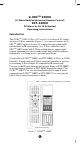
Z-URCTM 550EU (Z-Wave Enabled Universal Remote Control) ZXT-300EU (Z-Wave-to-AV IR Extender) Operating Instructions Introduction The Z-URCTM 550EU Z-Wave AV Controller is a universal AV remote and also a Z-Wave controller (Figure 1). As a universal remote, the ZURCTM 550EU replaces all your AV remotes through its built-in IR code database or IR code learning.
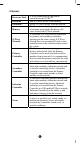
Glossary Device or Node Inclusion Exclusion Remove Z-Wave Network Primary Controller Secondary Controller Inclusion Controller Scene Z-Wave enabled device that can be controlled by the Z-URCTM. Add a Z-Wave device to the network. Delete a Z-Wave device from the network. To take a device out of a group, scene or association group while that device still exists in the same Z-Wave network. A collection of Z-Wave devices controlled by primary and secondary controllers operating on the same system.
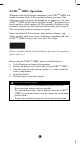
Z-URCTM 550EU Operations Welcome to the world of home automation, your Z-URCTM 550EU will be able to control all the Z-Wave products around your house. The following section will guide you through the set up processes for your Z-URCTM 550EU. Firstly there is the XpressZetupTM for beginner users that do not have a large amount of Z-Wave products. Following is the advanced set up that you will need to become familiar with as your ZWave network of products continues to expand.
Configurations Please open the configuration compartment then you can see the ZURCTM 550EU setup keys (Figure 2).
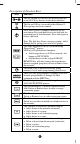
Description of Function Keys Keys Functions The All-On and All-Off keys are used for turns on or off all Z-Wave devices in the device database. The On and Off keys are used for the different ZWave groups and scenes control. Press once to access secondary functions for the next button. Press and hold to activate shift lock for permanent use of shift functions. Press shift again to release shift lock. Note: The shift key allows you access group's shift 1 through shift 8 giving you a total of 16 groups.
This Remove key is used in the Advance Setup to: • Remove a device from a group; • Remove a device from an association group; • Remove a device from a scene. Group Control The Z-URCTM 550EU enables you to control single or multiple ZWave devices with the press of a button. For example, you can group all your bedroom lights together so that all of them will turn on with the press of a button. You can control up to 16 groups (Group On/Off) with your Z-URCTM 550EU.
Note 2: XpressZetupTM cannot support “Multi-Channel Device”, please refer to [Adding Device to the Network] and [Adding Device/End-point to a group] for normal setup procedure.
Note 2: This process will only remove the group devices from its assigned group but will not exclude it from the network. Group Operation After adding devices to your Z-URCTM 550EU using XpressZetupTM, you can turn the device on/off or up/down via the corresponding group control keys in front (Figure 3). • • • • For on/off switches, press key to turn on the devices and key to turn them off.
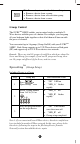
Scene Control Z-Wave Scenes are used for setting up multiple devices in the same way as a group but in addition to groups, scenes also control dimmer lights that you can set to different levels depending on the situation. For example you can have the scene set to low brightness for watching a movie or going to bed or alternatively set the lights brighter when reading or working. After the scene has been programmed it will work with the corresponding ON OFF key on the top side of the remote.
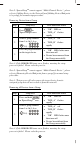
• “OK" LED flashes once then turns off Press • “LED_B" off 6 • The current status of the device will be learned and saved to a scene successfully Note 1: Your target device must be included in the network before this setup procedure, please refer to [Adding Device to the Network] section.
• “LED_A" flashes slowly Select a scene number from 1 to 16 (1-8 or • “OK" LED flashes once then turns off • “LED_A" off 3 1-8) • Scene deleted from the scene successfully Note 1: This process will only remove the scene devices/EPs from its assigned scene but will not exclude it from the network. Scene Operation After the scene setup is done, you can trigger the desired scene via scene control keys in front panel of the Z-URCTM 550EU.
Press the program button on the target device • “OK" LED flashes once then turns off • “LED_B" off 3 • Device inclusion completed Note 1: This step can be skipped if the device is already included in the network.
Note 1: Your target device must be included in the network before this setup procedure, please refer to [Adding Device to the Network] section.
Assign Association for Two Devices The Z-URCTM 550EU can be used to assign one device to automatically interact directly with another device. For example you can assign a door sensor (primary node) to turn on the light switch (secondary node) when the door is opened.
Removing Device/End-point from an Association Group Step 1 Setup Key Press Setup LED Indication Status in Advance • “OK" LED flashes once and stays on Press 2 • “LED_A" flashes slowly Select a group number from 1 to 16 (1-8 or • “OK" LED flashes once and stays on • “LED_A" off 3 1-8) 4 • The “OK" light turns on • “LED_B" flashes slowly Press the program/EP button on the secondary device (e.g. light switch) Press the program/EP button on the primary device (e.g.
Deleting an Association Group Step 1 Setup Key Press Setup LED Indication Status in Advance • “OK" LED flashes once and stays on Press 2 • “LED_A" flashes slowly Select a group number from 1 to 16 (1-8 or 3 1-8) 4 • The “OK" light turns on Press the program/EP button on the primary device (e.g.
Add/Delete All-On/All- Off functions If desired, specific devices can be setup to ignore the All-On and AllOff commands. The four possible responses are: • It will respond to All-On and the All-Off commands (default). • It will not respond to All-On and All-Off commands. • It will respond to the All-Off command but will not respond to the All-On command.
Adding Devices to All Control Step 1 Setup Key Press Setup LED Indication Status in Advance Press and hold the key for 2 seconds which you want to add to the front • The “OK" light turns on • “LED_B" flashes slowly top side Example: i) Press key to add to all-on function, 2 ii) Press key to add to all-off function, iii) Press and hold keys simultaneously for 2 seconds to add to both all-on and all-off function.
Change Device Configuration This function is used to modify the parameter of the Z-Wave device via the configuration command class. Look up the Parameter No. and Parameter Value of the target device from the device user manual before you start the below process.
Advanced Z-Wave Network Setups Copying All Network and Device Information to a Secondary Controller You can add a secondary controller to your network and copy all of your Z-URCTM 550EU’s network and device information to the secondary controller by following the steps below.
Copying Network Information to a Secondary Controller You can add a secondary controller to your network and copy all of your primary controller’s network information to the secondary controller by following the steps below.
Transferring All Network and Device Information to a New Primary Controller (Primary Shift) You can transfer all of your controller information to another remote so that it will become the new primary remote. This is done by following the steps below.
Transferring Only Network Information to a New Primary Controller (Primary Shift) You can just transfer network information to another remote so that it will become the new primary remote. This is done by following the steps below.
Replicating All Network and Device Information from a Primary Controller to Your Z-URCTM 550EU (“Learning Mode") Your Z-URCTM 550EU can: • Copy the settings from another Z-Wave controller • Be included into existing Z-Wave network and become a new primary or secondary remote • Be excluded from the Z-Wave network This is done by following the steps below.
Listening Mode There are multiple usages by entering this mode: • Version command class: To get application software version, the Z-Wave protocol version and the supported Z-Wave command version of this controller. • Manufacturer command class: To get the manufacture ID, product type ID and the product ID of this controller. • Scene configuration command class: Home gateway can bundle a scene ID to a group ID using this command.
Resetting Your Network You can reset your Z-URCTM 550EU to clear all Z-Wave network and device information by the following steps: Step 1 Setup Key LED Indication Status • “OK" LED on Press & hold for 3 seconds Type “8761" on the setup number keypad • “OK" LED flashes once for each number input • “OK" LED on after entering the 4-digit 2 • “OK" LED blinking then turns off • Reset completed Note 1: After reset the remote, each device should individually perform in the section on “Delete device from the
ZXT-300EU Operations Before using the ZXT-300EU, please read the [INSTALLATION] if it is needed to mount the ZXT-300EU to a wall. Power up the ZXT300EU by the supplied AC/DC adaptor. L CAUTION − Be sure to always use the supplied AC/DC adaptor. − Do not try to power up other device with the supplied AC/DC adaptor. This could damage the AC/DC adaptor or the connected device.
ZXT-300EU Information Change Z-Wave-to-IR Channel (EP) on ZXT-300EU Step LED Indication Status on ZXT-300EU Setup Key Press and hold PROG button on the ZXT-300EU for 3seconds to start switching the EP (1->2->3->4->5->6->1->2..
Add/Delete Devices Adding Device to the Network Step Setup Key LED Indication Status on Z-URCTM 550EU LED Indication Status on ZXT-300EU • LED flashes once then keep on 1 Make sure ZXT-300EU switched to Channel 1 (EP1) • Back “OK" LED and front “OK" LED turns on - 2 Press in Advance Setup area 3 Press • “LED_B" flashes slowly - Press the PROG button on ZXT300EU 4 - • Back “OK" LED and front “OK" LED flashing then turns off • “LED_B" off • LED flashes twice then keep on • Device inclusion c
Deleting Device from the Network Step Setup Key LED Indication Status on Z-URCTM 550EU LED Indication Status on ZXT-300EU • LED flashes once then keep on 1 Make sure ZXT-300EU switched to Channel 1 (EP1) • Back “OK" LED and front “OK" LED turns on - 2 Press in Advance Setup area 3 Press • “LED_B" flashes slowly - Press the PROG button on the target device 4 - • Back “OK" LED and front “OK" LED flashing then turns off • “LED_B" off • LED flashes twice then keep on • Device exclusion complet
Add/Remove Device to/from a Simple AV channel There are 6 Simple AV Channels in ZXT-300EU, user can assign them to any of the 8 device buttons on Z-URCTM 550EU: “TV”, “DVD”, “STB/CBL”, “AUX”, “Shift + TV”, “Shift + DVD”, “Shift + STB/CBL”, “Shift + AUX”. L Important − Simple AV Channel is a Z-Wave virtual channel and it is not related to IR Port output. User can use the IR Port Mapping function to map the IR port output to Simple AC Channel/AV device.
Adding Device to a Simple AV channel Step Setup Key LED Indication Status on TM Z-URC 1 Switch ZXT300EU to your preferred EP no.
2 Press in Advance Setup area Select a Simple AV Channel by press device key such as 3 • Back “OK" LED and front “OK" LED turns on - • Back “OK" LED and front “OK" LED flashes once and stays on - • “LED_B" flashes slowly 4 Press the PROG button on the ZXT300EU (Now EP1 was ACK to TV device and remove a Simple AV Channel) • Back “OK" LED and front “OK" LED flashing then turns off • LED flashes twice then keep on • Setup completed • “LED_B" off • Setup completed Note 1: Error LED in front or back
TV. (enter “0", “0",“0", “1" at the front if it’s show 0001) 4 Press the PROG button on ZXT300EU (The code no. has been assigned to the EP1 as it is ACK by EP1) on for each key press • Front “OK" LED flashing then turns off • LED flashes twice then keep on • Entering device code successful • Entering device code successful Note 1: Error LED in front or back on Z-URCTM 550EU or ZXT300EU Red LED flashes 6 times means that the setup process is failed. Please redo the process again.
which you want to transmit the IR signal 6 7 Press Press the PROG button on ZXT300EU (The IR port number has been assigned to the EP1 as it is ACK by EP1) on for each key press • Front “OK" LED flashes once and stays on - • Front “OK" LED flashing then turns off • LED flashes 2 times then keep on • Set IR Port output successful • Set IR Port output successful Note 1: Error LED in front or back on Z-URCTM 550EU or ZXT300EU Red LED flashes 6 times means that the setup process is failed.
4 5 Press Set IR output power level by entering “0" or “1" in the front • Front “OK" LED flashes once and stays on - • Front “OK" LED flashes once and stays on for each key press - • Front “OK" LED flashes once and stays on - “0" low power mode “1" high power mode (default is in high power mode) 6 7 Press Press the PROG button on ZXT300EU (The IR output power has been assigned to the EP1 as it is ACK by EP1) • Front “OK" LED flashing then turns off • LED flashes twice then keep on • Set IR
AV Command Operation (Z-Wave Simple AV command class) After added ZXT-300EU to Z-URCTM 550EU network, add device to Simple AV channel and Selecting an IR Device Code in ZXT-300EU. You can use the function key on Z-URCTM 550EU to control each device that you have been set. • Press a desired device key (e.g. ). • Press a desired key which you want to transmit the command. • Z-URCTM 550EU: Front “OK" LED turns on then off when the key is released.
once which you want to learn the command once and stays on - • LED flashes once then keep on - - 7 Place the ZXT300EU and your original remote on a flat surface, aimed at each other 1-3 inches apart • Front “OK" LED flashing then turns on • LED flashes twice then keep on 8 Press and keep holding the key on your original equipment remote which you want to learn for a few seconds • Learn a code successful • Learn a code successful 9 Repeat step 5 to 8 to learn other keys.
IR Code Learning on Z-URCTM 550EU (Learn an IR control code from the original remote control to Z-URCTM 550EU then download to ZXT-300EU) Step LED Indication Status on Setup Key Z-URCTM 550EU 1 2 - • LED flashes once then keep on • Back “OK" LED and front “OK" LED turns on - • Front “OK" LED flashes once and stays on - • Front “OK" LED flashes once and stays on for each key press - • Front “OK" LED flashes once and stays on - Press a desired key on Z-URCTM 550EU once which you want to learn
a flat surface, aimed at each other 1-3 inches apart 9 10 Press and keep holding the key on your original equipment remote which you want to learn for a few seconds • Front “OK" LED flashes 2 times then keep on • Learn a code successful Repeat step 6 to 9 for next key learning Press any device key to exit the learn mode - • LED flashes twice then keep on • Learn a code successful - • All LEDs off - 11 (e.g.
to your AV device name) 3 Press in Advance Setup Press any device 4 key (e.g.
INSTALLATION MOUNTING THE ZXT-300EU TO A WALL MOUNTING LOCATION PRECAUTIONS • Before mounting, check the material and structure of the mounting location. If the location does not have the proper material or structure, the ZXT-300EU can fall and cause an injury. • Use commercial items that best match the wall structure and material for the screws and other fixtures. • Do not mount near a kitchen counter, humidifier, or other location in which it can be exposed to smoke or steam.
adjusting the antenna direction before mounting the ZXT300EU. Note 2: No screws are provided for mounting to a wall. Note 3: Before mounting to a wall, be sure to fully read the precautions. 1. Obtain two screws suitable for the wall strength and material. The screw size is shown in the figure below. 2. The positional relationship between the ZXT-300EU key holes and the screw mounting positions are shown in the figure below.
WIRELESS INFORMATION Wireless range: This device has an open air line of sight transmission distance of 100 feet which complies with the Z-Wave standards. Performance can vary depending on the amount of objects in between Z-Wave devices such as walls and furniture. Every Z-Wave device set up in your house will act as a signal repeater allowing devices to talk to each other and find alternate routes in the case of a reception dead spot. Radio frequency limitations: 1. Each wall or object (i.e.
AUDIO/VIDEO SETUP AND OPERATION In addition to Z-Wave device and scene control, your Z-URCTM 550EU is also a universal remote which enables you to control all your audio/video systems around your house. Audio/Video Control Keys Figure 7 Audio/Video Control Keys of the Z-URCTM 550EU Note: The audio/video control of the Z-URCTM 550EU can be done via infrared or Z-Wave.
Description of Audio/Video Control Keys The Z-URCTM 550EU operates up to 8 AV equipments which are accessed by using the SHIFT key and TV or DVD and so on. Note: The SHIFT key is used when operating both the AV and Z-Wave equipments Press once to access secondary function for the next button. Press and hold to activate shift lock for permanent use of secondary functions.
Return, Cancel or Exit Selects the Electronic Program Guide while in SAT/CBL mode also INFO when in shift mode Mute the audio Scrolls through AV modes while in TV mode Skip Backwards also Subtitle when in shift mode Skip Forwards also Aspect Ratio Control when in shift mode Stop also Teletext On when in shift mode Record also Picture-in-Picture toggle when in shift mode Rewind also Teletext Mix when in shift mode Play also Teletext Off when in shift mode Pause also Teletext Hold / STOP when in shift mode Fa
Green button when in SAT/CBL and TV modes also disc menu for DVD when in shift mode Yellow button when in SAT/CBL and TV modes also zoom when in shift mode Blue Button when in SAT/CBL and TV modes -/-- also LAST in shift mode to return to the previous channel Favorites channel also ENTER when in shift mode AV Equipment Selection by Entering Device Code You may setup the Z-URCTM 550EU by following the code entering instructions: 1.
Suggestions: • If you cannot find a correct Device Code for your equipment, refer to AV Equipment Selection by Searching through the Library. • For future reference you are recommended to take note of your Devices codes in the space provided in the manual after setting up the Z-URCTM 550EU correctly. AV Equipment Selection by Searching through the Library If you cannot identify a correct Device Code for your equipment from the Device Code list, you may search for the code in the library: 1.
L IMPORTANT − If the power on/off function of your device is not infra-red controlled, you need to follow steps 2 to 6 above and start searching. − Press and another function key alternately until your device responds to the expected function, then press the same Device Mode Key (e.g. TV) to lock in the code. e.g. − Press & alternately, or ; Press & alternately. Notes: − TV, SAT/CBL, DVD, and other device codes can be searched for and locked into any device modes.
5 6 7 8 Press a desired key once and release on the Z-URCTM 550EU which you want to learn the command. The green indicator will flash once then stay lit. Press and keep holding the key on your original equipment remote which you want to learn for a few seconds. When the green indicator light flashes twice and stays lit continuously, the command has been learned successfully and you can release the key on your original equipment remote.
Punch Through Punch Through Channel Punch through channel allows you to operate channel up and down without having to switch the device modes repeatedly even when your Z-URCTM 550EU is in other operating modes. To activate the punch through channel setting: 1. Press desired Device Mode Key (e.g. TV). 2. Press and Hold "CH+" key. 3. While still holding the “CH+" key press desired Device Mode Key (e.g. SAT). 4.
Macro Power Macro Power allows you to turn two of your A/V equipment on/off simultaneously. To activate the macro power setting: 1. Press desired Device Mode Key (e.g. TV). 2. 3. Press and Hold key. Press desired Device Mode Key (e.g. SAT). 4. Release activated). (the green indicator flashes once if the setting is To deactivate the macro power setting: 1. Press desired Device Mode Key (e.g. TV). 2. 3. Press and Hold key. Press desired Device Mode Key (e.g. SAT). 4. Release deactivated).
Restore Factory Settings 1 2 Press and hold "CH+" and "VOL-" keys on the remote simultaneously for 3 seconds until you the indicator lights up and stays lit. Enter the reset code "9", "9", "9", "9". The indicator light goes out immediately. All settings are now restored to the factory default setting. MAINTENANCE 1 2 3 4 5 Do not expose your Z-URCTM to dust, strong sunlight, humidity, high temperatures or mechanical shocks. Do not use old and new batteries together as old batteries tend to leak.
also being a standard universal remote that can control up to 8 AV equipments. Your Z-URCTM truly turns your living room into your whole houses control station. Q What is multi-channel device? A The multi-channel command class used to control one or more end points in a given device that supports this command class. There are several kinds of multi-channel products in the market such as Z-Wave ExtenderTM, Z-Wave wall switch / dimmer and power strip. It is able to control the end-point individually.
Q A Why do I need a different module for outdoor lighting? The outdoor module is designed to withstand various weather conditions including heat, rain and snow. Q Can I use 2 or more Z-URCTM controllers in my house at one time? You can use multiple Z-URCTM around your house by assigning one remote to be the primary remote and have an additional secondary controller.
AV Control Frequently Asked Questions Q My Z-URCTM does not work at all! A Check your A/V device, if the device's main switch is turned off, your Z-URCTM cannot operate your device. A Check whether your batteries are inserted properly and are in the correct +/- position. A Check whether you have pressed the corresponding device mode key for your device. A If the batteries are low, replace the batteries.
TECHNICAL SPECIFICATIONS Model No. BW8332 V1 (Z-URCTM 550EU) RF Frequency 868.42MHz (EU) IR Frequency Up to 455kHz IR Learning Max 100 commands Max. Range up to 100ft outdoor line of sight, in unobstructed environment Power AAA x 3pcs Temperature operation: 0~40℃ storage: -20~60℃ Humidity 10~85%, non-condensing Dimension (LxWxH) 240mm x 60mm x 29mm Weight (ex. Batteries) 150g Model No. BW8370EU (ZXT-300EU) RF Frequency 868.
Z-URCTM 550EU Z-Wave device type Basic Device Class: BASIC_TYPE_CONTROLLER Generic Device Class: GENERIC_TYPE_GENERIC_CONTROLLER Specific Device Class: SPECIFIC_TYPE_PORTABLE_SCENE_CONTROLLER Z-Wave Command Class Controlled Supported COMMAND_CLASS_MULTI_CHANNEL_V2 YES NO COMMAND_CLASS_MULTI_CHANNEL_ASSOCIATION_V2 YES YES COMMAND_CLASS_SIMPLE_AV_CONTROL YES NO COMMAND_CLASS_SWITCH_ALL YES NO COMMAND_CLASS_SWITCH_MULTILEVEL YES NO COMMAND_CLASS_SCENE_CONTROLLER_CONF NO YES COMMAND_CLASS_S
COMMAND_CLASS_POWERLEVEL NO YES COMMAND_CLASS_MULTI_CHANNEL_V2 NO YES You can record down your device code under the below table for future reference after setting up the Z-URCTM 550EU correctly. AV devices programmed to your Z-URCTM 550EU TV DVD SAT/CBL AUX SHIFT + TV SHIFT + DVD SHIFT + SAT/CBL SHIFT + AUX CHECKING THE ACCESSORIES After opening the cover of the packing box, check that the following accessories are included.
WARNINGS Changes or modifications not expressly approved by the party responsible for compliance could void the user's authority to operate the equipment. - RISK OF FIRE - RISK OF ELECTRICAL SHOCK - RISK OF BURNS Exercise extreme caution when using Z-Wave devices to control appliances. Operation of the Z-Wave device may be in a different room then the controlled appliances, also an unintentional activation may occur if the wrong button on the remote is pressed.