
User manual

PIR Sensor Function
The PIR sensor integrated in the exterior spotlight responds to temperature changes within
the detection range, e.g., if a person or an animal, with a temperature different from the back-
ground, enters the detection range.
The range for detecting motion is determined by several factors:
• Mounting position (height)
• The temperature difference between the moving object and the background (ambient)
• The size of the object
• The distance of the object from the PIR sensor
• Direction and speed of the movement
• Ambient temperature (summer/winter)
The horizontal detection angle of the PIR-Sensor is 130°, the vertical detection angle 60°. The
range depending on the above mentioned factors is approx. 8 m.
Due to the operating principle applied, the detection of changes in temperature through glass
is not possible. Thus consider selecting an appropriate mounting site.
Do not point the PIR sensor towards reective surfaces (windows, water, or similar) or towards
moving objects (such as a street with passing vehicles) either in order to avoid false alarms.
Also do not point the PIR sensor‘s detection range towards sources or other lamps.
The recommended mounting height is 1.8 to 2.5 m; however, this will depend on local condi-
tions.
The detection range can be altered by turning the PIR sensor. You can also attach an opaque
cover (such as a piece of electrical tape) on the PIR sensor‘s diffuser lens in order to restrict
the range of detection.
To ensure the best motion detection, you should install the LED outdoor spotlight in a way that
the object to be detected is not approaching the PIR sensor, but rather passing the detection
area from left to right or vice versa.
Preparing installation and connection
Please observe the chapter „Safety Instructions“!
It is important to pay attention to the correct mounting position of the LED outdoor
spotlight; install it only with the PIR sensor positioned on the bottom side. The arrow
marking on the mounting plate must point upwards in a vertically direction.
Install the LED outdoor spotlight only on a rm base, e.g., masonry. Use screws and,
if necessary, screw anchors that are suitable for the surface.
The LED outdoor spotlight must be installed so that it is out of the reach of children.
Select the mounting height depending on the on-site conditions.
The LED outdoor spotlight has to be protected by a 10/16A fuse on the sub-dis-
tribution board. An earth fault circuit interrupter must be installed beforehand (FI
protective switch).
Install the LED outdoor spotlight only when the switch is disconnected from the
mains. It is not sufcient to just turn off the light switch!
First switch off all poles of the mains supply by removing the fuse or switching off
at the circuit breaker; then also switch off the associated residual current circuit
breaker. Secure it against unauthorised reconnection, e.g., with a warning sign.
Check that the power supply is free of current using an appropriate tester.
Installation and connection
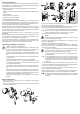
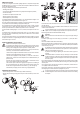
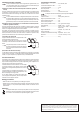
• Undo rst the single screw on the bottom using a suitable screwdriver (A).
• After that keep the locking knob (B) pressed and pull out the wall holder by means of the
strap (C).
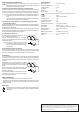
39,5 mm
• Undo both screws of the cable relief on the inside of the wall holder; then remove the clip of
the cable relief (D).
• Remove approximately 3 cm of the installation cable‘s insulation; then remove 6 mm of the
insulation of the individual wires.
In case the installation cable you are using has an earth conductor, we will not need
it (either cut it off or carefully wrap tape around the wire to prevent a short circuit).
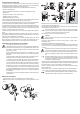
• Pierce through the rubber seal with the installation cable (E).
Important!
Make sure that the hole in the rubber seal is not too large, so that proper sealing is
ensured!
• Connect the power supply to the screw clamps (F), brown cable = L / phase, blue cable =
N / neutral.
• Secure the installation cables with the cable relief (G).
• Attach the wall holder with four suitable screws and, if necessary, wall plugs to the wall (dis-
tance between the holes is approx 39.5 mm). The textile strap should be placed behind the
wall mount here (do not cut!).
Pay attention to the correct mounting position of the wall holder! The arrow markings
inside and outside of the wall holder must face upwards in a vertical direction; the
cable hole in the wall holder must face down!
Pay attention when drilling and tightening the screws that no cables or pipes are
damaged.
If the installation cable is not laid in the wall, you can bring it out of the wall holder
and lead it downwards. For this purpose, the housing below the rubber seal is slight-
ly thinner, so that these half-round shaped parts can be broken (for example, with a
wire cutter or pliers).
• Push in the locking knob of the wall holder (keep pressed) and put the LED outdoor spotlight
with the correct orientation on the wall holder (PIR sensor facing down) until the locking knob
clicks into place.
• Turn in again the screw, which was previously removed, at the bottom, so that the LED out-
door spotlight is xated on the wall holder.
• Switch on the voltage supply. The LED outdoor spotlight is now activated for a few seconds;
then the light goes out and the LED outdoor spotlight is ready for use.
The light is automatically switched on depending on the preset switching threshold
for ambient brightness. Please observe the information contained in the following
two chapters.