
Installation Guide


7
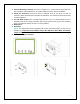
1. Choose Mounting Location—place the controller on a vertical surface protected from
direct sunlight, high temperatures, and water. Make sure there is good ventilation.
2. Check for Clearance—verify that there is sufficient room to run wires, as well as
clearance above and below the controller for ventilation. The clearance should be at least
6 inches (150mm).
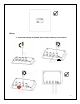
3. Cut out Wall section—the recommended wall size to be cut should follow the inner
protruding part of the charge controller while being careful not to go past the mounting
holes. The depth should be at least 1.7 inches (43mm).
4. Mark Holes
5. Drill Holes
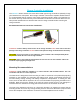
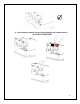
NOTE: The Adventurer comes equipped with screws for wall mounting. If they are not
suitable try using Pan Head Phillips Screw 18-8 Stainless Steel M3.9 Size 25mm
length screws.
6. Secure the charge controller.