
How to Guide


10
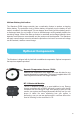
Operation
LED Indicators
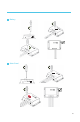
Simply hold the gray button for approximately 7 seconds until the LED flashes. Once
flashing, then press the gray button again to the desired battery type (they are color
coded) and simply leave the controller alone until the flashing stops (this should take
approximately 10 seconds). This indicates the parameter has been set.
After connecting the battery to the charge controller, the controller will turn on
automatically. Operation of this controller is very simply. Users set the battery type,
and leave the rest of the work to the charge controller.
If the LED lights do not flash, hold the gray button for 7 seconds again,
release, and immediately press the gray button again to enable the flashing.
NOTE
Setting Battery Type
Set Battery Type
Sealed Gel Li
Flooded
The Wanderer is a simple to use controller requiring little to no maintenance. Users can
be informed about the charge controller’s status based on the LED indicators at the PV
and Battery levels. The following chart goes into further detail regarding the Wander-
er’s indicators.
n/a
Solid
n/a
Solid
Slow
Flashing
Slow
Flashing
Slow
Flashing
Slow
Flashing
n/a
Fast
Flashing
Fast
Flashing
n/a Solid
n/a
Solid
n/a
PV terminal is over-voltage
PV terminal low output
Battery is charging normally
The battery is in float charge
The battery is over-voltage
The battery is under-voltage
The battery is over-discharged
The battery is over-heating
PV Indicator BATT Indicator Controller Status