
How to Guide


11
System Status Troubleshooting
Description Troubleshoot
Other Considerations
Use a multi-meter to verify the rated battery voltage.
Disconnect any loads connected to the battery to allow it to
charge.
Use a multi-meter to check the voltage of the battery. Make
sure the battery voltage is not exceeding the rated
specification of the charge controller. Disconnect battery.
Use a multi-meter to check the voltage of the panels.
Ensure that they meet the specification of the controller
to not exceed 25 VDC.
The PV output is typically lower in the early mornings
and in the late afternoons. This should not require
troubleshooting unless a solar panel is defective.
When heat is exceeding the specification of the controller,
it will automatically shut down. The controller will resume to
operate once it interprets a change in temperature.
The battery voltage may be less than 9V. A minimum of
9V is required to power on the controller.
Confirm that there is a tight and correct connection from
the battery bank to the charge controller and the solar
panels to the charge controller. Use a multi-meter to
check if the polarity of the solar modules have been
reversed on the charge controller’s solar terminals.
Charge controller does
not charge during daytime
when the sun is shining on
the solar panels.
No LED indicator when
battery is connected to
the charge controller
Battery LED light does
not flash when holding
for 7 seconds.
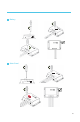
The battery selection LED must be enabled. Disconnect
the battery from the controller, then connect the battery to
the controller to reset it. Then hold the gray button for 7
seconds, release the button, and then immediately press
the gray button one more time to select a battery type.
Battery is low-voltage
Battery is over-voltage
Battery is over-heating
PV is over-voltage
PV terminal low output