PHOENIX 1000 Portable Power Station Version A0
APPLICABILITY The User Manual applies to the following product: • PHOENIX 1000 Portable Power Station (RPS100150AA-PCS) DISCLAIMER • User Manual because continuous product improvements are going to be made. • Renogy assumes no responsibility or liability for losses or damages, whether direct, indirect, consequential, or incidental, which might arise out of the use of information in the User Manual.
Important Safety Instructions Please save these instructions. The User Manual provides important operation and maintenance instructions for PHOENIX 1000 Portable Power Station. Please read the User Manual carefully before operation and save it for future reference. Failure to observe the instructions or precautions in the User Manual can result in electrical shock, serious injury, or death, or can damage PHOENIX, potentially rendering it inoperable.
• • • • Please ensure that no water sources including downspouts, sprinklers, or faucets are above or near PHOENIX. • • Please ensure that snow does not accumulate around PHOENIX. • Please ensure that PHOENIX is securely fastened during transportation. DO NOT lean on, stack anything on top of, or hang anything from PHOENIX or from cables leading to PHOENIX.
Table of Contents Product Overview - - - - - - - - - - - - - - - - - - - - - - - - - - - - - - - - - - - - - - - - - - - - - - - - - - - - - 05 - - - - - - - - - - - - - - - - - - - - - - - - - - - - - - - - - - - - - - - - - - - - - - - - 05 Package Content- - - - - - - - - - - - - - - - - - - - - - - - - - - - - - - - - - - - - - - - - - - - - - - - - - - - 07 LCD Display - - - - - - - - - - - - - - - - - - - - - - - - - - - - - - - - - - - - - - - - - - - - - - - - - - - - - - - - - - 08 Operation - - -
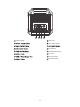
Product Overview United States /Canada/Japan Europe /South Korea United Kingdom China Australia - 05 -
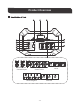
LCD Display CIG Port LED Strip Lights AC Outlets Overload Protector AC Inlet DC Input Port Parallel Outlet - 06 -
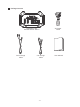
Package Content PHOENIX 1000 Portable Power Station Solar Charge Cable Car Charge Cable - 07 - AC Power Cable User Manual
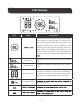
LCD Display Icon Name Description Indicates the current battery level. As the PHOENIX charges, the ring will light up clockwise with the increasing percentage, and the endmost ring segment will fast flash. Once PHOENIX is fully charged, all the ring segments will light up and remain solid. As the PHOENIX discharges, the ring will go out counterclockwise. When the battery level drops below 10%, the last ring segment will slow Input Power Indicates the amount of power going into PHOENIX.
Icon Name Description CIG Port Status SPS Mode Status WiFi Status Single Phase Parallel Mode Status Indicates the connection status of the WiFi. allel mode. When the single phase parallel mode is Split Phase Parallel Mode Status mode. When the split phase parallel mode is initial- High Temperature Protection Indicates the protection related to high temperatures. Low Temperature Protection Indicates the protection related to low temperatures.
Operation • display the operating status of PHOENIX. • go out. DC Home Connection • It is required to turn on PHOENIX before connecting it to the DC Home app. Setting Up • • Scan the QR code to download the DC Home app. Open the DC Home app. Click “Sign Up” to sign up for a new account.
Bluetooth Connection • • • • • Click “+” on the top right corner to search for PHOENIX. Please keep the phone or tablet within 65.6 feet (20 m) of PHOENIX. WiFi Connection • Click “+” on the top right corner to search for PHOENIX.
• PHOENIX only connects to the 2.4GHz WiFi network.
Charging • DO • • • • • • ONLY use Renogy approved accessories to charge PHOENIX. DO NOT charge PHOENIX immediately after a long heavy run. Please charge PHOENIX immediately when the battery level drops below 10% to prevent overdischarge. To extent the cycle life, please fully charge PHOENIX before each use. It is not required to turn on PHOENIX manually before charging. PHOENIX turns on automatically once it detects the charging source(s). PHOENIX features 3 charging methods – solar, AC, and car.
• The operating voltage of the solar panel array shall exceed 10V, and the open circuit voltage shall NOT exceed 100V. • Please ensure that the solar panels are of the same type and ratings and under similar conditions. • PHOENIX automatically limits the input power. It is allowed and recommended to charge PHOENIX with a solar panel array rated above 400W to account for the energy conversion loss.
Car Charging • • Start the car engine. Connect the DC Input Port of PHOENIX to the CIG port in the car with the included Car Charge Cable. PHOENIX will start charging automatically. Powering Devices • DO NOT discharge PHOENIX at high tempe • PHOENIX can provide a total output power of up to 2100W. Please allocate the output power rationally. DO NOT overload PHOENIX. • DO NOT connect high power devices to PHOENIX when it is running low.
• It is required to turn on PHOENIX before powering devices. low 2100W. • PHOENIX might not be able to deliver exact 998.4Wh energy when powering high power devices CIG, and AC. USB-A/USB-C Devices will stop powering the devices. speaker, wireless headphone, and drone. held game console, and DSLR camera. power. support the Quick Charge (QC) standard. Power Delivery (PD) standard. Car Powered Devices vice to the CIG Port to start powering the device. stop powering the device.
AC Devices devices to the AC Outlets to start powering the devices. • The output frequency of the AC Outlets can be switched between 50Hz and 60Hz on the DC Home app. stop powering the devices. • The AC Outlets can power most AC devices rated under 1500W including desktop computer, TV, game console, full-size refrigerator, space heater, vacuum, and microwave. 1500W and 3000W including hair dryer, electric kettle, toaster oven, electric grill, electric cooktop, and electric iron. Home app. • tions.
• • DO NOT connect AC devices rated over 1500W to PHOENIX for emergency AC power. DO NOT connect AC devices that require a transfer time less than 20ms including data server and workstation to PHOENIX for uninterrupted AC power. Please check the holdup time of the Parallel Connection • It is required to turn on PHOENIXes before connecting them in parallel. The iStack technology allows two PHOENIXes to be connected in parallel to deliver 1996.8Wh capacity and 2700W AC output.
Split Phase Parallel (US/CA/JP Models Only) • Connect the Parallel Outlets of two PHOENIXes with a split phase parallel kit (sold separately). The split phase parallel mode will be turned on after a few seconds of initialization. • Connect the devices to the split phase parallel kit to start powering the devices. • Through the split phase parallel kit, two PHOENIXes can together power most split phase AC devices rated under 2700W including baseboard heater, electric clothes dryer, and electric stove.
• • • • • • The split phase parallel mode is available on US, CA, and JP models only. Please read the user manuals of PHOENIX Single Phase Parallel Kit and PHOENIX Split Phase Parallel Kit before connecting PHOENIXes in parallel. Please fully charge the PHOENIXes before connecting them in parallel. The AC Inlet will be disabled for AC charging and SPS mode when the single phase parallel kit or split phase parallel kit is connected to PHOENIX.
CIG Port/AC Outlets Timeout • When the device draws low or no power from the CIG Port or AC Outlets for 1 hour, the CIG • The timeout of the CIG Port or AC Outlets can be set or disabled on the DC Home app. Unit Timeout gy. • The timeout of PHOENIX can be set or disabled on the DC Home app.
Maintenance Cleaning • • • • • • • Remove all the connections from PHOENIX. Clear the leaves, debris, and dust from the fans of PHOENIX. Clean the casing of PHOENIX with a soft dry cloth. Keep the area around PHOENIX clean and dry. Turn PHOENIX back on. Reconnect the devices to PHOENIX. Storage • • • • Charge PHOENIX to 50%. Remove all the connections from PHOENIX. Handle PHOENIX carefully to avoid sharp impacts or extreme pressure on the casing of PHOENIX.
Troubleshooting • If PHOENIX does not operate properly, refer to the table below for possible causes and corrective steps. • If the corrective steps do not work, contact our customer service through renogy.com/contact-us/. Icons Pattern Possible Causes Corrective Steps • • Slow Flash Overload Protector Pop Up Slow Flash AC Input Overvoltage/ Undervoltage AC Input Overcurrent Disconnect the AC Inlet from the wall outlet. Measure the voltage of the wall outlet.
Icons Pattern Possible Causes Corrective Steps • • • Slow Flash Charge Output Overcurrent/Short Circuit Check the current ratings of the devices. Stop using the devices if they draw currents that ex- • LCD Display lit up to release the protection. • Connect the devices with the appropriate curFast Charge Port. Power can be resumed. Slow Flash • • Overvoltage/ Undervoltage LCD Display lit up to release the protection. • • • • Slow Flash Overcurrent Contact us for help if the icons persist.
Icons Pattern Possible Causes Corrective Steps • • • Slow Flash CIG Output Overcurrent/Short Circuit Disconnect the device from the CIG Port. Remove the short circuit if the CIG Port is shorted. Check the current rating of the device. Stop using the device if it draws current that ex- • LCD Display lit up to release the protection. Slow Flash Slow Flash AC Output Overvoltage/ Undervoltage AC Output Overload/Short Circuit • Connect the device with the appropriate current rating to the CIG Port.
Icons Pattern Possible Causes Corrective Steps • Reallocate the output power to ensure that the total output power is under 1050W. • Slow Flash Total Output Overload LCD Display lit up to release the protection. • Power can be resumed. Slow Flash • Disconnect all the connections from PHOENIX. • • • Check if the fan inlet and outlet are blocked. Temperature Cool down PHOENIX to the room temperature. Reconnect the charging source(s) to PHOENIX. Charging can be resumed.
Icons Pattern Fast Flash Fast Flash Possible Causes Single Phase Parallel Failure Split Phase Parallel Failure Corrective Steps • Disconnect the single phase parallel kit from PHOENIXes. • Check the models of PHOENIXes. Stop connecting PHOENIXes in parallel if they are of • Check the output voltages of the AC Outlets. Stop connecting PHOENIXes in parallel if their • Switch the AC Outlets of PHOENIXes to the same output frequency. • • Fully charge PHOENIXes.
General Dimension 18.27 x 10.79 x 11.57 inch / 464 x 274 x 294 mm Weight 41.0 lbs / 18.6 kg Charge Temperature Discharge Temperature Storage Temperature Battery Type Lithium Iron Phosphate Capacity 41.6V, 24000mAh / 998.4Wh Cycle Life 2000 Cycles (80% DOD, 80% EOL) Input AC Input 85V~120V (JP)/90V~140V (US, CA)/200V~240V (EU, UK, AU, KR, CN) 45Hz~55Hz/57Hz~65Hz, 998W Max DC Input 10V~100V 10A, 400W Max Output put (x1) 5V 2.4A, 12W Max 5V 3A, 9V 2A, 12V 1.
FCC STATEMENT This device complies with Part 15 of the FCC Rules. Operation is subject to the following two conditions: (1) This device may not cause harmful interference, and (2) This device must accept any interference received, including interference that may cause undesired operation. This equipment has been tested and found to comply with the limits for a Class A digital device, pursuant to Part 15 of the FCC Rules.
RENOGY.COM Renogy reserves the right to change the contents of this manual without notice. R210189206 US CN 5050 S Archibald Ave, Ontario, CA 91762 909-287-7111 www.renogy.com support@renogy.com 400-6636-695 https://www.renogy.cn support@renogy.cn JP https://www.renogy.jp supportjp@renogy.com CA https://ca.renogy.com supportca@renogy.com AU https://au.renogy.com supportau@renogy.com UK https://uk.renogy.com supportuk@renogy.com DE https://de.renogy.com supportde@renogy.