
Installation Guide


5
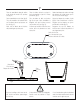
3
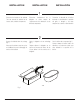
Turn the bathtub over and adjust the
leveling pads so that they provide a gap
of 5mm (1/4’’) from the floor (fig. 2).
Retourner la baignoire et ajuster les
patins de nivellement afin d’avoir un
dégagement d’au moins 5mm (1/4’’)
avec le plancher (fig.2).
Voltear la bañera y ajustar las almohadillas
de nivelación para que proporcionen un
espacio libre de 5 mm (1/4’’) desde el
piso (fig.2).
Leveling pad
Patins de nivellement
Almohadillas de nivelación
Fig. 2
5mm (1/4")
3mm (1/8")
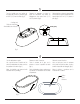
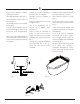
4
Turn the bathtub over again.
Use a pencil to trace an outline of the
skirt of the bathtub on the floor, as well as
the position of the drain (fig. 3).
Move the bathtub and proceed with
installation of the plumbing.
Retourner le bain à nouveau.
Tracer le contour de la jupe sur le
plancher et tracer la position du drain
(fig. 3).
Retirer la baignoire de son emplacement
et procéder à l’installation des raccords
de plomberie.
Voltear de nuevo la bañera.
Usar un lápiz para trazar el contorno
de la falda de la bañera sobre el piso y
también la posición del desagüe (fig.3).
Mover la bañera y continuar con la
instalación de la tubería.
5mm (1/4")
3mm (1/8")
Fig. 3
Outline
Tracé
Contorno