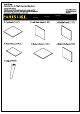
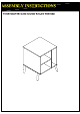
Night Stand Contains One (1) Night Stand and Hardware IMPORTANT NOTE: Carefully remove ie box. Arrange on a TOOLS REQUIRED: surface and parts and Fo ~Phillips Screwdriver For customer support please call 314-993-2693. -Hammer 1.Top Panel (1 PC) 2.Left Side Panel (1 PC) 3.Middle Panel (1 PC) 4.Shelf Panel (1 PC) 5 Bottom Panel (1 PC) 6.Right Side Panel (1 PC) 7.
HARDWARE LIST A.Allen Key (1 PC) B.Dowel (12 PCS) C.JCBC W Screw M6x40 (6 PCS) D. Minifix Bolt (6 PCS) E. Minifix House (6 PCS) F. Minifix Cap (6 PCS) HS G.Screw 20mm (16 PCS) ~~ H.
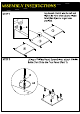
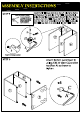
ASSEMBLY INSTRUCTIONS STEP 1 Tap Dowels (Part B) into the Left and Right Side Panel (Part 2,6) and Middle Panel (Part 3) in the larger holes — provided. STEP 2 Using a Phillips Head Screwdriver, attach Mini fix Bolts (Part D) to the Top Panel (Part 1).
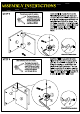
ASSEMBLY INSTRUCTIONS STEP 3 This is how a mini fix works... The head of the mini fix oP housing goes into the open 7 mouth of the mini fix bolt. You then turn the mini fix a housing so it tightens i over the mini fix bolt. Insert the Mini fix House (Part E) to the Right Side Panel (Part 6) and make sure the open side of the Mini fix House (Part E) is facing the opening on panels.Attach the Right Side Panel (Part 6) as shown.
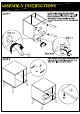
ASSEMBLY INSTRUCTIONS STEP 5 Insert the Mini fix House (Part E) to the Left Side Panel (Part 2) ‘This is how a mini fix works... and make sure the open side of the Mini fix House (Part E) is Ls The bead of the mick fx facing the opening on panels.Attach the Left Side Panel (Part 2) i" momofdemmmxoen | as shown. Turn the Mini fix House (Part E) to tighten using the ©, en a indemnify | Allen Key (Part A) or screwdriver.Cover the Mini fix House using over the mini fix bolt.