
Installation Instructions


Customer Service: 800-626-1126 | rev-a-shelf.com
4
FIGURE 2
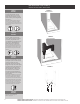
FIGURE 1
FIGURE 3
FIGURE 4
DOOR MOUNTING INSTRUCTIONS
Loosen the (4) lock nuts (3/8”
wrench) inside the front wall of
the unit (see Fig.1).
Pull the Adjustable Door
Mounting Brackets to ensure
that you are mounting to the
“thick” portion of the cabinet
door. (Front of pullout should
line up with front of face frame).
NOTE: For measurement
locations see Fig. 2.
Measure from the base of the
face frame up to each mounting
bracket slotted hole location and
record those dimensions.
NOTE: For measurement
locations see Fig. 3.
Measure the entire door opening
and record that value (a).
Measure the cabinet door height
and record that value (b).
Pre-drill these holes on the back
side of the cabinet door, making
sure not to drill through the door.
If the door is larger than the
cabinet opening, add the divided
difference found in Step 2 to
the measurements in Step 1. If
the door is smaller (Inset doors),
subtract the divided difference
from the measurements in Step 1.
Record these numbers in Figure
4 and mark the locations on the
rear side of the cabinet door.
Attach the door to the bracket
using the pre-drilled hole locations.
STEP 1
STEP 2
STEP 4
STEP 3
STEP 5
Measure Opening Height (a)________
Measure Door Height (b)________
Mark the
screw
locations
on your door.
Bottom Bracket Measurements
Right__________ Left__________
Measure from frame to left bracket slot ________
Measure from frame to right bracket slot ________
Repeat for top brackets:
Left Bracket Slot_________
Right Bracket Slot_________
(b)
3
32
Height Difference ________
Divide Difference by 2 _______
(a)
#2
Top Bracket Measurements
Right__________ Left__________
12400 Earl Jones Way
Louisville, KY 40299
rev-a-shelf.com
Customer Service: 800-626-1126
3
8
T-Nut Screw for
Tilt Adjustment
Lock Nut