
Owner's Manual


4
In-Ceiling Architectural Loudspeaker
Instruction Manual
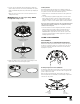
LOUDSPEAKER PLACEMENT FOR DUAL-TWEETER
STEREO MODELS
Because a single Revel dual-tweeter stereo in-ceiling speaker
reproduces both stereo channels from a single location, it will deliver
outstanding performance from a wide variety of mounting locations
where a pair of stereo speakers would be impractical, including
hallways, bathrooms and closets.
INSTALLATION INSTRUCTIONS
CAUTION: Do not use the tweeter-mounting baffle as a handle
to move, carry or position the speaker. Doing so can damage the
baffle. Such damage is not covered by the speaker’s warranty.
Revel architectural speakers are extremely easy to install. However, if
you are unable to understand and follow the instructions in this manual
clearly and fully, or if you are unsure of your ability to install these
loudspeakers properly, please contact your dealer or a qualified installer.
WARNING: HARMAN International assumes
no responsibility for improper installation of
hardware or for any personal injuries or product
damages resulting from improper installation or
a fallen loudspeaker.
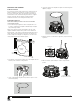
CONNECTING TO THE AMPLIFIER
CAUTION: REMOVE POWER
You must connect the speaker wires before the speaker is fully
installed. To protect the audio system and yourself from damage
or injury through accidental electrical shorting and surges
during installation, turn all audio system power OFF before
beginning the speaker installation.
Speaker Wire
Use high-quality speaker wire to obtain the best performance from your
Revel in-ceiling speakers.
s For wire lengths of less than 50 ft (15m), use at least 16-gauge
speaker wire.
s For wire lengths between 50 ft and 100 ft (15m – 30m), use at least
12-gauge speaker wire.
s For wire lengths of greater than 100 ft (30m), use at least 10-gauge
speaker wire.
Note: All speaker wires must comply with all local building and
safety codes for use in in-ceiling applications.
Making Connections
Connect each channel’s positive (+) terminal on the back of the amplifier
or receiver to the positive (“IN+”/red) terminal on the corresponding
speaker; connect each channel’s negative (–) terminal on the back of
the amplifier or receiver to the negative (“IN–”/black) terminal on the
corresponding speaker. Do not reverse polarities (that is, do not connect
+ to –, or – to +) when making connections. Doing so will cause poor
imaging and diminished bass response.
Negative Terminal
(“IN–”/Black)
Positive Terminal
(“IN+”/Red)
Press down on the top of the terminal to open the hole; insert the bare
end of the wire into the hole; and release the terminal to secure the wire.
CAUTION: To avoid short circuits that may damage your
equipment, be certain that positive and negative wire strands do
not touch each other and do not touch metal parts such as the
speaker frame.