
Owner's Manual


5
In-Ceiling Architectural Loudspeaker
Instruction Manual
MOUNTING THE SPEAKERS
For New Construction
If you wish to pre-install a rough-in frame for the speakers before the
drywall is installed in new construction, you will need to purchase
the correct rough-in frame kit for your loudspeaker model from your
authorized Revel dealer. Detailed mounting instructions are supplied
with the rough-in kit. After the drywall is installed, follow the
installation instructions in For Existing Construction, below.
For Existing Construction
Note: The installation procedure is the same for all models
covered by this manual.
1. Ensure that the drywall, plywood or other ceiling material is 1/2" –
2" (13mm – 51mm) thick and capable of withstanding the weight of
the speaker being installed.
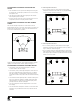
Make sure to allow at least 3/4" (19mm) between the edge of the
supplied installation template and any rafters or other obstructions
behind the wall, so the speaker’s locking mechanism will have room to
engage fully. Perform an obstruction survey to be sure that there are
no studs, lengths of conduit, pipes, heating ducts or air returns in the
ceiling cavity that will interfere with the speaker.
Mounting
Opening
3/4"
(19mm)
3/4"
(19mm)
3/4"
(19mm)
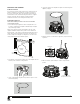
2. Determine the correct speaker location and use the template included
with the speaker to mark the ceiling material.
3. Cut the ceiling drywall along the mark you made in Step 2 to create
the mounting opening.
4. Connect the speaker to the amplifier as explained in Connecting to the
Amplifier, on page 4.
5. Attach the speaker's seismic tab to a support line, as per local safety
regulations.
Seismic Tab
Support Line
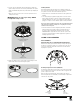
6. Make sure all four speaker clamps are in their “ready-to-mount”
position.
C2 Speaker Clamps in
Ready-to-Mount Position