
User Manual


Installation Instruction
s
Revel
®
Ultima Voice
™
2 Pedestal
Harman Specialty Group
3 Oak Park Drive
Bedford, MA 01730-1413
USA
Tel 781-280-0300
Fax 781-280-0490
www.revelspeakers.com
Customer Service
Tel 781-280-0300
Fax 781-280-0495 (Sales)
Fax 781-280-0499 (Service)
Revel Part No. 353273-001 | Rev 0 | 03/07
Thank you for purchasing the Voice2 Pedestal for your Revel
®
Ultima Voice
™
2 Loudspeaker. Follow
the instructions below to install the pedestal.
INSTALLATION
Step 1: Set the Ultima
Voice
™
2 Loudspeaker
upside down on a soft
non-scratch surface.
Step 2: Remove the speaker
from its cradle by carefully
removing the tilt
adjustment knobs, felt washers, and metal washers.
Note: Keep the knobs and washers together as
they’ll be re-used in Step 6.
Step 3: If the combination
spikes/glides were installed
on the cradle, remove the
spikes, felt washers, and
knurled locking rings. If
the combination spikes/
glides were not installed,
continue to Step 4.
Step 4: Remove the feet and screws from the
cradle. Put them aside.
Step 5: Install the
combination spikes/
glides with the felt
washers and knurled
locking rings to the
bottom of the pedestal.
Hand-tighten the spikes
firmly, but do NOT over-
tighten.
Note: If the combination spikes/glides were not
previously installed on the cradle, the hardware will
be with the loudspeaker hardware accessories.
Note: Refer to the Ultima Voice™2 Loudspeaker
Owner’s Manual for further instructions on how to
install the combination spikes/glides to the bottom
of the pedestal.
Step 6: Use the four Phillips
head screws located in the
Pedestal accessories bag to
install the cradle to the top
of the pedestal. Tighten the
screws firmly but do NOT
over-tighten.
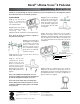
Step 7: Install the loudspeaker onto the cradle/
pedestal assembly. Insert each threaded tilt
adjustment knob first through a metal washer and
then through a felt washer before inserting it into
one of the threaded inserts toward the rear of the
loudspeaker.
Step 8: Slide the loudspeaker in the cradle to
adjust the tilt. When the loudspeaker has been
appropriately positioned, firmly hand-tighten the
tilt adjustment knobs to lock the loudspeaker in
place. Do NOT over-tighten.
Front & rear tilt
adjustment threaded inserts
Felt washer
Metal washer
Lockdown knob