
User Manual


4
1
2
3
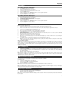
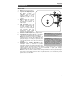
Front Panel
1. Volume: Adjusts the sound level for the internal speakers and the headphone output.
2. USB Port: Playback tracks from your USB flash drive or record songs to the USB flash drive.
3. Standby: Press to power the unit on/off.
4. Standby LED: This LED will illuminate when the unit is powered on.
5. Phono LED: This LED will illuminate when Phono is selected with the Source button.
6. USB LED: This LED will illuminate when USB is selected with the Source button.
7. Source: Press this button to cycle through the sources for Phono, USB, AM, FM, and Aux.
8. Previous Track/Scan Backward: Press and release this button to go to the previous USB track.
Press and hold this button to scan backward through the current track.
9. Play/Pause: Press this button to play or pause a USB track.
10. Next Track/Scan Forward: Press and release this button to go to the next USB track. Press and hold
this button to scan forward through the current track.
11. Stop: Press this button to stop playback of a USB track.
Press to end the recording to the USB flash
drive.
12. +10: Press this button to skip ahead 10 tracks on a USB flash drive.
13. Rep/Rec (Repeat/Record): When USB is selected as the source, press this button to repeat the
currently playing track and press the button again to repeat after all tracks have played through on the
USB flash drive. If Phono or Aux is selected as the source, press this button to start recording to a
connected USB flash drive.
14. Headphone Output: Connect headphones here (sold separately) to listen to your source. When
headphones are connected, the internal speaker is muted.
15. Aux In: Connect the output of a line-level device to this input, such as from a smartphone, media
player, tablet, etc. The audio played through this input can also be recorded to a connected USB flash
drive.
16. Tuning: Adjust this to go to another radio station.
17. Aux LED: This LED will illuminate when Aux is selected with the Source button.
18. FM LED: This LED will illuminate when FM is selected with the Source button.
19. AM LED: This LED will illuminate when AM is selected with the Source button.
20. Speakers: Music from the selected source will playback through these internal speakers (as along as
headphones are not connected to the headphone output).
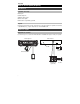
Rear Panel
1. Power Input: The integrated power cable is connected here.
2. FM Antenna: Adjust this wire for better FM radio reception. For AM reception, rotate the unit until the
best reception is found.
3. Line Output: Connect this output to a receiver, amplifier, or powered speakers.
Note: Mustang LP’s volume control will not adjust the volume when the line output is in use.
7
2
3
8
9
10
11
12
13
14
15
17
16
18
19
1
4
5
6
20
20