
Specifications


TM024 Premier Loline Solar Drain back Service Instructions REV: A
D.O.I: 12/12/2007
This document is stored and maintained electronically by Service. All printed copies not bearing this statement in RED are deemed “uncontrolled”
48
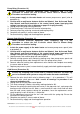
Hot Sensor (Procedure 13)
1. Isolate power supply to the water heater.
2. Remove the spring clip retaining the hot sensor in the collector connector and remove
the locating washer and hot sensor.
3. Fit the replacement sensor into the connector and secure with the spring clip. Ensure
the clip retains the locating washer.
4. Cut the wiring to the existing sensor and connect to the replacement sensor. Ideally
this connection should be made in the roof space. If the connection is to be made on
the roof, ensure the connection is water and UV proof.
5. Restore electricity supply and check appliance operation.
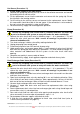
Pump (Procedure 14)
Ensure any escaping solar circuit fluid is contained and does not enter any
part of a rainwater tank system as entry will render the water undrinkable.
1. Remove the solar circuit relief valve by following steps 1 – 6 in procedure 2. This will
relieve the solar circuit pressure. Note: ensure all warnings in procedure 2 are
observed and adhered to.
2. Turn heat exchanger isolation valve off by rotating clockwise 90º.
3. Unplug pump plug from control board.
4. Disconnect pump wire from N/O terminal of pump relay.
5. Undo pump unions and remove pump. Note: a small amount of solar circuit fluid will
drain from the pump pipe work during this procedure. This fluid should be caught in a
clean container and added back into the system via the solar circuit relief valve
opening.
8. Complete reassembly in reverse order of above.
6. Restore electricity supply, check appliance operation and check for any leaks.
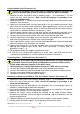
Heat Exchanger Drain Valve (Procedure 15)
Ensure any escaping solar circuit fluid is contained and does not enter any
part of a rainwater tank system as entry will render the water undrinkable.
1. Remove the solar circuit relief valve by following steps 1 – 6 in procedure 2. This will
relieve the solar circuit pressure. Note: ensure all warnings in procedure 2 are
observed and adhered to.
2. Attach one end of a ½” flexible hose to heat exchanger drain valve and insert the other
end into a clean container.
3. Open heat exchanger drain valve by rotating 90º in an anti clockwise direction. Solar
circuit fluid will now drain into the container. Note: approximately 16 litres of fluid will
drain out of the heat exchanger. When all fluid has been drained remove ½” hose.
4. Unscrew heat exchanger drain valve from pipe work.
5. Unscrew ½” nipple from drain valve and screw into replacement drain valve using
thread tape.
6. Screw replacement drain valve into heat exchanger pipe work using thread tape and
ensure drain valve is in closed position.
7. Pour solar circuit fluid into solar relief valve opening and complete solar circuit relief
valve reassembly in reverse order of procedure 2 steps 1 – 6.
8. Restore power and water supplies and check for leaks.
9. If fluid was lost, recommission appliance to check solar circuit fluid level (refer to
‘Commissioning Procedure’ on page 57).