
User Manual
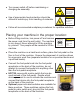


Setting the paper stop:
u HD7500, HD7650, HD7100, HD7000, HD7000 Plus, HD6500 and HD6700 -
Locate the paper stop on the front cover of the
machine. Loosen the knob counterclockwise,
so that the guide can be adjusted to the left or
the right.
until the
punch pattern is centered on the paper.
The
punch machines allow for viewing of common sized paper
position markings on the die assemblies. Aligning the paper
stop with these marks will result in the punch pattern being
centered on the paper and need only small adjustments if at all.
Move the paper stop until the
desired position is reached and tighten the
knob clockwise until tight to lock the paper
stop in place. Repeat this procedure
HD7650, HD7100, HD7000, HD7000 Plus, HD6700 and HD6500
9
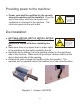
u HD7700/H -
The HD7700/H utilizes a “lift and move”
feature that combines with a fine adjustment
knob located on the left side of the machine.
To adjust the paper stop, lift up on the small
knob of the paper stop and slide to the left or
the right. Move the paper stop until the
desired position is reached and let the paper
stop back down. Minor adjustments of the
paper stop can now be made by turning the knob on the left side of the
HD7700/H to move the paper stop left or right until the punch pattern is
centered on the paper.
The HD7700/H has markings for common sized paper and
punch patterns. Lift and move the paper stop to the paper size
you are punching and align the pointer of the paper stop with
the pattern you are punching in the paper. Set the paper stop
down and utilize the knob on the left side to finalize the setting.
The paper stop will now be correctly positioned to center the punch
pattern on the paper.
Paper stop