
All in One Printer User Manual


Copying
118
2
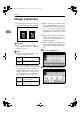
Margin Adjustment
You can shift the image left, right, top
or bottom to make a binding margin.
Limitation
❒ If you set the margin too wide, ar-
eas you do not want to delete
might be erased.
Note
❒ You can change the width of the
binding margin as follows:
❒ The margin width default is as fol-
lows. You can change this default
setting with the User Tools. ⇒
“Front Margin: Left/Right”, “Back
Margin: Left/Right”, “Front Mar-
gin: Top/Bottom”, “Back Margin:
Top/Bottom” in P.216 “Edit
1
/
2
”.
❒ When making two-sided copies
from one-sided originals, you can
set a binding margin for back pag-
es. ⇒ “1 sided → 2 sided Auto
Margin: T to T”, “1 sided → 2 sided
Auto Margin: T to B” in P.216 “Edit
1
/
2
”.
❒ When making copies in Combine
mode, the binding margins are
made on the copies after the com-
bining is finished.
❒ When “2 Sided → 1 Sided” is se-
lected, set the binding margins for
front and back pages of the origi-
nal.
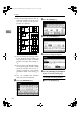
A
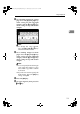
Press the [Edit/Stamp] key.
B
Press the [Margin Adjustment] key.
Metric
version
0 – 30mm (in 1mm steps)
Inch
version
0" – 1.2" (in 0.1" steps)
Metric
version
• Front: 5mm Left
• Back: 5mm Right
Inch
version
• Front: 0.2" Left
• Back: 0.2" Right
A
A
AdonisC2_AEcopy110F_FM.book Page 118 Wednesday, October 3, 2001 1:43 PM