Operating Instructions User Guide For safe and correct use, be sure to read "Safety Information" before using the machine.
TABLE OF CONTENTS 1. Guide to the Machine How to Read This Manual.................................................................................................................................5 Introduction.....................................................................................................................................................5 Legal Prohibition........................................................................................................................................
Resetting the Print Job..................................................................................................................................33 4. Copying Originals Copier Mode Screen.......................................................................................................................................35 Basic Operation...............................................................................................................................................36 Canceling a Copy.
Specifying the Scan Settings.......................................................................................................................68 Receiving a Fax................................................................................................................................................70 Selecting Reception Mode..........................................................................................................................70 Lists/Reports Related to Fax.......................
Checking the Condition of the Machine..................................................................................................110 Printer Problems.............................................................................................................................................111 Print Positions Do Not Match Display Positions......................................................................................112 Copier Problems.............................................................
1. Guide to the Machine How to Read This Manual Introduction This manual contains detailed instructions and notes on the operation and use of this machine. For your safety and benefit, read this manual carefully before using the machine. Keep this manual in a handy place for quick reference. Legal Prohibition Do not copy or print any item for which reproduction is prohibited by law.
1. Guide to the Machine Model-Specific Information This section explains how you can identify the region your machine belongs to. There is a label on the rear of the machine, located in the position shown below. The label contains details that identify the region your machine belongs to. Read the label. CHZ966 The following information is region-specific. Read the information under the symbol that corresponds to the region of your machine.
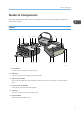
Guide to Components Guide to Components This section introduces the names of the various parts on the front and rear side of the machine and outlines their functions. Exterior 1 8 2 9 4 3 10 11 5 12 6 13 14 7 15 16 CHZ967 1. Control Panel Contains a screen and keys for machine control. 2. ADF Cover Open this cover to remove originals jammed in the ADF. 3. Input Tray for the ADF Place stacks of originals here. They will feed in automatically.
1. Guide to the Machine 7. Input Tray Cover Set this cover up and pull out the paper source tray to load paper. 8. Tray Extension Pull out and extend this tray extension to hold the output paper. 9. Front Cover Open this cover to pull out the output tray before printing. 10. Maintenance Cover Lift up this cover to replace consumables or clear a paper jam. 11. Auto Document Feeder (Exposure Glass Cover) The auto document feeder (ADF) is integrated with the exposure glass cover.
Guide to Components 1. Print Cartridge A replacement consumable that is required to make prints on paper. It needs to be replaced after approximately every 2000 pages printed. For details about replacing the cartridge, see p.97 "Replacing the Print Cartridge". Control Panel • The actual control panel may look different from the illustration below, depending on the country of use. 1 2 7 3 8 9 10 4 11 5 12 6 CHZ950 1.
1. Guide to the Machine 8. Power Indicator This indicator lights up blue when the machine is turned on. It flashes when a print job is received and while printing, scanning, or fax transmission/reception is in progress. 9. Screen Displays current status and messages. 10. Alert Indicator This indicator lights up red when the machine runs out of paper or consumables, when the paper settings do not match the settings specified by the driver, or when other abnormalities occur.
Installing the Driver and Software Installing the Driver and Software You can install the necessary driver for this machine using the included CD-ROM. The operating systems compatible with the drivers and software for this machine are: Windows XP/ Vista/7 and Windows Server 2003/2003 R2/2008/2008 R2. The procedure in this section is an example based on Windows 7. The actual procedure may vary depending on the operating system you are using.
1. Guide to the Machine 11. Restart the computer. Deleting the printer driver 1. On the [Start] menu, click [Devices and Printers]. 2. Right-click the icon of the printer you want to delete, and then click [Remove device]. 3. Click [Yes]. 4. Click any printer icon, and then click [Print server properties]. 5. Click the [Drivers] tab. 6. Click the [Change Driver Settings] button if it is displayed. 7. Click [Remove...]. 8. Select [Remove driver and driver package.], and then click [OK]. 9. Click [Yes]. 10.
Initial Setup Initial Setup When you turn this machine on for the first time, you must set the following items. Select each setting using the [ ], [ ], or number keys, and then press the [OK] key.
1. Guide to the Machine What is Smart Organizing Monitor? Install this utility on your computer from the included CD-ROM before using it. Smart Organizing Monitor provides the following functions: • Displays the status of the machine Displays paper jam messages and other error messages. • Paper size and type settings Displays the settings for paper sizes or types available on this machine.
2. Loading Paper Supported Paper Paper Size • A4 • 8 1/2 " × 11 " (Letter) • B5 • 5 1/2 " × 8 1/2 " (Half Letter) • 7 1/4 " × 10 1/2 " (Executive) • A5 • A6 • B6 • 16K (197 × 273 mm) • 16K (195 × 270 mm) • 16K (184 × 260 mm) • Custom Paper Size The following paper sizes are supported as custom paper sizes: • Approximately 90-216 mm (3.6-8.5 inches) in width • Approximately 148-297 mm (5.8-11.7 inches) in length Paper Type • Plain Paper (65-104 g/m2 (20-24 lb.)) • Recycled Paper (65-104 g/m2 (20-24 lb.
2. Loading Paper Non-Recommended Paper Types Do not use the following types of paper: • Ink-jet printer paper • GelJet special paper • Bent, folded, or creased paper • Curled or twisted paper • Wrinkled paper • Damp paper • Dirty or damaged paper • Paper that is dry enough to emit static electricity • Paper that has already been printed onto, except a preprinted letterhead paper. Malfunctions are especially likely when using paper printed on by other than a laser printer (e.g.
Print Area Print Area The diagram below shows the area of the paper that the machine can print on. From the printer driver 4 4 3 1 3 2 CHZ904 1. Print area 2. Feed direction 3. Approx. 4.2 mm (0.2 inches) 4. Approx. 4.2 mm (0.2 inches) • The print area may vary depending on the paper size and printer driver settings.
2. Loading Paper Copier function 4 4 3 1 3 2 CHZ904 1. Print area 2. Feed direction 3. Approx. 4 mm (0.2 inches) 4. Approx. 3 mm (0.1 inches) • The print area may vary depending on the paper size. Fax function 4 4 3 1 3 2 CHZ904 1. Print area 2.
Print Area 3. Approx. 4.2 mm (0.2 inches) 4. Approx. 4.2 mm (0.2 inches) • The print area may vary depending on the paper size.
2. Loading Paper Loading Paper Load a stack of paper for printing in the input tray on the back of the machine. • When loading paper, be sure to configure the size and type of paper. When printing a document, specify the paper size and type in the printer driver so that the settings configured when paper is loaded can be used for printing. 1. Open the input tray cover and pull out the tray. 2 1 CHZ005 2.
Loading Paper 3. Fan the paper before loading it in the tray. CBK254 4. Slide the paper guide on both sides outward, and then load the paper print side up until it stops. 2 1 1 CHZ007 5. Adjust the paper guide on both sides to fit the paper width.
2. Loading Paper 6. Open the front cover and tray extension. CHZ027 Specifying Paper Type and Paper Size Using Control Panel Specifying the paper type 1. Press the [User Tools] key. CHZ960 2. Press the [ ] or [ ] key to select [System Settings], and then press the [OK] key. 3. Press the [ ] or [ ] key to select [Tray Paper Settings], and then press the [OK] key. 4. Press the [ ] or [ ] key to select [Paper Type], and then press the [OK] key. 5.
Loading Paper Specifying the standard paper size 1. Press the [User Tools] key. CHZ960 2. Press the [ ] or [ ] key to select [System Settings], and then press the [OK] key. 3. Press the [ ] or [ ] key to select [Tray Paper Settings], and then press the [OK] key. 4. Press the [ ] or [ ] key to select [Paper Size], and then press the [OK] key. 5. Press the [ ] or [ ] key to select the paper size, and then press the [OK] key. 6. Press the [User Tools] key to return to the initial screen.
2. Loading Paper 8. Press the [OK] key. 9. Press the [ ] or [ ] key to select the length, and then press the [OK] key. 10. Press the [OK] key. 11. Press the [User Tools] key to return to the initial screen. Specifying Paper Type and Paper Size Using Smart Organizing Monitor The procedure in this section is an example based on Windows 7. The actual procedure may vary depending on the operating system you are using. Specifying the paper type and paper size 1. On the [Start] menu, click [All Programs]. 2.
Placing Originals Placing Originals This section describes the types of originals you can set and how to place them. About Originals Recommended size of originals Exposure glass • Up to 216 mm (8.5 ") in width, up to 297 mm (11.7 ") in length ADF • Paper size: 140 to 216 mm (5 1/2 " to 8 1/2 ") in width, 128 to 297 mm (5.0 " to 11.7 ") in length • Paper weight: 60 to 90 g/m2 (16 to 24 lb.) Up to 15 sheets of an original can be placed in the ADF at once (when using paper weighing 80 g/m2, 20 lb.).
2. Loading Paper • Originals that are wet with toner or white out Unscannable image area Even if you correctly place originals, margins of a few millimeters on all four sides of the original may not be scanned. Margins when using exposure glass CHZ916 1. Approx. 4.1 mm (0.2 inches) 2. Approx. 3 mm (0.1 inches) 3. Approx. 4 mm (0.2 inches) Margins when using ADF CHZ919 1. Approx. 4.1 mm (0.2 inches) 2. Approx. 3 mm (0.1 inches) 3. Approx. 4.3 mm (0.
Placing Originals Placing Originals on the Exposure Glass • Do not place originals until all correction fluid or toner becomes completely dry. Doing so may create marks on the exposure glass that will appear on copies. 1. Lift the exposure glass cover. 2. Place the original face down on the exposure glass. The original should be aligned to the rear left corner. CHZ009 3. Lower the exposure glass cover.
2. Loading Paper 1. Open the input tray for the ADF. CHZ010 2. Adjust the guides according to the size of the originals. CHZ011 3. Place the aligned originals face up in the ADF. The last page should be on the bottom.
3. Printing Documents Basic Operation Use the printer driver to print a document from your computer. 1. After creating a document, open the [Printing Preferences] dialog box in the document's native application. 2. Change any print settings if necessary.
3. Printing Documents 3. When setting changes are completed, click [OK]. 4. Print the document using the print function in the document's native application. • If a paper jam occurs, printing stops when the current page has printed. Open the maintenance cover to remove the jammed paper. Printing will resume automatically after the maintenance cover is closed. If the maintenance cover is not opened to remove jammed paper, press the [Start] key to resume printing. Printing on Both Sides of Sheets 1.
Basic Operation Landscape CHZ922 6. Press the [Start] key. Canceling a Print Job You can cancel print jobs using either the machine's control panel or your computer, depending on the status of the job. Canceling a print job before printing has started 1. Double-click the printer icon on the task tray of your computer. 2. Select the print job you want to cancel, click the [Document] menu, and then click [Cancel].
3. Printing Documents Canceling a print job while printing 1. Press the [Clear/Stop] key. CHZ961 2. Press the [1] key.
If a Paper Mismatch Occurs If a Paper Mismatch Occurs If the paper size or type does not match the print job's settings, the machine reports an error. There are two ways to resolve this error: Continue printing using mismatched paper Use the form-feed function to ignore the error and print using mismatched paper. Reset the print job Cancel printing. Continuing Printing Using Mismatched Paper If the paper is too small for the print job, the printed image will be cropped. 1.
3.
4. Copying Originals Copier Mode Screen When the machine is turned on, the copier screen appears first. When the fax screen is shown on the display, press the [Copy/Facsimile] key on the control panel to switch to the copier screen. Standby mode screen Copier A4 100% Text/Photo 01 • First line: Displays the function and paper size specified on the machine.
4. Copying Originals Basic Operation • The original in the ADF takes precedence over the original on the exposure glass if you place originals both in the ADF and on the exposure glass. • When making multiple copies of a multi-page document, you can select whether copies are output in collated sets, or in page batches in the [Sort] setting under [Copier Features]. 1. Make sure that the copier mode screen is displayed.
Basic Operation • If a scanning jam occurs in the ADF, copying is canceled immediately. If this happens, copy the originals again starting from the jammed page. Canceling a Copy If copying is canceled while the machine is scanning the original, copying is canceled immediately and there is no printout. When the original is placed in the ADF, scanning stops when the current page is fed. If copying is canceled during printing, the photocopy process is canceled after the current page has been printed out. 1.
4. Copying Originals Making Enlarged or Reduced Copies There are two ways to set the scaling ratio: using a preset ratio or manually specifying a customized ratio. Preset ratio CES103 (mainly Europe and Asia) 50%, 71%, 82%, 93%, 122%, 141%, 200% (mainly North America) 50%, 65%, 78%, 93%, 129%, 155%, 200% Custom ratio CES106 25% to 400% in 1% increments.
Making Enlarged or Reduced Copies Specifying Reduce/Enlarge 1. Press the [User Tools] key. CHZ960 2. Press the [ ] or [ ] key to select [Copier Features], and then press the [OK] key. 3. Press the [ ] or [ ] key to select [Reduce/Enlarge], and then press the [OK] key. 4. Press the [ ] or [ ] key to select the ratio, and then press the [OK] key. If [Zoom: 25-400%] has been selected, enter the ratio using the number keys, and then press the [OK] key. 5.
4. Copying Originals Combining Multiple Pages Scanned pages of the original can automatically be scaled down so that two or four pages can be printed at once on a single sheet of paper. • To use this function, the paper size used for printing copies must be set to A4 or Letter. 2 on 1 You can copy two pages of an original onto a single sheet of photocopied paper.
Combining Multiple Pages CES036 • Landscape: L to R CES037 • Landscape: T to B CES038 Specifying Combine 1. Press the [User Tools] key. CHZ960 2. Press the [ ] or [ ] key to select [Copier Features], and then press the [OK] key. 3. Press the [ ] or [ ] key to select [Combine], and then press the [OK] key. 4. Press the [ ] or [ ] key to select [2 on 1] or [4 on 1], and then press the [OK] key. 5. Press the [ ] or [ ] key to select the printout format, and then press the [OK] key. 6.
4. Copying Originals 7. Make sure that the copier mode screen is displayed. When the fax mode screen is appears, press the [Copy/Facsimile] key to switch to the copier mode screen. CHZ957 8. Place the original on the exposure glass or in the ADF. 9. To make multiple copies, enter the number of copies using the number keys. 10. Press the [Start] key. CHZ962 When you place the original on the exposure glass, perform the following steps to scan the subsequent pages of the original. 11.
Copying Both Sides of an ID Card onto One Side of Paper Copying Both Sides of an ID Card onto One Side of Paper This section describes how to copy the front and back sides of an ID card or other small documents onto either side of a sheet of paper. When copying onto A4 paper, you can copy documents that are smaller than A5. Likewise, when copying onto Letter size paper, you can copy documents that are smaller than Half Letter size.
4. Copying Originals 2. Press the [ID Card Copy/On Hook Dial] key. CHZ959 3. To make multiple copies, enter the number of copies using the number keys. 4. Place the original front side down with the top to the rear of the machine on the exposure glass. Place the original in the center of the A5/Half Letter scan area. CHZ023 5. Press the [Start] key. CHZ962 6.
Making 2-sided Copies Making 2-sided Copies • To use this function, the paper size used for printing copies must be set to A4 or Letter. You can select top-to-top or top-to-bottom binding, in either portrait or landscape orientation.
4. Copying Originals Specifying 2 Sided Copy 1. Press the [User Tools] key. CHZ960 2. Press the [ ] or [ ] key to select [Copier Features], and then press the [OK] key. 3. Press the [ ] or [ ] key to select [2 Sided Copy], and then press the [OK] key. 4. Press the [ ] or [ ] key to select [Top to Top] or [Top to Bottom], and then press the [OK] key. 5. Press the [ ] or [ ] key to select the orientation, and then press the [OK] key. 6. Press the [User Tools] key to return to the initial screen. 7.
Making 2-sided Copies 10. Press the [Start] key. CHZ962 When you place the original in the ADF, all the pages are automatically scanned and then only the pages on one side are copied sequentially. Proceed to Step 12. When you place the original on the exposure glass, perform the following steps to scan the subsequent pages. 11. When the current page is scanned, place the next page on the exposure glass, and then press the [Start] key.
4. Copying Originals Landscape CHZ922 13. Press the [Start] key.
Specifying the Scan Settings Specifying the Scan Settings This section describes how to specify image density and scan quality for the current job. Adjusting Image Density There are five image density levels. The higher the density level, the darker the printout. 1. Press the [User Tools] key. CHZ960 2. Press the [ ] or [ ] key to select [Copier Features], and then press the [OK] key. 3. Press the [ ] or [ ] key to select [Density], and then press the [OK] key. 4.
4. Copying Originals Specifying the Original Type 1. Press the [User Tools] key. CHZ960 2. Press the [ ] or [ ] key to select [Copier Features], and then press the [OK] key. 3. Press the [ ] or [ ] key to select [Original Type], and then press the [OK] key. 4. Press the [ ] or [ ] key to select the document type, and then press the [OK] key. 5. Press the [User Tools] key to return to the initial screen.
5. Scanning from a Computer Basic Operation Scanning from a computer (TWAIN scanning and WIA scanning) allows you to operate the machine from your computer and scan originals into your computer directly. TWAIN Scanning TWAIN scanning is possible if your computer is running a TWAIN-compatible application. 1. Place the original. 2. Open the properties dialog box for this machine using a TWAIN-compatible application. 3. Configure the scan settings as required, and then click [Scan].
5. Scanning from a Computer • [Filing] (Auto change to Text, 200dpi × 200dpi) • [OCR] (Auto change to Text, 400dpi × 400dpi) 2. Original Scan Method Specify the method to scan originals. If [ADF] is selected in [Original Scan Method], specify the orientation of the original. 3. Image Quality Adjustment You can adjust the image quality. The scan settings that can be adjusted are as follow: Rotation, Curve, Brightness/Contrast, Level, Color Balance, and Hue/Saturation.
6. Sending and Receiving a Fax Fax Mode Screen When the machine is turned on, the copier screen appears first. When the copy screen appears, press the [Copy/Facsimile] key on the control panel to switch to the fax screen. Standby mode screen Ready Standard 12-31 16:00 • First line Displays the current machine status, month, and date. • Second line Displays the current resolution settings and time. • The start-up mode can be specified in the [Function Priority] setting under [System Settings].
6. Sending and Receiving a Fax Setting the Date and Time 1. Press the [User Tools] key. 2. Press the [ ] or [ ] key to select [System Settings], and then press the [OK] key. 3. Press the [ ] or [ ] key to select [Set Date/Time], and then press the [OK] key. 4. Press the [ ] or [ ] key to select [Set Date], and then press the [OK] key. 5. Enter the current year using the number keys, and then press the [OK] key. 6. Enter the current month using the number keys, and then press the [OK] key. 7.
Entering Characters Entering Characters To enter characters, use keys as follows: To enter a digit Press a number key. To delete a character Press the [ ] key one second. To enter a fax number • To enter a number Use the number keys. • To enter characters other than digits “ ”: Press the [ ] key. “ ”: Press the [ ] key. Pause: Press the [ID Card Copy/On Hook Dial] key. Space: Press the [ ] key one second. To enter a name Letters, numbers, and symbols can be entered using the number keys.
6. Sending and Receiving a Fax Registering Fax Destinations This section describes how to register fax destinations in the Address Book using the control panel. The Address Book can also be edited using Smart Organizing Monitor. For details, see the Smart Organizing Monitor Help. • The Address Book data may become damaged or lost unexpectedly. The manufacturer shall not be held responsible for any damages resulting from such data loss. Registering Fax Destinations 1. Press the [User Tools] key.
Registering Fax Destinations Modifying or Deleting Fax Destinations 1. Press the [User Tools] key. CHZ960 2. Press the [ ] or [ ] key to select [Address Book], and then press the [OK] key. 3. Press the [ ] or [ ] key to select [Fax Speed Dial Dest.], and then press the [OK] key. 4. Press the [ ] or [ ] key to select the Speed Dial number, and then press the [OK] key. 5. Modify the fax number using the [ ], [ ], and number keys, and then press the [OK] key.
6. Sending and Receiving a Fax 9. Click [Apply] located in the lower part of the window. 10. Click [OK]. 11. Click [Close]. 12. Click [OK].
Sending a Fax Sending a Fax • It is recommended that you call the receiver and confirm that they received the fax after sending important documents. A fax number can contain 0 to 9, pause, " ", " ", and space. If necessary, insert a pause in the fax number. The machine pauses briefly before it dials the digits following the pause. You can specify the length of the pause time in the [Pause Time] setting under fax transmission settings.
6. Sending and Receiving a Fax 1. Press the [User Tools] key. CHZ960 2. Press the [ ] or [ ] key to select [Fax Features], and then press the [OK] key. 3. Press the [ ] or [ ] key to select [TX Settings], and then press the [OK] key. 4. Press the [ ] or [ ] key to select [Immediate TX], and then press the [OK] key. 5. Press the [ ] or [ ] key to select [Off], [On], or [Next Fax Only], and then press the [OK] key. For Memory Transmission, select [Off].
Sending a Fax 3. Enter the fax number using the number keys. If the machine is connected to a telephone network through a PBX, be sure to enter the outside line access number specified in [PBX Access Number] before the fax number. 4. Press the [Start] key. CHZ962 Depending on the machine's settings, you may be prompted to enter the fax number again if you manually entered the destination fax number. If the fax numbers do not match, go back to step 3.
6. Sending and Receiving a Fax 1. Press the [Clear/Stop] key. CHZ961 2. Press the [1] key. • If you cancel sending a fax while broadcasting, only the fax to the current destination is canceled. The fax will be sent to the subsequent destinations as normal.
Sending a Fax 2. Place the original on the exposure glass or in the ADF. 3. Press the [Speed Dial] key. CHZ958 4. Enter the Speed Dial number using the number keys, and then press the [OK] key. 5. Press the [Start] key. CHZ962 When you place original on the exposure glass and Memory Transmission mode is enabled, perform the following steps to scan the subsequent pages of the original. 6.
6. Sending and Receiving a Fax CHZ957 2. Place the original on the exposure glass or in the ADF. 3. Add a destination by using one of the following methods: To add a Speed Dial destination 1. Press the [Speed Dial] key. CHZ958 2. Select a destination using the number keys, and then press the [OK] key. 3. Press the [OK] key. To add a manually-specified destination 1. Enter the destination fax number using the number keys. 2. Press the [OK] key. 4. Go back to step 3 to add further destinations. 5.
Sending a Fax 1. Make sure that the fax mode screen is displayed. When the copier mode screen is displayed, press the [Copy/Facsimile] key to switch to the fax mode screen. CHZ957 2. Place the original on the exposure glass or in the ADF. 3. Press the [ ] or [ ] key to select [Redial], and then press the [OK] key. 4. Press the [Start] key. CHZ962 Useful Sending Functions You can confirm the status of the other party's machine easily before sending a fax by using the On Hook Dial function.
6. Sending and Receiving a Fax CHZ957 2. Place the original on the exposure glass or in the ADF. 3. Press the [ID Card Copy/On Hook Dial] key. CHZ959 4. Add a destination by using one of the following methods: To add a Speed Dial destination 1. Press the [Speed Dial] key. CHZ958 2. Select a destination using the number keys, and then press the [OK] key. 3. Press the [OK] key. To add a manually-specified destination 1. Enter the destination fax number using the number keys.
Sending a Fax 2. Press the [OK] key. 5. Press the [Start] key. CHZ962 6. Press the [1] key. 7. Press the [Start] key. Sending a fax after a conversation An external telephone allows you to send a fax after finishing your conversation, without having to disconnect and redial. This function is useful when you want to ensure that the fax will be received. 1. Place the original. 2. Pick up the handset of the external telephone. 3. Specify the destination using the external telephone. 4.
6. Sending and Receiving a Fax Specifying the Scan Settings Adjusting image density There are five image density levels. The darker the density level, the darker the printout. 1. Press the [User Tools] key. CHZ960 2. Press the [ ] or [ ] key to select [Fax Features], and then press the [OK] key. 3. Press the [ ] or [ ] key to select [TX Settings], and then press the [OK] key. 4. Press the [ ] or [ ] key to select [Density], and then press the [OK] key. 5.
Sending a Fax 1. Press the [User Tools] key. CHZ960 2. Press the [ ] or [ ] key to select [Fax Features], and then press the [OK] key. 3. Press the [ ] or [ ] key to select [TX Settings], and then press the [OK] key. 4. Press the [ ] or [ ] key to select [Resolution], and then press the [OK] key. 5. Press the [ ] or [ ] key to select the resolution settings, and then press the [OK] key. 6. Press the [User Tools] key to return to the initial screen.
6. Sending and Receiving a Fax Receiving a Fax • When receiving an important fax, we recommend you confirm the contents of the received fax with the sender. • The maximum number of fax pages that can be received and stored in the machine’s memory is 100 pages (50 jobs). • An external telephone is required to use this machine as a telephone. • Only A4 or Letter size paper can be used for printing faxes.
Receiving a Fax 1. Press the [User Tools] key. CHZ960 2. Press the [ ] or [ ] keys to select [Fax Features], and then press the [OK] key. 3. Press the [ ] or [ ] keys to select [RX Settings], and then press the [OK] key. 4. Press the [ ] or [ ] keys to select [Switch RX Mode], and then press the [OK] key. 5. Press the [ ] or [ ] keys to select the reception mode, and then press the [OK] key. 6. Press the [User Tools] key to return to the initial screen. Receiving a fax in Manual mode 1.
6. Sending and Receiving a Fax Receiving a fax in Auto mode When the reception mode is set to Auto mode, the machine automatically answers all incoming calls in fax reception mode. • You can specify the number of times the machine rings before answering a call in the [Number of Rings] setting under [Fax Features]. • If you answer a call with the external telephone while the machine is ringing, a normal telephone call starts. If you hear a fax calling tone or no sound, receive the fax manually.
Lists/Reports Related to Fax Lists/Reports Related to Fax The lists and reports related to the fax function are as follow: • Fax Journal Prints a fax transmission and reception journal for the last 100 jobs. • TX Status Report Prints out the latest Transmission result. • TX Standby File List Prints a list of unsent fax jobs remaining in the machine's memory.
6.
7. Configuring the Machine Using the Control Panel Basic Operation 1. If you want to configure the machine's system settings, press the [User Tools] key. CHZ960 2. Press the [ ] or [ ] key to select the settings you want to use. The machine’s default settings are grouped into the following six categories: • [System Settings], [Printer Features], [Copier Features], [Fax Features], [Address Book], [Print List/Report]. 3. To confirm setting items and values displayed, press the [OK] key. 4.
7. Configuring the Machine Using the Control Panel Copier Features Settings Sort Configures the machine to sort the output pages into sets when making multiple copies of a multipage document (P1, P2, P1, P2...). Default: [Off] • On • Off Original Type Specifies the content of originals so that the copy quality can be optimized. Default: [Text/Photo] • Text Select this when the original contains only text and no photographs or images. • Photo Select this when the original contains photographs or images.
Copier Features Settings • (mainly North America) 50%, 65%, 78%, 93%, 100%, 129%, 155%, 200%, Zoom: 25-400% Combine Select this to photocopy two or four pages of an original onto a single sheet of paper. Default: [Off] • Off • 2 on 1 • Portrait • Landscape • 4 on 1 • Portrait: L to R • Portrait: T to B • Landscape: L to R • Landscape: T to B For details, see p.40 "Combining Multiple Pages".
7. Configuring the Machine Using the Control Panel Fax Features Settings TX Settings Immediate TX Sets the machine to send a fax immediately when the original is scanned. Default: [Off] • Off Select this when using Memory Transmission. • On Select this when using Immediate Transmission. • Next Fax Only Select this when using Immediate Transmission for the next transmission only. Resolution Specifies the resolution to use for scanning originals.
Fax Features Settings Pause Time Specifies the length of pause time when a pause is inserted between the digits of a fax number. Default: 3 seconds • 1 to 15 seconds, in 1 second increments Auto Redial Sets the machine to redial the fax destination automatically when the line is busy or a transmission error occurs. Default: [On] • Off • On If [Auto Redial] is set to [On], the redial count and interval can be specified. The redial count is 3 times. The redial interval is 5 minutes.
7. Configuring the Machine Using the Control Panel Default: [On] • Off • On Sort Begins printing from the last page when the data has been received within the memory. Default: [Off] • Off • On Number of Rings Specifies the number of times the machine rings before it starts to receive faxes in [Switch RX Mode] is [Auto]. Default: 3 times • 3 to 5 times, in increments of 1 Add Footer Sets the machine to add a footer to every fax you received. Default: [On] • Off • On Del.
Fax Features Settings Default: [On] • Off • On Dial Tone Detect Sets the machine to automatically detect a dial tone before dialing the destination. Default: [Detect] • Detect • Do not Detect Transmission Speed Specifies the transmission speed for the fax modem. Default: [33.6 Kbps] • 33.6 Kbps • 14.4 Kbps • 9.6 Kbps • 7.2 Kbps • 4.8 Kbps • 2.4 Kbps Reception Speed Specifies the reception speed for the fax modem. Default: [33.6 Kbps] • 33.6 Kbps • 14.4 Kbps • 9.6 Kbps • 7.2 Kbps • 4.8 Kbps • 2.
7. Configuring the Machine Using the Control Panel PSTN / PBX Sets the machine to connect to a public switched telephone network (PSTN) or a private branch exchange (PBX). Default: [PSTN] • PSTN • PBX PBX Access Number Specifies the dial number to access the external line when the machine is connected to a PBX. Make sure that this setting matches your PBX settings. Otherwise, you may not be able to send faxes to external destinations. Default: 9 • 0 to 999 Fax No.
Fax Features Settings Fax Journal Sets the machine to print a fax journal automatically for every 100 fax jobs (both sent and received).
7. Configuring the Machine Using the Control Panel Address Book Settings Fax Speed Dial Dest. Fax numbers and names can be registered in the speed dial list. Up to 100 entries can be registered. To register a fax name containing double-byte characters, use Smart Organizing Monitor. For details, see p.56 "Registering Fax Destinations".
System Settings System Settings Tray Paper Settings Paper Size Specifies the paper size. (mainly Europe and Asia) Default: [A4] (mainly North America) Default: [LT (8 1/2 x 11)] • A4, B5, A5, B6, A6, LT (8 1/2 x 11), HLT (5 1/2 x 8 1/2), EXE (7 1/4x10 1/2), 16K (197x273mm), 16K (195x270mm), 16K (184x260mm), Custom Paper Type Specifies the paper type. Default: [Plain Paper] • Plain Paper, Recycled Paper, Thin Paper, Thick Paper Adjust Sound Volume Specifies the volume of the sounds produced by the machine.
7. Configuring the Machine Using the Control Panel Print Job End Tone Specifies the volume of the beep sound when a print job is complete. Default: [Off] Print Job Error Tone Specifies the volume of the beep sound when a print job error occurs. Default: [Middle] Scan Job End Tone Specifies the volume of the beep sound when a scan job is complete. Default: [Off] Scan Job Error Tone Specifies the volume of the beep sound when a scan job error occurs.
System Settings • Minute: 0 to 59 Program Fax Info. Specifies the user information for sending a fax. • Own Fax Number Specifies the fax number of the machine using up to 20 characters, including 0 to 9, space, and "+". • Own Name Specifies the name of the machine using up to 20 characters. Function Priority Specifies the mode that is activated when the power is turned on.
7. Configuring the Machine Using the Control Panel • English, German, French, Italian, Spanish, Dutch, Swedish, Norwegian, Danish, Finnish, Portuguese, Czech, Hungarian, Polish, Russian, Portuguese (BR), Turkish Country Code Selects the country in which the machine is used. The country code you specify determines the time and date display format and the default values of the fax transmission-related settings. Make sure to select the country code correctly.
System Settings • Vertical (-15 to +15 mm, in 1 mm increments) Adjust Image Density Adjusts the density of printing. Default: • (Lightest) • • • • • • (Darkest) Reset Settings • Reset All Settings Resets all settings to the factory default, except for the language, date and time, and fax Speed Dialing settings. • Clear Address Book Deletes all fax speed dial entries.
7. Configuring the Machine Using the Control Panel Printing Lists/Reports Printing the Configuration Page 1. Press the [User Tools] key. CHZ960 2. Press the [ ] or [ ] key to select [Print List/Report], and then press the [OK] key. 3. Press the [ ] or [ ] key to select types of report, and then press the [OK] key. Types of Report Configuration Page Prints the machine’s general information and current configuration. Test Page Checks the results of print position adjustment.
Printer Features Settings Printer Features Settings I/O Timeout Timeout: USB Specifies how many seconds the machine waits for print data and if the data is interrupted while being sent from the computer via USB. If the machine does not receive any data within the specified time, the machine only prints the data it has received. Default: 60 sec. • Off • 15 sec. • 60 sec. • 300 sec. Auto Continue Sets the machine to ignore errors on paper size or type and continue printing.
7.
8. Configuring the Machine Using Smart Organizing Monitor Checking the System Information The state and status information of the machine can be checked using Smart Organizing Monitor. Checking the Status Information 1 3 2 CHZ920 1. Image area Displays the status of this machine with an icon. 2. Status area • Paper Size Displays the paper size configured on the machine. • Paper Type Displays the paper type configured on the machine. • Toner The remaining toner level is displayed in ten levels.
8. Configuring the Machine Using Smart Organizing Monitor 3. Message area Displays the status of this machine with a message. For details about error messages, see p.121 "Error and Status Messages Appear on the Smart Organizing Monitor". Printing the Configuration Page 1. On the [Start] menu, click [All Programs]. 2. Click [Smart Organizing Monitor for SP 100 Series]. 3. Click [Smart Organizing Monitor for SP 100 Series Status]. 4.
Configuring the Machine Settings Configuring the Machine Settings Smart Organizing Monitor is used to modify the machine’s settings. 1. On the [Start] menu, click [All Programs]. 2. Click [Smart Organizing Monitor for SP 100 Series]. 3. Click [Smart Organizing Monitor for SP 100 Series Status]. 4. On the [User Tool] tab, click [Printer Configuration]. 5. Change the settings if necessary. 6. Click [OK]. 7. Click [Close].
8. Configuring the Machine Using Smart Organizing Monitor Updating the Firmware • In no event shall the company be held liable to customers for damages of any kind resulting from use or loss of use of this software. • The company shall also not be held liable for any disputes between the customer and third parties resulting from any use or loss of use of this software. • To make sure that a firmware update has successfully completed, print the configuration page before and after the update.
9. Maintaining the Machine Replacing the Print Cartridge • If “Out of Toner / Print Cartridge” is displayed in the control panel, replace the print cartridge by following the procedure described below. • Store print cartridges in a cool dark place. • Actual printable numbers vary depending on image volume and density, number of pages printed at a time, paper type and size, and environmental conditions such as temperature and humidity. Toner quality degrades over time.
9. Maintaining the Machine 5. Hold the grips of the print cartridge, and then insert it into the machine until it stops. CHZ017 6. Close the maintenance cover.
Cautions When Cleaning Cautions When Cleaning Clean the machine periodically to maintain high print quality. Dry wipe the exterior with a soft cloth. If dry wiping is not sufficient, wipe with a soft, damp cloth that has been wrung out thoroughly. If you still cannot remove the stain or grime, use a neutral detergent, wipe over the area with a thoroughly-wrung damp cloth, and then dry wipe the area and allow it to dry.
9. Maintaining the Machine Cleaning the Inside of the Machine 1. Open the maintenance cover. 2. Hold the grips of the print cartridge, and then pull it out of the machine. CHZ013 3. Using a cloth, wipe the inside of the machine. CHZ028 4. Hold the grips of the print cartridge, and then insert it into the machine until it stops. CHZ017 5. Close the maintenance cover.
Cleaning the Exposure Glass Cleaning the Exposure Glass 1. Lift the exposure glass cover. Be careful not to hold the input tray when lifting the exposure glass cover, for the tray might be damaged. 2. Clean the parts indicated with arrows with a soft damp cloth and then wipe the same parts with a dry cloth to remove any remaining moisture.
9. Maintaining the Machine Cleaning the Auto Document Feeder 1. Lift the ADF. Be careful not to hold the input tray when lifting the ADF, for the tray might be damaged. 2. Clean the parts indicated with arrows with a soft damp cloth and then wipe the same parts with a dry cloth to remove any remaining moisture.
10. Troubleshooting Common Problems This section describes how to troubleshoot common problems that may occur while operating the machine. Problem The machine does not turn on. Pages are not printed. Possible cause The power cord is not connected properly. • The USB cable is not connected correctly. • Front cover is closed. Strange noise is heard. The consumable is not properly installed. Solution • Make sure that the power plug is firmly inserted into the wall outlet.
10. Troubleshooting Paper Feed Problems If the machine is operating but paper will not feed or paper jams occur frequently, check the condition of the machine and paper. Problem Solution • Use supported types of paper. See p.15 "Supported Paper". Paper does not feed smoothly. • Load paper correctly, making sure that the paper guides are properly adjusted. See p.20 "Loading Paper". • If the paper is curled, straighten the paper. • Take out the paper from tray and fan it well.
Paper Feed Problems Problem Solution • Paper is damp. Use paper that has been stored properly. See p.15 "Supported Paper". Paper gets wrinkles. • Paper is too thin. See p.15 "Supported Paper". • If there are gaps between the paper and the paper guides, adjust the paper guides to remove the gaps. • Load the paper upside down in the paper tray. The printed paper is curled. • Paper is damp. Use paper that has been stored properly. See p.15 "Supported Paper". Images are printed diagonally to the pages.
10. Troubleshooting 1. Pull out the jammed paper carefully. CHZ024 If you cannot find the misfed paper, look inside the machine. 2. Open the maintenance cover. 3. Hold the grips of the print cartridge, and then pull it out of the machine. CHZ013 4. Pull out the misfed paper by holding both sides of paper. Be careful not to get toner dust on your hands or clothes.
Paper Feed Problems CHZ025 5. If it is difficult to remove the jammed paper out of the main unit, remove the jammed paper from the output tray side. CHZ026 6. Hold the grips of the print cartridge, and then insert it into the machine until it stops. CHZ017 7. Close the maintenance cover.
10. Troubleshooting Removing Scanning Jams 1. Open the ADF cover. CHZ018 2. Gently pull the jammed original to remove it. Be careful not to pull the original too hard, as it may rip. CHZ014 3. Close the ADF cover. CHZ019 4. Lift the ADF, and if there is original remaining in the ADF, gently pull the jammed original to remove it. Be careful not to hold the input tray when lifting the ADF, for the tray might be damaged.
Paper Feed Problems CHZ022 5. Close the ADF.
10. Troubleshooting Print Quality Problems Checking the Condition of the Machine If there is a problem with the quality of printing, first check the condition of the machine. Possible Cause 110 Solution There is a problem with the machine's location. Make sure that the machine is on a level surface. Place the machine where it will not be subject to vibration or shock. Unsupported types of paper is used. Make sure that the paper being used is supported by the machine. See p.15 "Supported Paper".
Printer Problems Printer Problems Problem Solution If an error occurs when printing, change the computer or printer driver settings. • Check the printer icon name does not exceed 32 alphanumeric characters. If it does, shorten it. An error occurs. • Check whether other applications are operating. Close any other applications, as they may be interfering with printing. If the problem is not resolved, close unneeded processes too. • Check that the latest printer driver is being used.
10. Troubleshooting Print Positions Do Not Match Display Positions If the position of items on the printed page differs from the position displayed on the computer screen, the cause may be one of the following. Possible Cause 112 Solution Page layout settings have not been configured. Check that the page layout settings are properly configured in the application. The paper size setting does not match the paper loaded.
Copier Problems Copier Problems Problem Photocopied paper is blank. Solution The original was placed with the front and back reversed. See p.25 "Placing Originals". Copied pages are too dark or too light. Adjust the image density. Copied pages do not look the same as the originals. Select the correct scan mode according to the type of original. Black spots appear when photocopying a photographic print. A moire pattern is produced.
10. Troubleshooting Scanner Problems Problem Solution • The scanning part is dirty. The scanned image is dirty. 114 • Before placing originals on the exposure glass, make sure that toner or correction fluid is dry. The scanned image is distorted or out of position. The original was moved during scanning. Do not move the original during scanning. The scanned image is upside down. The original was placed upside down. Place the original in the correct orientation. See p.25 "Placing Originals".
Fax Problems Fax Problems When an error code appears on the fax journal or TX status report The table below describes the meaning of error codes that appear under "Status" on the fax journal or TX status report, and what to do when a particular error code appears. TX Status Report Error Code Solution The line was not connected correctly. The fax transmission did not finish successfully. There was a problem with either the transmission or reception.
10. Troubleshooting Fax Journal Error Code Cause Solution 0001 The recipient’s fax machine does not Select a transmission speed supported by the support G3 standard. recipient fax machine, and resend the fax. 0071 Memory is full. Print, send, or delete the jobs stored in the memory. Send the fax again. Contact the recipient and ask them to check that their fax machine is working properly. 0080 The recipient’s fax machine did not respond within 35 seconds.
Fax Problems Problem Cannot print received faxes. Faxes you sent appear spotty or dirty when received. A fax you sent appears blank when received. Solution • The input tray is empty. Load paper in the input tray. See p.20 "Loading Paper". • The input tray does not contain paper of the right size. Load paper of the right size in the input tray. • The exposure glass or ADF is dirty. See p.102 "Cleaning the Auto Document Feeder".
10. Troubleshooting Error and Status Indicate on the Control Panel Messages on the Screen Message Solutions Paper has been jammed in the paper tray. • Remove the jammed paper. See p.97 "Maintaining the Machine". Out of Paper The input tray has run out of paper. • Load paper to the input tray. See p.20 "Loading Paper". Misfeed: Inner/ Outer Paper has been jammed in the machine. • Remove the jammed paper. See p.104 "Paper Feed Problems". Misfeed: Stnd. Tray Misfeed: ADF Open Cov. Rmv.
Error and Status Indicate on the Control Panel Message Cannot Print Report Change Paper Size Out of Toner Print Cartridge Toner Almost Empty Print Cartridge On Hook Causes Solutions An appropriate size paper for printing Report is not loaded. Load A4 or Letter size paper in the input tray. The machine has run out of the toner. Replace the print cartridge. See p.97 "Replacing the Print Cartridge". The print cartridge is almost empty. Prepare a new print cartridge.
10. Troubleshooting Message Cannot Print Memory Overflow Paper Size Mismatch Press Start or Stop Paper Type Mismatch Press Start or Stop Causes The data is too large or complex to print. Select [600 x 600 dpi] in [Resolution] to reduce the size of data. For details, see the Printer Driver Help. The paper size set for the Press the [Start] key to begin printing, or document differs from the size of press the [Clear/Stop] key to cancel the the paper. job.
Error and Status Messages Appear on the Smart Organizing Monitor Error and Status Messages Appear on the Smart Organizing Monitor Message Printer Power Off (Communication Error) Causes • The power cable of the machine is not plugged in. • The power of the machine is not turned ON. • The USB cable is not connected. Solutions • Check the printer power cord. • Check the printer power switch is on. • Check the USB cable is properly connected. If paper is not loaded, load paper in the input tray.
10.
11. Appendix Notes About the Toner • Proper operation cannot be guaranteed if any third-party toner is used. • Depending on printing conditions, there are cases where the printer cannot print the number of sheets indicated in the specifications.
11. Appendix Moving and Transporting the Printer This section provides cautions that you must follow when moving the machine both short and long distances. Repack the machine in its original packing materials when moving it a long distance. • Be sure to disconnect all cables from the machine before transporting it. • The machine is a precision piece of machinery. Be sure to handle it carefully when moving it. • Make sure to move the machine horizontally.
Consumables Consumables Print Cartridge Print cartridge Black Average printable number of pages per cartridge *1 2,000 pages *1 The printable number of pages is based on pages that are compliant with ISO/IEC 19752 with the image density set as the factory default. ISO/IEC 19752 is an international standard for measurement of printable pages, set by the International Organization for Standardization. • Unless a print cartridges is replaced before toner runs out, printing will become impossible.
11. Appendix Specifications of the Machine This section lists the machine's specifications. General Function Specifications Configuration Desktop Print process Laser electrostatic transfer Maximum paper size for scanning of exposure glass 216 mm × 297 mm (8.5 × 11.7 inches) Maximum paper size for scanning of ADF 216 mm × 297 mm (8.5 × 11.7 inches) Maximum paper size for printing 216 mm × 297 mm (8.5 × 11.7 inches) Warm-up time Less than 25 seconds (23 °C, 71.
Specifications of the Machine Memory 32 MB Power requirements (mainly Europe and Asia) 220-240 V, 4 A, 50/60 Hz (mainly North America) 120 V, 8 A, 60 Hz Power consumption • Maximum power consumption 70 W • Energy Saver mode 1 60 W or less • Energy Saver mode 2 5 W or less Machine dimensions (Width × Depth × Height) 402 × 412 × 205 mm (15.8 × 16.2 × 8.1 inches) Weight (machine body with consumables) Approximately 9.0 kg (19.9 lb.
11. Appendix Copier Function Specifications Maximum resolution (scanning and printing) • Exposure glass Scanning: 600 × 600 dpi Printing: 600 × 600 dpi • ADF Scanning: 600 × 300 dpi Printing: 600 × 600 dpi First copy speed (A4/Letter, at 23 °C, 71.
Specifications of the Machine • ADF 600 × 600 dpi Maximum resolution when scanning from a computer (WIA) 600 × 600 dpi Scanning time Black and white: 3.9 seconds or less Color: 7.9 seconds or less (A4/200 dpi/Compressed) Not including transfer time. ADF throughput Black and white: 75.3 mm per second Color: 37.
11.
Trademarks Trademarks Microsoft®, Windows®, Windows Server®, and Windows Vista® are either registered trademarks or trademarks of Microsoft Corporation in the United States and/or other countries. Other product names used herein are for identification purposes only and might be trademarks of their respective companies. We disclaim any and all rights to those marks.
11.
INDEX F 2 Sided copy.........................................................45 Address book.........................................................84 ADF (Auto Document Feeder)............................102 Auto mode.............................................................72 Fax destinations.....................................................56 Fax features............................................................78 Fax function.........................................................
Print area................................................................17 Print cartridge................................................97, 125 Print quality problems.........................................110 Printer features.......................................................91 Printer function.....................................................127 Printer problems...................................................111 114, 115 TWAIN................................................................
MEMO 135
MEMO 136 EN GB EN US EN AU M103-8692
EN GB EN US EN AU M103-8692 © 2011