
Use and Care Manual

6
MAINTENANCE
ALWAYS DISCONNECT THE PUMP FROM POWER SUPPLY before
installing, servicing or making any adjustments.
LET PUMP COOL FOR A MINIMUM OF 2 HOURS BEFORE ATTEMPTING TO
SERVICE. Submersible pumps contain oil that become pressurized
and hot under normal operating conditions.
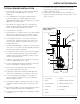
1. Submersible pump models have permanently lubricated
bearings and require no additional lubrication.
2. The pump should be inspected 3-4 times per year for
pump movement or buildup of debris on the switch or float.
Reposition pump if it has moved. Remove any debris that
could interfere with the operation of the switch.
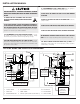
DO NOT SUBMERGE PEDESTAL MOTOR or allow motor to be exposed
to water.
3. Submersible pump may contain dielectric oil for cooling.
Dielectric oil can be harmful to the environment. Follow
state environmental laws when disposing of oil.
4. The pump motor is equipped with automatic resetting
thermal protector and may restart unexpectedly. Protector
tripping is an indication of motor overloading as a result of
operating the pump at low heads, excessively high or low
voltage, inadequate wiring, incorrect motor conditions, or a
faulty motor or pump.
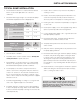
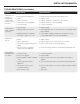
TROUBLESHOOTING
DO NOT USE AN EXTENSION CORD. Extension cords could present
a safety hazard if not sized properly, become damaged or the
connection falls into the sump. If receptacle is not within reach of the
pump’s power cord, contact a qualified licensed electrician to install
a new receptacle.
Symptoms Possible Cause(s) Suggested Remedies
Pump will not
start or run
1. Water level too low
2. Blown fuse or tripped circuit breaker
3. Low line voltage
4. Motor
5. Switch
6. Inlet screen clogged
7. Switch obstruction
1. Water must be at the appropriate level to activate switch
2. If blown, determine cause and then either replace with proper
sized fuse or reset breaker
3. Contact an electrician
4. Replace pump
5. Replace switch
6. Remove debris
7. Remove obstruction to ensure free motion of switch
Pump starts and
stops too often
1. Back-flow of water from discharge
pipe
2. Switch
3. Check valve not functioning properly
or leaking
1. Install check valve
2. Replace switch
3. Remove and examine check valve for prop er in stal la tion and free
operation. Replace check valve if necessary.
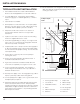
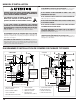
INSTALLATION MANUAL