
User Guide


Tool and Work Area Set-Up
WARNING
Set up the press tool, attachment and work area
according to these procedures to reduce the risk of
injury from electric shock and other causes and to
prevent property damage.
1. Inspect the work to be done and determine
• The system of fittings to be used
• The sizes of fittings to be used
• The amount of space available for the tool and
attachments to make the pressed connections.
2. Determine the appropriate pressing tool and attach-
ments for the application. See the Description and
Specification section for information on the attach-
ments available for the ProPress systems. Information
on clearance requirements for various attachments can
be found at the back of the manual. Information on
RIDGID Pressing Tools and other RIDGID press tool
attachments can be found at www.RIDGID.com, or by
contacting Ridge Tool Technical Services at (800)
519-3456 or rtctechservices@emerson.com.
Only use RIDGID Press Tools and RIDGID press
tool attachments (jaw sets, rings, actuators, etc.)
when specified by the fitting manufacturer for use
with their system. Be sure to use the correct actuator
for the ring being used. Rings are marked to indicate
the correct actuator for use with the ring. Use of in -
correct press tools and/or attachments for a system
can cause system leaks, damage the press tool and
attachment or cause severe personal injury.
3. Make sure that the press tool and attachment have
been inspected according to their respective manuals
or instructions.
4. Follow tool set up procedure according to the specif-
ic press tool operator’s manual.
Mounting Attachment Into Press Tool
1. Make sure that the press tool is unplugged or that the
battery is removed from the tool.
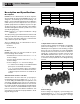
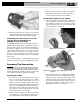
2. Pull the attachment mounting pin on the press tool
out. If there is already an attachment in the tool,
slide it out of the pressing tool (See Figure 5).
4
ProPress
®
Fitting System
and correct any problems to reduce the risk of seri-
ous injury from electric shock, tool and attach-
ment failure and other causes and to prevent tool
and property damage.
1. Inspect press tool according to the specific tool oper-
ator's manual.
2. Clean any oil, grease or dirt from the tool and attach-
ments, especially the handles and controls. This
reduces the risk of the tool or attachment slipping from
your grip and makes inspection easier.
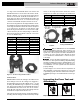
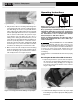
3. Closely inspect all pressing attachment components
(jaw sets, rings, actuators, etc.) for any cracked, bro-
ken, worn, missing, misaligned or binding parts or any
other sign of damage that may prevent proper and
safe operation. Damaged parts can cause the attach-
ment to make incorrect pressed connections or fail
during use, and cause serious injury or property dam-
age. If any damage is found, the attachment should
discarded and replaced. (See Figure 14.)
Always discard the complete pressing
attachment. Never replace individual components or
exchange parts between assemblies. Failure to replace
the entire assembly may result in component failure
and serious injury.
Do not modify pressing attachments or use modified
attachments. A pressing attachment component that
has been welded, ground, drilled or modified in any
manner can shatter during pressing, resulting in sharp
flying objects, severe injury or death. Discard and replace
damaged pressing attachments.
4. Inspect the attachment markings to make sure that it
is clearly marked as to the system and size that it is
appropriate for. Do not use an attachment that is not
clearly marked.
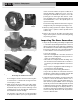
5. Inspect the press profile of the attachment. If it is
rusty, dirty or if there is a build up of fitting material,
clean as described in the maintenance section. It is
important to keep the press profile clean to prevent the
formation of burrs during pressing process, prevent
the attachment from sticking to the fitting and making
sure that a proper press connection is made.
6. Make sure that springs are intact and bias the attach-
ment in the proper direction (closed for rings, jaws and
actuators). Attachment should cycle freely from the
fully open to fully closed position. If needed, lubricate
pivot points with a light lubricating oil. Wipe any
excess oil from the attachment.
WARNING