
User Guide

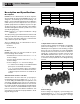
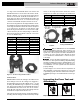
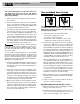
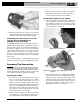

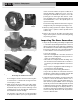

Figure 7 – Marking the Tube Before Inserting Into Fitting
3. Fully insert the tube into the fitting. Most fittings have
a stop that the tube end contacts to indicate full inser-
tion. Other fittings do not have a stop and will allow the
tube to fully pass through the fitting, and are typically
used in repair applications. If there is no stop, insert the
tube so that the mark made in the previous step is
even with the end of the fitting. In some cases, a
twisting motion during insertion makes the process
easier. Never use any lubricant unless the fitting man-
ufacturer specifically advises to. Lubricants can de -
grade the seal and cause leaks. Tubing that is difficult
to insert may be out of round or have burrs on the tube
end, which can damage the seal and cause leaks.
4. Make sure that the tube is fully inserted in the fitting
and if not marked in previous steps, mark the tube at
the end of the fitting to give a visual reference that the
tube is fully inserted. See Figures 8 and 9.
Figure 8 – Marking the Tubing After Fully Inserting Tube
Figure 9 – Inserting the Tube Into Fitting to Proper Depth
Operating Instructions
WARNING
Always wear eye protection to protect your eyes
against dirt and other foreign objects.
Keep your fingers and hands away from the tool
attachment during the pressing cycle. Your fingers
or hands can be crushed fractured or amputated in
the attachment or tool or between the attach-
ment, work piece and other objects.
Follow operating instructions to reduce the risk of
injury from crushing and other causes and to pre-
vent tool damage.
Only use RIDGID Press Tools and RIDGID
press tool attachments (jaw sets, rings, actuators, etc.)
when specified by the fitting manufacturer for use with their
system. Use of incorrect press tools and/or attachments for
a system can cause system leaks, damage the press
tool or attachment, void warranties or cause severe per-
sonal injury.
Confirm that the tool and attachments have been properly
set up.
Pressing the Connection with a Jaw Set
1. Squeeze the jaw arms to open the Jaw set and place
the open jaws around the fitting. Allow the jaw set to
close around the fitting, making sure to align the
press profile of the jaw set with the contour of the fit-
ting (See Figure 10).
Figure 10 – Opening the Jaw set and Placing Around
Fitting
2. Confirm that the tubing is inserted to the proper depth
in the fitting. As specified in appropriate Fitting System
instructions.
6
ProPress
®
Fitting System
WARNING