
User Guide


999-888-101.10_REV B
3
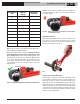
Pipe Wrench Use Guide
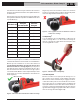
Pipe Wrench
Size
Suggested
Pipe Size
Range
Maximum
Pipe Size
6"
1
⁄
8
" -
1
⁄
2
"
3
⁄
4
"
8"
1
⁄
4
" -
3
⁄
4
" 1"
10"
1
⁄
4
" - 1" 1
1
⁄
2
"
12"
1
⁄
2
" - 1
1
⁄
4
" 2"
14"
1
⁄
2
" - 1
1
⁄
2
" 2"
18" 1" - 2" 2
1
⁄
2
"
24" 1
1
⁄
2
" - 2
1
⁄
2
" 3"
36" 2" - 3
1
⁄
2
" 5"
48" 3" - 5" 6"
60" 3" - 6" 8"
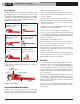
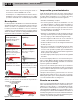
Make sure the work piece is stable and well supported to
prevent tipping and falling during use.
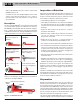
When using a pipe wrench of any size, a gap must be main-
tained between the shank of the hook jaw and the work
piece. (Figure 3) This permits the two gripping points (heel
jaw teeth and hook jaw teeth) to produce the gripping action
of the wrench. Allowing the shank of the hook jaw to contact
the work piece greatly reduces the gripping action and can
cause slippage. It may also result in the failure of the hook
jaw. (Figure 4)
Adjust the hook position by rotating the nut as needed. Wrench
should be square to the pipe. Do not use with the wrench at
an angle to the pipe.
Figure 4 – Wrench Too Small For Work Piece, Hook Shank
Touching Work Piece.
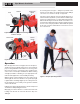
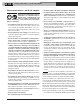
RapidGrip
®
Wrench
When using a RapidGrip wrench, be sure to center the work
piece in the “v” of the hook. If the work piece is not in contact
with both sides of the “v”, it can reduce wrench gripping action
and may result in failure of the hook.
Figure 5 – Using a RapidGrip Wrench
Compound Leverage Wrenches
Mount trunnion on pipe close to threads, with shank of trun-
nion pointing towards the threads as shown in Figure 6A.
Run chain over pipe, hook into ears of trunnion and securely
tighten with chain screw handle. With wrench head properly
adjusted for work piece size (maintain gap between hook jaw
shank and work piece), place the end of the wrench handle
over the shank of the trunnion. Place the wrench head on the
work piece. Secure the wrench handle to the trunnion shank
with the cotter pin. (Figure 6B)
Figure 3 – Maintain Gap Between Hook Shank and Work Piece
Chart 1 - Suggested Pipe Size Range
Hook Shank