
User Guide
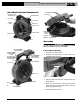


If the system cable slip-ring module is not installed,
squarely insert the slip-ring module into the hub and twist
it clockwise until it locks into position.
(See Figure 8.)
If changing system cable, twist slip ring module counter
clockwise to unlock and squarely retract. Install new
cable as shown previously
.
Figure 8 – Locking The Slip Ring Module Cover
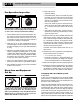
Reversing/Installing The Display Cradle
(microEXPLORER Camera Monitor)
If you are using the microDrain Reel with the microEX-
PLORER Camera monitor unit, you may find it more con-
venient to have the microEXPLORER Camera monitor
facing the other way when it is seated in its cradle. To re-
verse the orientation of the cradle, do the following:
1. Remove the microEXPLORER Camera monitor from
the cradle. With a Philips head screwdriver, remove
four screws holding the cord wrap arms and cradle to
the case. Remove the cord wrap arms and the screws
(Figure 9)
.
Figure 9 – Cradle Support and Cord-Wrap Arms
2. Use one of the screws to remove the nuts from the
back side of the cradle. The nuts are friction-fitted into
the holes on the opposite side of the cradle from the
cord-wrap arms. By inserting a screw from the back
Figure 5 – Routing The Camera Head
Figure 6 – Camera Head Properly Routed
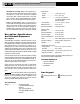
Installing System Cable
Do NOT touch the contact pins in the slip-ring
module. This can cause the contact pins to break.
The contact pins will not break under normal use, cor-
rectly connected. However pressing side ways on them
can cause them to break, as shown in
Figure 7
.
Figure 7 – Broken Contact Pin
Ridge Tool Company
6
SeeSnake
®
microDrain™ Inspection System
NOTICE
Broken
Contact
Pin
Cord Wrap
Arm
Cradle
Screwhead
Unlocked
Locked
Slip Ring
Module
Cover