
User Guide

8
4. Make sure the foot switch is attached to the drain
cleaning machine. Do not operate the machine with-
out the foot switch.
5. Inspect the drain cleaning machine for the following
items:
• Proper assembly and completeness
• Any broken, worn, missing, mis-aligned or binding
parts
• Smooth and free movement of the AUTOFEED
handle throughout range. Rotate the drum and
make sure that it turns freely without binding.
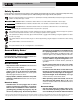
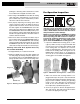
• Presence and readability of the warning label
(see
Figure 7)
.
• Presence and proper adjustment of the belt guard.
Belt guard should be adjusted so that the gap be-
tween the guard and the drum is no more than
1
/
4
".
(See Figure 3.)
• Any condition which may prevent safe and normal
operation.
If any problems are found, do not use the drain
cleaner until the problems have been repaired.
Figure 7 – Warning Label
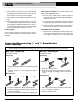
6. Clean any debris from the cable and cutting tools.
Inspect cables for wear and damage. Inspect for:
• Obvious flats worn into the outside of the cable
(cable is made from round wire and the profile
should be round).
• Multiple or excessively large kinks (slight kinks up to
15 degrees can be straightened).
• Space between cable coils indicating that the cable
has been deformed by stretching, kinking, or running
in reverse (REV).
• Excessive corrosion from storing wet or exposure to
drain chemicals.
All of these forms of wear and damage weaken the
cable and make cable twisting, kinking or breaking
more likely during use. Replace worn and damaged
cable before using drain cleaner.
Make sure the cable is fully retracted with no more
than 6" of cable outside of the machine. This will
prevent whipping of the cable at start up.
7. Inspect the tools for wear and damage. If necessary,
replace prior to using the drain cleaning machine.
Dull or damaged cutting tools can lead to binding,
cable breakage, and slow the drain cleaning pro-
cess.
8. Make sure that the FOR/OFF/REV switch is set to the
OFF position.
9. With dry hands, plug cord into properly grounded
outlet. Test the GFCI provided in the electrical cord to
insure that it is operating correctly. When the test
button is pushed in, the indicator light should go off.
Reactivate by pushing the reset button in. If the indi-
cator light goes on, the GFCI is functioning properly.
If GFCI is not functioning properly, unplug the cord and
do not use the drain cleaning machine until the GFCI
has been repaired.
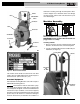
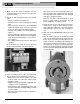
Figure 8 – Proper Drum Rotation (FOR Switch Position)
K-750 Drain Cleaning Machine
FORWARD
Drum
Rotation