
User Guide

Pre-Operation Inspection
WARNING
Before each use, inspect your drain cleaning ma-
chine and correct any problems to reduce the risk of
serious injury from electric shock, twisted or broken
cables, chemical burns, infections and other causes
and prevent drain cleaner damage.
Always wear safety glasses, RIDGID drain cleaning
gloves, and other appropriate protective equipment
when inspecting your drain cleaner. For extra pro-
tection from chemicals and bacteria on the equip-
ment, wear latex, rubber or other liquid barrier
gloves under the RIDGID drain cleaning gloves.
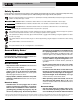
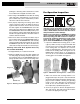
1. Inspect the RIDGID drain cleaning gloves or mitts
(“gloves”). Make sure they are in good condition with
no holes, tears or loose sections that could be caught
in the rotating cable. It is important not to wear im-
proper or damaged gloves. The gloves protect your
hands from the rotating cable. If the gloves are not
RIDGID drain cleaning gloves or are damaged or
worn out, do not use machine until RIDGID drain
cleaning gloves are available.
See Figure 6.
Figure 6 – RIDGID Drain Cleaning Gloves – Leather, PVC
2. Make sure that the drain cleaning machine is un-
plugged and inspect the power cord, Ground Fault
Circuit Interrupter (GFCI) and plug for damage. If the
plug has been modified, is missing the grounding
prong or if the cord is damaged, to avoid electrical
shock, do not use the machine until the cord has
been replaced by a qualified repair person.
3. Clean any oil, grease or dirt from all equipment han-
dles and controls. This helps prevent the machine
or control from slipping from your grip.
7
parking lot or driveway) with no obstructions or items
that could become wrapped around the cable.
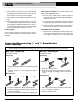
2. When using an AUTOFEED to load cable, the rotating
cable will tend to walk sideways. To prevent this,
place suitable stops (such as wood blocks) on either
side of the cable at 10 foot intervals.
3. After properly inspecting and setting up the drain
cleaner, attach the cable to the pigtail as shown in
Figure 4
. Make sure that no one is in the area around
the cable. Tighten the AUTOFEED knob so that the
roller touches the cable plus one additional turn. With
the FOR/OFF/REV switch in the FOR position, press
the foot switch to start the drum turning. Move the feed
handle in the opposite direction of the cable rotation to
feed the cable into the drum.
4. When 10' of cable is left outside of the drum, step off
the foot switch and move the FOR/OFF/REV switch to
OFF. Loosen the AUTOFEED knob and manually
feed the remaining cable into the drum. Do not use the
AUTOFEED to put all of the cable in the drum. The
cable end can whip around and cause serious injury.
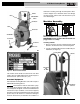
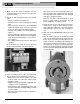
Attaching Front Guide Hose (Optional Accessory
For Use With AUTOFEED)
1. Pull approximately 4' of cable from the drum.
2. Slide Front Guide Hose over the cable, adapter end
first. Pull plunger pin head up and place adapter over
the mounting collar on the AUTOFEED. Make sure
plunger pin locks into the hole in the mounting collar.
Figure 5 – Attaching Front Guide Hose To AUTOFEED
K-750 Drain Cleaning Machine
Plunger Pin
Hole
Guide Hose