
Use and Care Manual
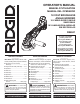


8 - English
ASSEMBLY
OPERATION
Loosen and remove the clamp nut from the spindle. Do
not remove the disc flange.
Make sure the flats on the bottom of the disc flange are
engaged with the flats on the spindle.
Place the grinding wheel over the spindle.
WARNING:
Always install a grinding wheel with the depressed
center against the disc flange. Failure to do so will
cause the grinding wheel to crack when tightening
the clamp nut. This could result in serious personal
injury because of loose particles breaking off and
being thrown from the grinder. Do not overtighten.
Thread the clamp nut on the spindle with the flat side of
the nut facing up.
Fit the raised, small diameter portion of the clamp nut
into the hole in the wheel and finger tighten.
Depress the spindle lock button and rotate the wheel
clockwise until the spindle locks in position.
Tighten the clamp nut securely with the wrench provided.
Do not overtighten.
WARNING:
Always check that the spindle lock button is fully
released before switching on the tool.
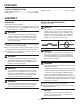
INSTALLING THE SIDE HANDLE
See Figure 2, page 11.
WARNING:
The side handle must always be used to help
prevent loss of control and possible serious injury.
The side handle can be installed on the top, left, or right side
of the grinder, depending on operator preference.
Insertthesidehandleintothedesiredoperatingposition.
Turn the side handle clockwise to securely tighten.
WARNING:
Do not allow familiarity with this product to make
you careless. Remember that a careless fraction
of a second is sufficient to inflict serious injury.
WARNING:
Always wear eye protection with side shields
marked to comply with ANSI Z87.1, along with
hearing protection. Failure to do so could result
in objects being thrown into your eyes and other
possible serious injuries.
WARNING:
Do not use any attachments or accessories not
recommended by the manufacturer of this product.
The use of attachments or accessories not
recommended can result in serious personal injury.
APPLICATIONS
You may use this product for the purpose listed below:
Grinding metals
Sanding wood or metal surfaces (sanding disc and pad
not included)
Wire brushing metal surfaces (wire wheel not included)
Polishing metal surfaces (pad and bonnet not included)
WARNING:
Battery products are always in operating condition.
Therefore, the on/off switch should always be in
the OFF position when not in use or carrying at
your side.
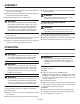
INSTALLING/REMOVING BATTERY PACK
See Figure 3, page 11.
To install:
Place the on/off switch in the OFF position.
NOTE: If the on/off switch is in the ON position when
the battery is installed, the lock-off feature will prevent
the tool from starting. If this occurs, turn the tool off and
back on to begin use.
Insert the battery pack.
Make sure the latches on each side of the battery pack
snap in place and that battery pack is secured in the
product before beginning operation.
To remove:
Depress the latches on each side of the battery pack.
For complete charging instructions, see the operator’s manu-
als for your battery pack and charger.